Showing posts with label Birthday. Show all posts

Thursday, August 15, 2024

Birthday Card | Krafty Chicks Challenge #729 - CAS


Hello!

Thanks for stopping by this week for another CAS Challenge over at the Krafty Chicks! This quick birthday card uses one of my favorite Ellen Hutson Sets - "Voices in My Head" with that giant speech bubble die and cute line drawing! All that I needed to add was a large word die cut and a teeny stamped sentiment to finish up the design! YAY!

Please stop over to see us at the Krafty Chicks Challenge this week for some clean & simple fun!

Be sure to head over to the Krafty Chicks' Blogs and leave them some love!

Thursday, July 18, 2024

Birthday Card | Krafty Chicks Challenge #725 CAS


Hi!

I'm back with another CAS design for this week's theme over at the Krafty Chicks Challenge and as usual, I needed a few more birthday cards! This older monster set from MFT needed a little love and I chose to pair this happy guy with a variegated washi tape border underneath and a simple stamped sentiment to finish the cards! Easy Peasy! Sometimes I just need a well-designed birthday card that doesn't require special padding and extra postage - this one fits the bill! (I know I could have added googly eyes for my little great-nephews, but I restrained myself!)


I love seeing your CAS creations so please and link them up over at challenge #725 this week and be sure to head over to the Krafty Chicks' Blogs and leave them some love!

Thursday, July 4, 2024

Birthday Card | Krafty Chicks Challenge #723 - "Stamps"


Hello!

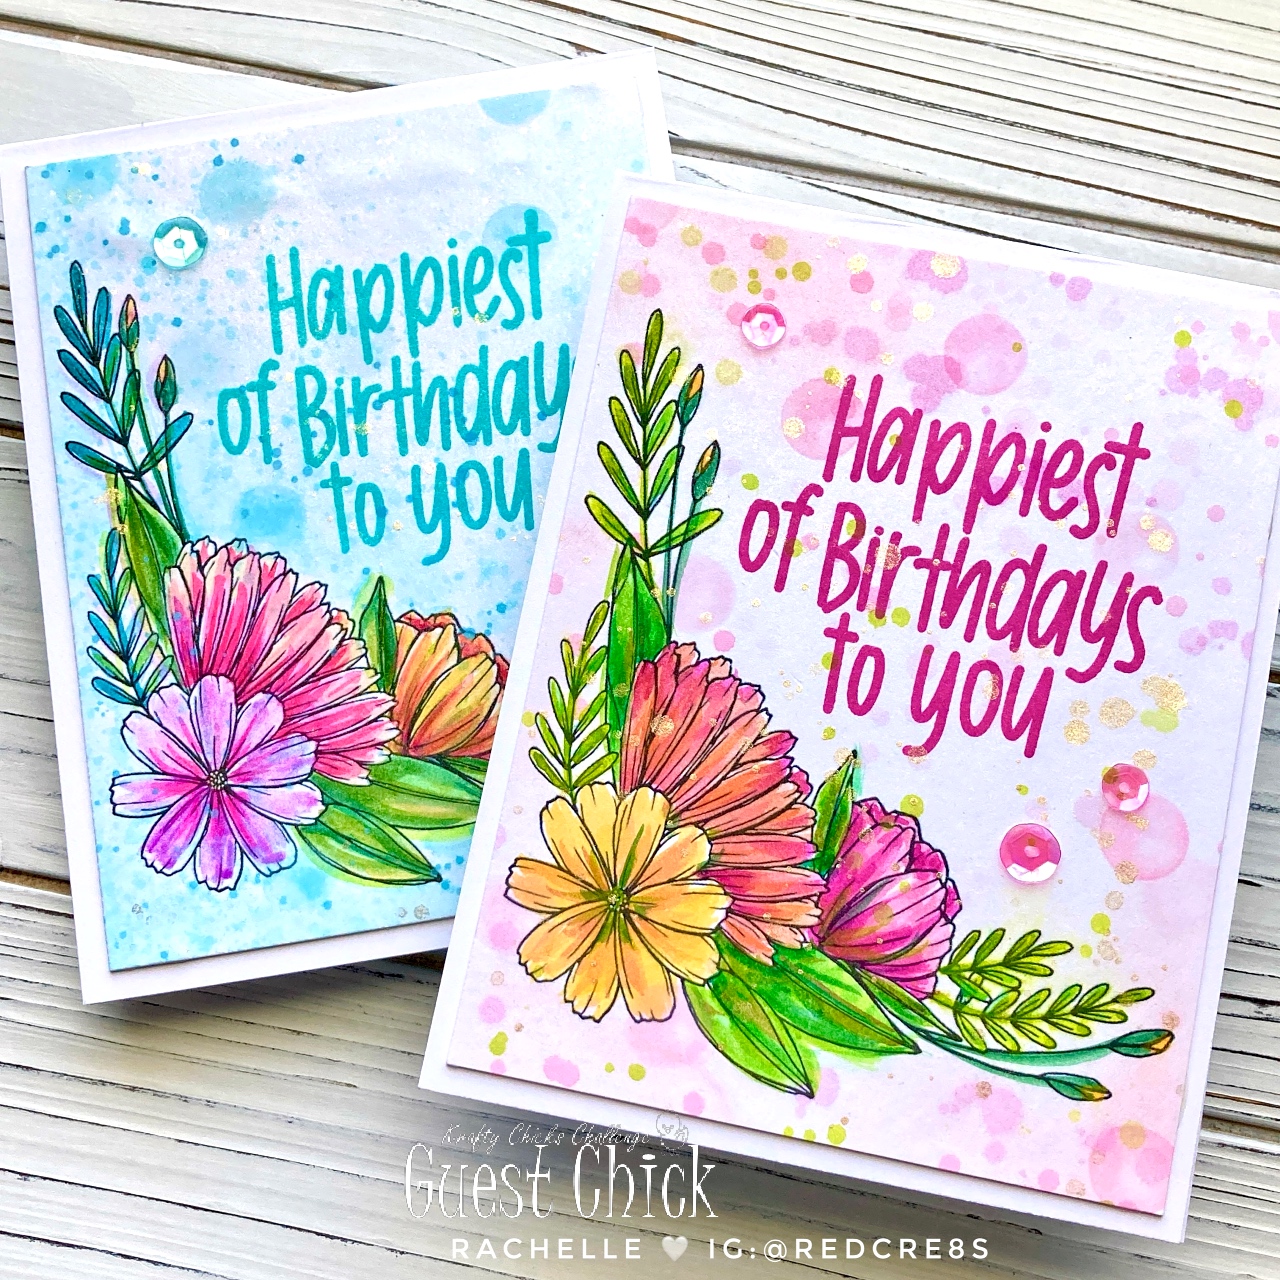
It's "Stamps" Week over at the Krafty Chicks Challenge and I hope you will join us with all of your creative stamping projects! It's birthday season for me (it seems it's always birthday season!) and I've got a double color way of this digi stamp from Graciellie Design to share today!


This simple corner floral spray can be used in vertical and horizontal positions with lots of space to stamp a greeting! I love it! I printed the image onto 110# white card stock, watercolored and trimmed it down to 3.75" x 5". I spattered the background with diluted paint and added a bit of bokeh effect with some distress oxide that I stenciled through a circle die cut into a piece of scrap paper. The entire panel was spritzed with shimmer mist and spattered with paint. I glued the panel to a top-folding card base and added a few sequins to finish up the design!

Please pop in and say "Hi" to the other Krafty Chicks and check our their awesome projects!

The KRAFTY CHICKS!

Thanks for stopping by today and happy crafting!

Rachelle 

Thursday, May 23, 2024

Birthday Card | Krafty Chicks - All Occasions Week #717


Hello!

This week we are featuring "All Occasions" over at the Krafty Chicks Challenge #717 and I chose a giant floral digital image from Graciellie Designs to split in two for a couple of birthday cards!

The image was printed in the middle of an 8.5 X 11" piece of white card stock and cut right down the middle. I randomly ink smooshed Distress Oxides onto the flowers, spritzed and spattered them with pearlized watercolors. Then I went back in and added just a bit more color to the petals/centers to bring the flower into focus. Here's what it looked like at this point:


I stenciled a small flower design onto the right panel for some added texture, trimmed the two sides down to 4.75" x 6.75" and attached them to different colored backgrounds. The card fronts were adhered to card bases, the sentiments were stamped and some sequins and pearls were added to finish up the designs. I love using pearls but sadly, they don't travel well in the mail for me, however, this card went to my next-door neighbor and so I was able to handle deliver it along with some homemade strawberry ice cream!  

I hope you will join us for some crafty fun this week at the Krafty Chicks Challenge! Please stop by and see the awesome projects the Krafty Chicks have created!

Rachelle

Thursday, May 2, 2024

Birthday Card | Angie Blom Designs "Coolest Chicks Ever" | Krafty Chicks Challenge #714 - Week #1 Stamps


Hey there!

It's Week #1 over at Krafty Chicks Challenge and that means it's time for some stamping! I decided to go with a very apt theme - Angie Blom's "Coolest Chicks Ever" digital stamp set! We raised chickens when I was growing up and they looked a lot like this one at the top!


I sized the chick with the flower necklace (kind of like The Girl With The Dragon Tattoo?!?) to fit an A2-sized card front and printed it onto 100# white card stock. I trimmed the panel and ink blended the background with Distress Oxides, leaving a bit of white space around the chick. I watercolored the image and attached this panel to a top-folding card base. I created the two sentiments on the computer and die cut them both. A strip of red gingham pattern paper was adhered to the bottom and the sentiments were attached on top; a few blue sequins were added to finish up the design!


I just love the expression on her face! I decided to do a second card with one of the other images in the set, "The Chick With The Giant Glasses" and I think I like this one even more than the first! I colored her like a Bantam Hen (we raised this type of chicken, too, and these feisty "Banties" would chase me around the barnyard!) 


I really like Angie Blom's illustrations - they have a touch of whimsy and imperfection that I find really fun to work with! This is what the set includes:


Thanks so much for stopping by today and I hope you'll join us over at the Krafty Chicks Challenge for Week #714 - Stamping! And check out what the Krafty Chicks are up to!


Happy crafting! 
Rachelle

Thursday, April 18, 2024

Birthday Card | Graciellie Designs - "Cupcake Wishes" | Krafty Chicks Challenge #712 Week 3 CAS


Hey there!


It's week #3 over at Krafty Chicks Challenge and that means CAS! I decided to go with one of my favorite birthday images from Graciellie Designs' "Cupcake Wishes" digital stamp set and I absolutely LOVE this cupcake image!

I printed the image on 80# white card stock, watercolored and trimmed it to fit an A2-sized card base. The wide sentiment is from one of my most-used stamp sets, Simon Says Stamps' "Birthday Greetings." This great set has nothing but birthday sentiments in all sizes/fonts and has a matching die set as well! The heat-embossed sentiment was cut to size and glued onto the card front.

I also made a second color way for a very special little girl who loves PINK and here is that version -


I hope you will join us over at the Krafty Chicks Challenge for some 'Clean & Simple" FUN!

The Chicks!


Thanks for stopping by and happy crafting!
Rachelle

Thursday, April 4, 2024

Birthday Card | Graciellie Design - "Rainbow Birthday Cake" Digital Stamp Set | Krafty Chicks Challenge #710 - Week #1 Stamps


Hello!

I’m so excited to announce that I have been invited to join the Krafty Chicks Challenge as a guest designer for the next few months! I have been following this wonderful weekly challenge for many years and it’s an honor to become a part of this great team for a guest gig! 

We are starting Challenge #710 with Week #1 - Stamps (inked or digital) and I chose a great digi stamp set from Graciellie Designs, “Rainbow Birthday Cake”. The original cake was created as a tall slimline image but with just a few tweaks, I was able to convert it to a 3-layer design that would fit on my A2-sized card front.

After resizing, I printed the image onto 80# white card stock and watercolored both versions. Distress Oxide Ink was blended around the edge of the pink version and both card fronts were spattered with gold metallic paint. I trimmed both painted fronts down to 4” x 5.35” and glued them to coordinating card stock. Baker’s twine was wrapped around and tied to the panel, which was attached to an A2 top-folding card base. 

The sentiment on the pink version was already printed onto the cake layers but I stamped/die cut the sentiment for the primary card and popped it into place with foam tape. This is a classic image and I have made dozens of these cards for my birthday stash!


Thanks so much for joining me today and I hope you will link up your “Stamp” project over at the Krafty Chicks Challenge !

Happy Crafting!
Rachelle

Friday, March 29, 2024

Birthday Card | Angie Blom Digital Designs - "Thanks, Let It Bee" Stamp Set


Happy Good Friday!

Today I've got a couple of card designs using the great digi stamp set, "Thanks, Let It Bee", from Angie Blom Digital Designs! Angie does such a get job mixing and matching her elements and she even lays out a full page of card front designs that you just print directly! Easy peasy! I really recommend heading over to her store and looking around for yourself!


I mass produced over two dozen cards using 5 different designs and they all started by printing the card fronts onto 80# white card stock. Using a honey comb stencil, I ink blended the pattern around the designs using Distress Oxides. The panels were spritzed with shimmer spray and spattered with gold watercolors. I went back in after they were dry and ink blended just a little bit more around the edges with Black Soot, trimmed them down to 4" x 5.25." and attached them to an A2 black cardstock panel.


I painted the images with watercolors in a very loose, gestural way and each panel only took about 10 minutes to complete. The card fronts were adhered onto top-folding A2 card bases and a few golden sequins finished up the designs! I'm so glad that I made a stash of these - they are such bright, happy cards and I can't wait to send them all out to spread a bit of sunshine to the recipients!


Thanks a million for buzzing by today and happy crafting!

Rachelle

Tuesday, January 16, 2024

Birthday Card | MFT Stamps Color Challenge #227


Hello!

Here's a "RAWRSOME" birthday card featuring the palette from the MFT Stamps Current Color Challenge! I used a now-retired stamp set, "Delightful Dinosaurs",  and paired it with lots of die cuts to create this window design! This great challenge color palette was perfect for this adorable brontosaurus hanging on to his bright red balloon!


Thanks for stopping by today and happy crafting!
Rachelle

Wednesday, July 12, 2023

Birthday Card | Graciellie Design - "Vintage Peony 2" Digital Stamp Set | Guest Designer


Hello!

I've got another floral birthday card for you today using the NEW "Vintage Peonies 2" Digi Stamp Set by Graciellie Design! This is the second peony set in her latest release and it works perfectly with the "Vintage Library Cards" Set!


Even though I'm a clean and simple cardmaker at heart, I really love these new vintage-feel designs and I decided to add some lace, silk ribbon and beadwork to this card. I first ink blended around the floral image, adding some distressed textures and water spatters on top. I didn't have to be too careful about blending the background colors over the peony because it was going to be watercolored with vibrant colors. I really like how distressed and aged it appears!


I then watercolored the floral image and spattered some of the purples/greens onto the background to integrate them together a bit more. I also added some gold paint for a bit of shimmer and set the panel aside to dry.


The lace was placed across the top of the card front and adhered to the back with strong tape; the lavender silk ribbon was added underneath. I used an awl to carefully punch small holes into the lace pattern and stitched the beads into place with gold thread. The sentiment was die cut with a banner die, popped into place with foam tape and a few sequins were attached to finish up the card. The completed panel was then adhered to an A7 card front.

Monday, July 10, 2023

Birthday Card | Ellen Hutson - "Mondo Wildflowers"


Happy Monday!

Here's a bright bouquet to start your week - from the "Mondo Wildflowers" Stamp Set! I stamped the image onto a pale yellow background and it was watercolored/die cut. If you want to see a quick 2-minute video of this process, I have a reel on my Instagram page of the painting! I edited 60 minutes of the actual watercoloring down to two!

The background was stenciled onto an A2-sized piece of the same yellow card stock and adhered to the card base. I popped the bouquet up with some foam tape and stamped the sentiment using my MISTI. The same bouquet was stamped on the inside with a birthday sentiment in deep pink to match the front flowers; a few embellishments were added to finish up the card front. 

Thanks for stopping by and I hope you have a great week!


Take care and happy crafting!
Rachelle  

Friday, July 7, 2023

Birthday Card | Graciellie Design - Vintage Peonies | Guest Designer


Hello and happy Friday!

I'm excited to say that I've been invited back to join the Graciellie Design Team as a guest designer for the month of July! I'm doubly excited because the images include lots of peonies, which happen to be one of my favorite spring flowers! My grandma always had peonies growing near her fence by the railroad and I remember smelling them as a small child and getting a nose full of black ants! They do love the sweet nectar of the peony flowers! My first card this month is using the main flower cluster from the NEW "Vintage Peonies" Digital Stamp Set. This gorgeous set features so many wonderful images and I really like the word pairings on the sentiments!


I always start by designing the layout in a PowerPoint presentation; this allows me to get the sizing right on all of the elements and play with the placement! Once I get a rough design of something I like, I copy that image onto a separate slide and print it on 100# white card stock. This is an A7 (5" x 7") card base and so the main floral is pretty large, which made it super easy (and fun) to watercolor. 


I fussy cut the finished floral and set it aside. Next I created a mixed media background starting with two of my Brushos Colour Crystals. I taped a piece of the same 100# white card stock onto a heat-resistant cutting board with painter's tape and wet down the surface thoroughly with water. Then the page was dusted with just a bit of the Crimson powder and sprayed with Shimmer Mist. I let the color bleed all over the sheet and dabbed the excess runoff with a paper towel. I added a bit of the Leaf Green Powder around the edge using this same technique. When I got the coverage I liked, I used my heat gun to dry the sheet on the cutting board. The panel was spattered with gold and opaque white paint and dried again with the heat gun. 

After the surface was dry, I used Hero Arts' Unicorn White Ink and randomly stenciled a pattern onto the background to add a bit of texture. This softened the overall intensity of the color and added some extra interest. I cut my favorite part of the panel to fit the card front and adhered it into place. Several sentiments were printed in different sizes and die cut. Then I played with the placement of the design elements and added a vellum leaf die cut behind the peonies. Once the layout was figured out, everything was attached in place and I added a few sequins to finish up the card!


I can honestly say that this is one of my favorite floral cards I've ever made and it's going to my Great Aunt Phoebe for her 98th birthday! The new peony cluster is so beautifully drawn and I really like the accompanying sentiments. The rest of this July's Digi Releases are equally fantastic so be sure to head over to Gracie's Shop for all of the details!

Thanks so much for joining me today and happy crafting!
Rachelle

CHALLENGES:


Tuesday, July 4, 2023

Birthday Cards | MFT Stamps - "Picture Perfect Party Animals" Stamp Set


Hello!

I've got tons of late summer birthdays and so it's time to start cranking out the cards! I shopped my stash for some fun kids' imagery and landed on the older MFT Stamps' "BB Perfect Party Animals" Stamp Set! I've had this set for a few years and don't know why I waited so long to use it because I had a blast coloring these cuties!! 


I began by inking the background with Pink & Main's "Rainbow Fun" Stencil and four Catherine Pooler Inks. I sprayed the background panels with shimmer mist and spattered them with several colors of metallic watercolors - they really shine in the light! The panels were trimmed to 4" x 5.25" and adhered onto a top-folding A2 card base.


The party animal images were stamped onto 100# white card stock, watercolored and trimmed around the square frame. I die cut the photo frames with an inset window, inserted the colored images into the opening and stamped the sentiment at the bottom. 


I stamped/die cut the words "Happy", glued them each to a black die cut and attached them to the top of the photo frames. A black shadow frame was adhered to the card front, the party animal toppers were popped up with foam tape and a few rainbow sequins finished up this fun card set!

Thanks for stopping by & happy crafting!
Rachelle

CHALLENGES:


Thursday, October 21, 2021

Birthday Card | Pink & Main - "Rainbow Wishes" Stamp/Die Set


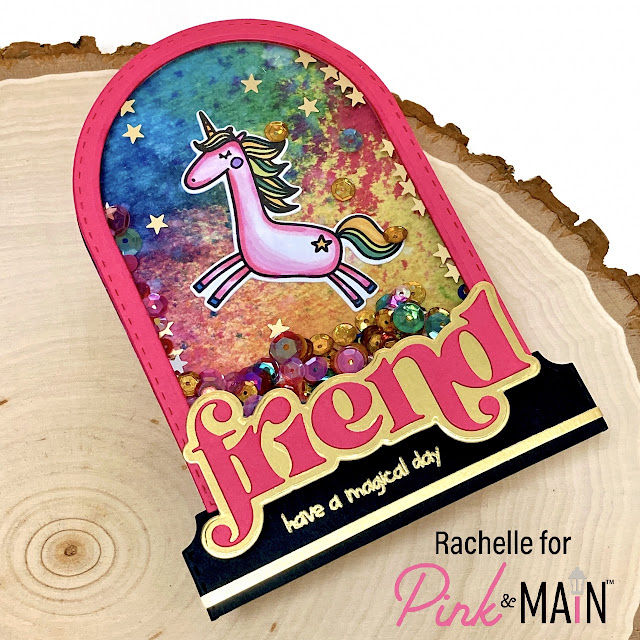
I've got a shaped shaker card I put together with some of the great new die sets! I love how Michelle creates her stand-alone dies - you can design so many wonderful projects using these items! I've captured a unicorn in this arched shaker card and it's sending out magical birthday wishes!

I started by creating the elongated arched card base using the "Stitched Arches" Dies. I die cut 4 arched frames from raspberry card stock, glued them together in pairs and sandwiched a piece of acetate between the two frames. The colors in the NEW Watercolor Rainbow Paper Pack are truly amazing and I used one of the overall textures as the base for the shaker, cutting it with the large arch and attached it to the card front. I love these jewel tone rainbow colors!!! 


I stamped, colored and die cut one of the adorable unicorn images from the NEW Unicorn Wishes Stamp/Die Set and glued it to the pattern paper. Gold stars were adhered around the unicorn, the shaker bits were piled onto the middle of the card and the shaker window was attached on top with foam tape. To create the black shaker base, I die cut one of the rectangles from the "Notched Corners Die Set", cut it in half and glued the pieces together. The small sentiment was heat embossed with gold powder and the base was attached to the card front just under the shaker frame. I added the large stacked word die from the NEW "Rainbow Friend Dies" Set, combining the same raspberry card stock and the gold shadow cut from the "Foil Cardstock" Paper Pack. A skinny accent strip of the same gold foil paper was added below the sentiments to finish up the card front! I had so much fun capturing a unicorn on this card!

Thanks so much for joining me and have a wonderful day!
Happy Crafting!
Hugs - Rachelle

Friday, October 1, 2021

Birthday Card | Picket Fence Studios - "Drop By To Say Croak" Stamp/Die Sets

Hey there!

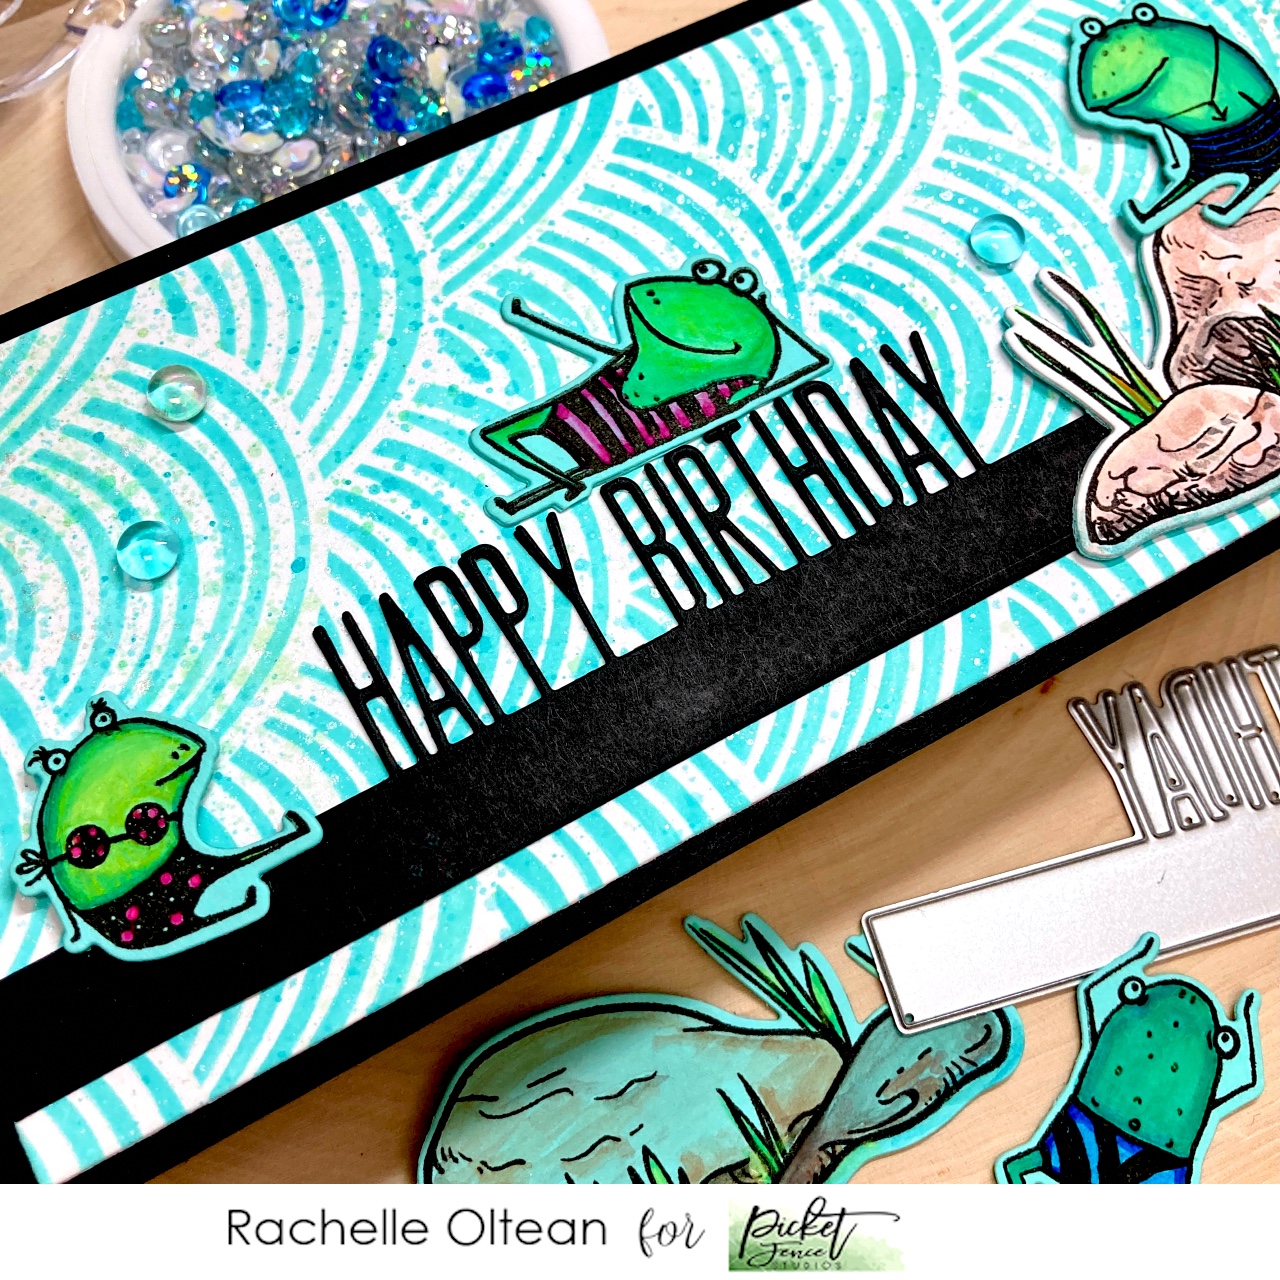
I am a huge frog lover and we have all kinds of frogs and toads in our yard; spring peepers that are smaller than my thumbnail, bright lime green tree frogs that cling to my front door in the spring and the huge "Fat Daddy” toad that lives under my driveway! And so I was very excited to use the “Drop By To Say Croak” Stamp & Die Sets on this birthday card! Aren't these frogs cute?!? - and each one has its own distinct personality!


I stamped a handful of these fun frogs on aqua card stock with Picket Fence Studios’ “Black Hybrid Ink” and they were simply colored and die cut. I also stamped, watercolored and die cut the rock/greenery image from the “Pond Scenery” Set and backed it with an extra die cut. A slimline panel was ink blended with “Salvaged Patina” Distress Oxide Ink using the “Slim Line Rainbow Stencil” and spattered with diluted ink and metallic paints.


I selectively die cut the middle of the NEW “Happy Birthday Word Topper Die” from black card stock and trimmed the length to fit the slimline sizing. The word topper die was attached to the stenciled panel and the rock scenery die cut was popped on top with foam tape. I added my sun bathing frogs to the scene, just relaxing and hanging out for some birthday fun! 


This entire panel was adhered to a black slim line card base and I finished the card with a few of the aqua-colored droplets from the NEW “Winter Lady Embellishment Mix Plus”. This mix is awesome and has so many different blue/aqua/clear droplets, gems, sequins and shaped bits - see below! 

Winter Lady Embellishment Mix Plus

Thanks so much for dropping by and I hope you have a great day!

Happy crafting! 
Rachelle

Tuesday, August 10, 2021

Birthday Card | Pink & Main - "Namaste" Stamp/Die Sets

Hi!

I’m so excited to share this post with you today! I just bought several of the newest Distress Oxide Inks, including Salvaged Patina and Kitsch Flamingo, which helped set the color palette for this card! I added Shaded Lilac for my transition color and ink blended these colors through the “Mandala” Stencil centering the image in the lower left corner of an A2-sized panel. This panel was spritzed with shimmer mist, spattered with pearl paint, die cut to 4” x 5.25” and adhered to a top-folding card base.


I stamped, colored and die cut the yoga girl (in her meditation pose) from the NEW "Namaste" Stamp Set. The heat embossed sentiment strip was glued to the stenciled panel and the image was popped on top with foam tape. I added some of the NEW coordinating "Pastel Pearls" to the mandala pattern to finish up this card! These pearls are so shiny and perfectly match all of my favorite pastel ink colors!


I really love the "Namaste" Stamp/Die Sets - the yoga figures are so well drawn, and the sentiments are awesomet! I'm sending this birthday card out to a friend who loves her yoga and the inside reads, "don't get bent out of shape, it's just another birthday!"

Challenges:


Thanks so much for stopping by and I hope you have a wonderful week!

Happy Crafting! - Rachelle