Showing posts with label Halloween. Show all posts

Thursday, August 29, 2024

Halloween Card | Krafty Chicks Challenge #731 - Anything Goes


Boo!

I'm sorry to say that it's my final challenge post with the gals over at the Krafty Chicks Challenge! My guest designer gig has been so much fun and I really appreciate being included with this great group of chicks for the past several months! My final project is a halloween collage card that blends together lots of my cherished spooky papers together for this ghostly winged vampire girl! This card is really sparkly and I love how the pearlized paint on the green ouija board piece illuminates her face with an unearthly glow!

Please head over to the challenge blog and let's see what you can create! And give the Chicks some love on their blogs as well!

Thursday, August 1, 2024

Halloween Card | Krafty Chicks Challenge #727 Stamps


Boo!

We are inching ever closer to my favorite card-making holiday...HALLOWEEN! So I took the opportunity to kick things off with these gorgeous gals for this week's Krafty Chicks' Stamp Challenge!


I used a large red rubber stamp for this card (it's probably over 15-years-old!) and stamped the retro ladies on white card stock and fussy cut them. I then stamped them again on two different orange card stocks and fussy cut out the dresses on each, which were then carefully pieced onto the white images. I stamped the skinny black witches hats, fussy cut each one and added a bit of glitter and orange rhinestones; these were then glued into place! 

I cut strips of coordinating patterned Halloween paper and adhered it to the front of a 5' x 7" card base, adding a piece of mini orange ric rac and a die cut yellow moon to set the spooky scene! The witches were popped up with foam tape and pressed into place on the card front. I gave the witch on the right a pumpkin scepter, sliding the pin under her fingers/into her hand and attached it with a glue dot on the back!  

I always look forward to stamp week and can't wait to see what you create! Be sure to head over to the Krafty Chicks' Blogs and leave them some love!

Thanks for stopping by and happy crafting!
Rachelle 🧡

Thursday, October 26, 2023

Halloween Card | Whimsy Stamps - "UFO" & "Boo" Die Sets


Hello!

Here's a spooky shaker card that's out of this world featuring a UFO beaming up all of the ghosts in the graveyard! This design started with four distress oxide ink-blended backgrounds - 1) the lemony green full background panel 2) the orange sky with a beam die cut omit from the "UFO Die Set" 3) the spooky trees w/gravestones "Haunted Graveyard Border Die" and 4) the larger gravestone foreground panel using the "Howling Night Die Set".

Each piece was ink blended, spritzed with a shimmer mist, spattered with pearlized paints and trimmed to fit a 4 x 9" shaker card base.


The UFO was cut from heavy weight black card stock glitter, special holographic papers and assembled. Another UFO outline was cut from acetate and attached to the back of the piece. Three of the ghosts from the "BOO Die Set" were cut from heavy weight white card stock and one was attached behind the acetate "glass" window of the UFO.

The lemon panel was glued onto a slimline card base. The orange sky panel was backed with a piece of acetate to create the shaker window and popped up with foam tape. I used the window to determine where my ghosts should be positioned and glued them to the lemon panel. 

The spooky tree panel was positioned to cover the bottom of the light beam and adhered on top. Once I determined where the dark foreground panel should go, I heat embossed the sentiment ("Spirited Sentiments Clear Stamps") with Ranger's "Princess Gold" Embossing Powder and glued it into place on the card front. The final item to be adhered was the UFO die cut at the top of the light beam.


With the entire front window panel complete, I piled my shaker bits (This Calls For Confetti - Candy Corn Mix 2.0)  onto the ghosts, peeled off all of the release paper from the foam tape and very carefully pressed the top panel into place! I just love those mini candy corn pieces in this confetti mix! They are perfect for Halloween shaker cards!


Thanks so much for stopping by - I really appreciate it! Take care and happy crafting!
Rachelle

CHALLENGES:


Tuesday, October 24, 2023

Halloween Card | Whimsy Stamps - "Elvira Moonlighting" Die Set


Hello!

Here's a ghostly figure haunting the graveyard under a giant crescent moon! This card started with the sky panel created with Uncharted Mariner and Black Soot Distress Oxide Inks. It was heavily spattered with water, shimmer mist and silver paint. The finished panel was trimmed to 5 x 7" and attached to an A7 card base. 

I selectively die cut the house with the "Haunted Graveyard Border Die" from kraft card stock and ink blended the house with "Gathered Twigs" Distress Oxides. I then used scrap paper as a hard edged stencil to ink blend the hills from the house leading to the graveyard in the foreground. I wanted it to look like a foggy backdrop for my ghostly figure in the front! Once I was happy with the blending, I trimmed the panel to fit and backed the house with pale cream cardstock to light up the windows.


I die cut the graveyard in the foreground (Howling Night Die Set) from a piece of light gray card stock and ink blended it to match the rest of the color palette. This panel was also heavily spattered with pearl watercolors to tie to the rest of the card, trimmed and glued onto the card front.

The figure (Elvira Moonlighting Die Set) was die cut twice from white card stock, glued together and backed with a black die cut. She was ink blended with Tumbled Glass, Speckled Egg, Black Soot and Hickory Smoke Distress Oxides and then stippled with white pearl paint. I used a piece of vellum and glued it to the back for her face/neck area and drew in her eyes with permanent marker. She was attached with glue and foam tape.  It's kind of difficult to see in the photos, but her face is slightly transparent and you can see the landscape through the vellum! It's a neat effect!

The moon and word sentiment were die cut twice from black card stock, stacked/glued together. I heat embossed the moon with a pewter-toned powder and highlighted the "Haunted" cut with silver paint. Both of these die cuts were glued into place and a few clear sequins finished up the card!


I really love the muted color palette on this design - it looks foggy, ethereal and very haunted!

Thanks for stopping in today and happy crafting!
Rachelle

CHALLENGES:


Monday, October 23, 2023

Halloween Card | Whimsy Stamps - "Hocus Pocus Kittens" Clear Stamp Set


Hi!

Here's a cute kitten (from Whimsy's Hocus Pocus Kittens Clear Stamp Set) who is looking for a few treats this Halloween! I created the background by blending Brushos Watercolor Crystals with pearlized paints and Distress Oxide Inks, trimmed it down to 4" x 5.25" and attached it to a top-folding A2 card base. 


The kitten was stamped with VersaMark Ink, watercolored as a golden tabby and die cut. I added a bit more shine by die cutting my word sentiments (Happy Large Word Die & Happy Halloween Word Die Set) from contrasting glitter paper and gluing them in place. The kitten was popped up with foam tape to sit on top of the "Happy" die cut and I added a few stamped bats and copper sequins to finish up the card!


Thanks so much for joining me here today and happy crafting!

Monday, October 16, 2023

Halloween Card | Whimsy Stamps - "Haunted Graveyards Paper" & "Monsters On Parade" Die Set


Hey There!

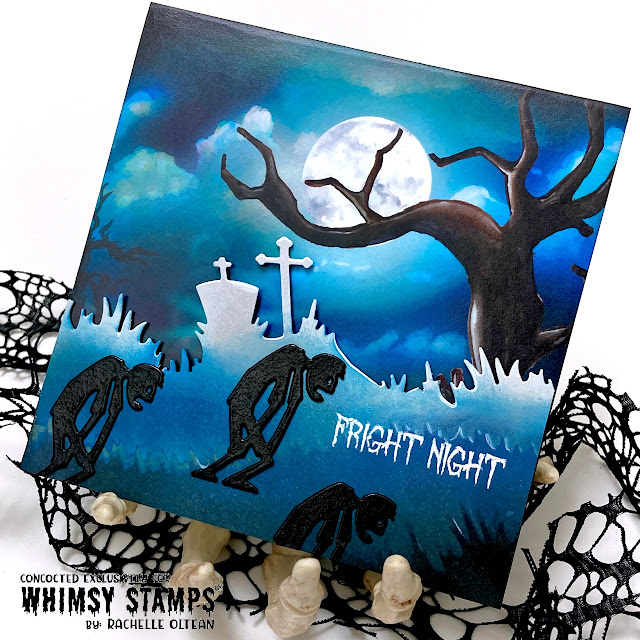
Here's a quick and easy design that uses Whimsy Stamps' great "Haunted Graveyards" 6 x 6" Paper Pack! All I had to do was to match the color palette with my die cut scenery and add some shiny zombies and the card was done! 


I trimmed the designer paper down to a 5.5" square and mounted it to a card base. Using the graveyard die from the "Howling Night" Die Set, I selectively cut the scene on a light gray card stock, extending it where it was needed to fill the 5.5" measurement. Then I ink blended the grassy details using the negative die cut with Distress Oxides to match the colors in the sky background. The panel was heat embossed with sentiment, trimmed to fit the bottom of the card front and popped up with foam tape. 


I die cut the zombies (From the Monsters On Parade" Die Set) and heat embossed them with black powder to give them some shine so that they would stand out from the background. The zombies were glued down and the excess was trimmed off the backside to finish up the card. This card only took about an hour to complete once I had the design figured out and that's pretty fast for me!

Thanks so much for joining me today and happy crafting!
Rachelle 

CHALLENGES:


♥  SUPPLIES  ♥ 
If you would like to do a little crafty shopping for some of the Whimsy Stamps' products I used in this card, I have them listed below. These are affiliate links which means that I receive a small commission if you use them through their website to make a purchase. These affiliate product sales are at NO ADDITIONAL cost to you but keeps my crafty supply drawer filled with card stock, glue, and Peanut M & M's! I truly appreciate your support


Tuesday, October 10, 2023

Halloween Card | Whimsy Stamps - "Build-A-Castle" Die Set & "Wizard In Training" Stamp Set


Abracadabra!

I've got a vibrant tunnel card for you today that's filled with a little magic - courtesy of this wizard in training and his sleeping assistant! This was so fun to put together with all of the great products from Whimsy Stamps!  

I began with a couple of large inky backgrounds on heavy-weight card stock. In order to accommodate all the components of this card, I sized it out to a 5" x 7" (A7) card base. The tunnel design starts with the largest die cut on the top panel and graduates down in size to the smallest. I stamped samples of my dragon/wizard on scrap paper and placed them on panel to make sure the spacing would work before I die cut the large frame. 


I deepened the color on the large die cut because it would be used for the background of the smallest opening on the actual card base itself. The second panel was just a bit bluer in color and a mid tone value between the other two. This gradual variation in size and value makes the tunnel card work! I decided to put together the castle die cut image (from the "Build-A-Castle" Die Set) just to be sure that the sizing was correct and die cut the frame from the mid-tone panel.


Now that I could arrange all of the components, I decided that I would die cut a slightly larger opening on the middle panel in order for the castle to fill the area. As you can see in the photo below, it was kind of tight in the framing and needed a bit more room for the castle and full moon!


The wizard and sleeping dragon were stamped, watercolored and fussy cut; the edges were touched up with black ink so that they would fade into the background without a bright white outline. I randomly ink blended a panel of white card stock with "Scattered Straw", "Mustard Seed" and "Wild Honey" Distress Oxides, die cut a circle for the moon and then the stars using the "Slimline Stars Background Die". Several bats were also die cut from black card stock.


Using a left over piece of the mid-tone panel,  I heat embossed the sentiment in gold powder and die cut it with one of the speech bubbles from the "Comic Speech Bubbles Die Set." Now it was time for the assembly! The darkest die cut was glued to the card base with the moon and castle attached on top. The back of the middle panel was covered in foam tape and adhered on top; the same process was followed with the top panel.


The stars/bats/speech bubble were glued to the front and the wizard/dragon were popped up with foam tape. This card ended up about 1/2" thick due to all of the layering and will definitely be hand delivered instead of going through the mail! I was so happy with the way this tunnel design worked and will be making more of these in the future! Hope you picked up some tips along the way and will try this design technique for yourself!

Thanks so much for sticking with me today and happy crafting!
Rachelle 

CHALLENGES:


♥  SUPPLIES  ♥ 

If you would like to do a little crafty shopping for some of the Whimsy Stamps' products I used in this card, I have them listed below. These are affiliate links which means that I receive a small commission if you use them through their website to make a purchase. These affiliate product sales are at NO ADDITIONAL cost to you but keeps my crafty supply drawer filled with card stock, glue, and Peanut M & M's! I truly appreciate your support

Wizard In Training Clear Stamp Set


Wednesday, October 4, 2023

Halloween Card | Whimsy Stamps - "Mini Slim Tree House Die Set"


Hi!

It's been awhile since I made a paper-pieced card and I decided to give it a try again with a modified candy corn color palette! WOW! Say that fast three times! I started with three large ink blended panels using the following Distress Oxide Ink Color Combinations: (the Wild Honey was used sparingly to give everything a cohesive feel)

1. Antique Linen/Wild Honey
2. Dried Marigold/Carved Pumpkin/Wild Honey (a little) 
3. Ripe Persimmon/Abandoned Coral/Wild Honey (a little)

Once these three panels were inked, spritzed and spattered with pearlized watercolors, I cut them into 1/4" strips, glued them onto a 5" x 7" panel and trimmed off the excess overhang from the backside. 


Here's a photo of the finished panel by itself - it really glows with all of the surface treatments and has a warm pinky feel! The striped panel was then glued onto an A7 card base.


I selectively die cut the "Mini Slim Line Tree House" from heavy weight black card stock, leaving the very bottom uncut so that I could extend the hillside by hand trimming to fit this larger card size. I heat embossed the sentiment with Ranger's "Princess Gold" powder and adhered it to the striped panel with glue.  

I added a few bat die cuts from a couple of different sets and coordinating sequins to finish up the card!


Those black die cuts are really striking against that warm sky!

Thanks so much for stopping by and happy crafting!
Rachelle

CHALLENGES:


SUPPLIES
If you would like to do a little crafty shopping for the Whimsy Stamps' product I used in this card, I have it listed below. These are affiliate links which means that I receive a small commission if you use them through their website to make a purchase. These affiliate product sales are at NO ADDITIONAL cost to you but keeps my crafty supply drawer filled with card stock, glue, and Peanut M & M's! I truly appreciate your support


Wednesday, September 27, 2023

Halloween Card | Whimsy Stamps - "Enchanted" Die Set

Hello!

I've got a magical card for you today featuring this "Marching Gnome" Digital Stamp! He's taking a stroll through the enchanted forest with a  pumpkin lantern lighting his way! Whimsy Stamps has a giant digital stamp catalog and this image is from the "Some Odd Girl" Collection

I began by downloading, sizing and printing the image onto white card stock. The original drawing had a leaf hanging down from the carrying stick and I simply edited that out before printing. I watercolored the image, carefully fussy cut him out and painted all of the edges black. I die cut one of the mini pumpkins from the NEW "Pumpkin & Mini Jacks Die Set", watercolored and attached it to the gnome's carrying stick. 

The background was created with a combination of Brushos Colour Crystals, watercolors and Distress Oxides - I wanted it to have a foggy bokeh feel to it with areas of light and shadow. This panel was trimmed to 8.5" x 3.5".

I die cut lots of the tree silhouettes from the "Tree Assortment Die Set" from heavy black card stock and determined their placement on the design. Then the trees were colored to fit into the landscape - darker trees in front and lighter trees in the distance. (see below) The NEW word die "Enchanted" was cut twice, glued together and inked in a light green with white highlights. The dry fit layout is below - right before I started gluing things down. I always take a photo on my phone when I get to this point so I have it as my reference!


I began gluing back to front and wanted the pumpkin lantern to be giving off a glow so I gave that area of the background (and the tree in the foreground) a small spritz of "Flickering Candle" Distress Mica Stain. I love how that spot is glowing in the shadowy forest! 


I continued to glue all of the pieces down and when finished, this panel was attached to a black slimline card base measuring 4" x 9". Here's a closeup of the NEW "Enchanted Word Die Set" - it's such a great set because you begin with the base word, "Enchant", and then you can add the different word endings to create: Enchanted, Enchanting or Enchantment!


This card was so much fun to make and I was really happy with the way all of the pieces came together! I hope you like it, too!

Thanks so much for stopping by and happy crafting!
Rachelle

CHALLENGES:


SUPPLIES
If you would like to do a little crafty shopping for some of the Whimsy Stamps' products I used in this card, I have them listed below. These are affiliate links which means that I receive a small commission if you use them through their website to make a purchase. These affiliate product sales are at NO ADDITIONAL cost to you but keeps my crafty supply drawer filled with card stock, glue, and Peanut M & M's! I truly appreciate your support

Monday, September 25, 2023

Halloween Card | Whimsy Stamps - "Mini Vampire" Digital Stamp


It's National COFFEE Week!

This card is an ode to my favorite beverage - COFFEE! It is also a nod to my hubby and his Romanian heritage, which can be traced directly back (by only one generation) to the Olt River Valley in Transylvania, the home of Dracula! In fact, this is where our last name comes from - Oltean - meaning someone who's from this valley! This little vampire has the exact same hairline/brows as my husband and when he saw this image he said, "Hey - that kinda looks like me! Without the fangs and the glowing red eyes of course!" And I replied, "Well, of course honey!"  ; )

I inked up the background with Distress Oxides - "Antique Linen", "Scattered Straw", "Abandoned Coral" and "Black Soot" - and added some red blood spatters with the "Clawed 6x9 Stencil." The entire panel was spritzed with shimmer spray and spattered with gold pearlized watercolor. I created a vibrant orange/red background panel with Oxides and die cut it with the "Wonky 1 Window Die." Two additional window die cuts were glued/stacked behind the top cut and I added some Black Soot toward the top to give it an ombre effect. The spattered panel was attached to an A2 card base and the window die was glued on top.


I downloaded/sized/printed and watercolored the "Mini Vampire" Digital Stamp and carefully fussy cut the image, adding black paint to the edges. The coffee traveler cup (from the "Coffee Cup Die Set") was die cut, inked and assembled. Dracula, his beverage and my own computer-generated sentiment strips were attached in place;  a few red sequins finished this card!


I just love his intent gaze fixed not on a victim's neck but on a giant cup of COFFEE! Thanks so much for stopping by today!

Happy crafting - Rachelle


SUPPLIES

If you would like to do a little crafty shopping for some of the Whimsy Stamps' products I used in this card, I have them listed below. These are affiliate links which means that I receive a small commission if you use them through their website to make a purchase. These affiliate product sales are at NO ADDITIONAL cost to you but keeps my crafty supply drawer filled with card stock, glue, and Peanut M & M's! I truly appreciate your support