Showing posts with label Tag. Show all posts

Thursday, February 25, 2021

Birthday Gift Tag | Jaded Blossom - "Pocket Tag Die"


Hello!

Today is my final guest designer post for Jaded Blossom and I did a little paper piecing! I began by die cutting some bright green gingham paper with the "Pocket Tag" and assembled it together. I chose not to use the front insert panel because I was going to be adding a giant slice of birthday cake on top instead!

I stamped the main cake image from the "Wish Big" Stamp Set on both white card stock and polka dot pattern paper. I watercolored the icing on the white card stock and fussy cut the image. Then the cake sections were cut from the polka dot paper and glued into place on the large image. I love how it looks like Funfetti Birthday Cake!  

The cake slice was popped off the pocket tag with foam tape and the "Birthday" sentiment was stamped using the MISTI. The word "Happy" was stamped on turquoise card stock, die cut and attached with a strip of acetate to the back of the cake. I added clay star embellishments, a green ribbon, and stuffed some tissue paper into the pocket along with the Starbucks Gift Card. I've had such a great time creating projects this month for Jaded Blossom and would like to thank Candace and Michelle for the design opportunity!

Thanks so much for joining me and take care!

Rachelle

Friday, February 19, 2021

Crafty Treat Pail | Jaded Blossom - February Release Day & Blog Hop

Hey Everyone - Happy Fri-YAY!!  

Now if you're here from Michelle's Blog, "Scrappin With My Bug, you're in the right place, if you're just passing through, start at the beginning because you don't want to miss a thing!  I also have the complete line up at the bottom.

Here's my project for today's hop!


This sweet treat pail is filled to the brim with chocolate for a favorite crafty friend! I've never been able to pass up the $1 section at Target and I've got a whole seasonal collection of their small metal pails! When I worked in an office, I used to keep these pails filled candy for anyone who happened to dropped by my cube and let me tell you...I went through a lot of Hershey's Kisses! I never knew if it was my scintillating conversation or if they were just trying to get through their 3:00 PM slump! ; )

This project is actually easy to put together, albeit a bit time consuming, but it's a great visual display and can be personalized for any recipient! I used tons of stamps from the new release - "Handmade With Care", "Kawaii Crafts""Kawaii Art" and "Paper Hoarder". All of the images were stamped/watercolored to match the color palette of my polka dot pail and fussy cut. I painted some thin bamboo skewers with coordinating acrylic paint and once dry, cut each one in half.  All of the crafty images were either adhered directly to the end of a skewer or layered onto small die cut shapes (Label Shape Dies I) and then attached. I added small punched hearts to the labels and ribbon ties to each skewer.


I adhered a 4" styrofoam ball to the bottom of the pail with a couple of large glue dots, stuck the skewers into the ball at varying heights and filled the rest of the pail with lots of chocolate! The small "Handmade With Care" Tag was tied to the handle to finish up this crafty project!


Regular Price for the Release Package is $141.99

 Free Stamp set for customers that spend $40 or more before tax and shipping! FREEBIE is only available until Sunday 2/21 11:59am pst or while supplies last.

HANDCRAFTED WITH PATIENCE

CUSTOMER TREAT

BLOG CANDY

1 Lucky Winner will get to pick a stamp set of their choice!
Just leave a comment on all the blogs along the hop!
The more blogs you comment on the more chances you have to win!

Now on to the HOP....


Just in case you get lost, here is the entire Blog Hop Line-Up:

Thanks so much for hopping with me today and stay safe!

Rachelle

Thursday, February 18, 2021

Gift Tag | Jaded Blossom - Day #4 February Release | "Handcrafted With Patience"

Hey There! 

It's Thursday and time to reveal the fantastic "Freebie" from this month's Jaded Blossom Release! It's a set entitled "Handcrafted With Patience" and I think I will probably wear this stamp set out before I'm done with it! I always stamp something on the back of every card - along with my signature/year - and the clipped note image is perfect for adding your own crafty notions to personalize your project!

February Freebie 


Free Stamp Set for customers that spend $40 or more before tax and shipping! FREEBIE is only available until Sunday 2/21 11:59am pst or while supplies last.

My tag was stamped, colored and die cut. I matched my coloration to the fabric patterns on these handmade masks and attached the image to a die cut base made from the Scallop Rectangle Dies I. I stamped, colored and fussy cut the scissors image from the Kawaii Crafts Stamp Set and popped it off the tag with foam tape. An assortment of coordinating embellishments and ribbons were added to finish off this large tag. 

Thanks so much for joining me for another Jaded Blossom Sneak Day and I hope you will stop by again tomorrow, Friday 2/19, for RELEASE DAY! I will be Blog Hopping with the amazing Jaded Blossom Designers and there will be some awesome inspiration along the way!

Please take care and stay safe!
Rachelle

Wednesday, February 17, 2021

Gift Card Pocket Tag | Jaded Blossom - Release Day #3 | "Handmade With Care"


Hi!

Well, we are on Day #3 of Jaded Blossom's February Release Week and the crafty goodness continues! 

 
My project today uses the Pocket Tag Die to make a combo gift card/Pixy Stix Treat perfect for any artist in your life! I used images from the new Handmade With Care and Paint Your Own Story Stamp Sets. 

$15.99


I created the painted background on white card stock with DO Inks, die cut the insert and framed it with lime green card stock. The pocket was die cut from heavy-weight purple card stock and assembled; the insert was attached to the pocket front.

The paint brushes and large illustrated sentiment were stamped, watercolored to match the painted background palette and fussy cut. I attached the brushes to the ends of coordinating Pixy Stix with Scor-Tape and tied a ribbon to the tag. The sentiment was stamped on the front using the MISTI and the "Handmade" sentiment was attached to the back. All that was left was to tuck the iTunes gift card and Pixy Stix into the Pocket Tag! I just love this handmade image - because there is an open space in the middle, you will be able to insert lots of different items perfectly matched to your project!


Thank you so much for stopping by today and please stay safe!


We have our Gotta Have it Now Package for $129.99

February 2021 Release will include:

5 - 4 x 6 Stamp Sets
2 - New Die
2 - New Stencils
1 - Freebie 3x4 Stamp

Ala Carte Items available on Friday 12am PST 

NO PREORDERS! NO BACKORDERS!
No waiting WEEKS for your stamps. 
This Package is only available till Wednesday 11:59pm pst, then will be back up on the store on Friday at 12 am pst during our Stamp Release Blog Hop!
*Freebie Stamp- Free While Supplies Last.*

Regular price for the release package is $141.99

Take care!
Rachelle

Tuesday, February 16, 2021

Paintbrush Treat Bag | Jaded Blossom - Guest Designer | February Release - Sneak Day #2

Hey there!

I've got such fun projects to share with you today featuring more new products from Jaded Blossom's upcoming February Release! 

The crafty theme continues today with 2 New Stamp Sets: "Kawaii Art" and "Paint Your Own Story" and a wonderfully fun stencil called "Paint Splatter!" 

$15.99


$15.99

$5.99

I created a paintbrush treat base by actually tracing the outline of one of my favorite house painting brushes! Once I had the shaped drawn, I squared everything up and hand cut the outline, which was then traced onto a new piece of 130# white card stock. I wanted the metal ferrule to fold over the top of the treat bag to create the closure - see below.


Once I had the template completed, I inked up the wooden handle, painted the bristles to look like it had been dipped in red paint (to match my nugget wrappers), and created the metal-looking ferrule from matte silver specialty paper. I scored the surface to resemble the markings on a real brush and added small die cut circles for the rivets. This metal accent piece was attached and wrapped around on top of the template after securing the the nugget treat bag in place. I was so happy with how realistic the brush looked! Here's a close-up photo: 


The images from the "Kawaii Art" Stamp Set were stamped, watercolored and fussy cut. For the tag, I wanted rainbow paint ribbons to be exploding from the paint tube and so I attached them to the back with Scor-tape and wrapped them around my tag (die cut using one of the Label Shape Dies I). The tag was then attached to the top of the paint brush. I also created a separate gift tag with the illustrated sentiment from the "Paint Your Own Story" Stamp Set.


I made another treat-based project using the "Candy Bar Slider Die", the new "Paint Splatter" Stencil and the adorable artist's palette stamp image! I constructed the slider box from the same pattern paper as my other projects and blended a die cut panel with DO Inks, which was attached to the box. The palette was stamped, colored with pearlized watercolors, fussy cut and attached with baker's twine. I added the sentiment strip and a few large gems to finish it up!


Thanks so much for joining me today for Sneak Day #2 and I hope to see you back each day this week!


We have our Gotta Have it Now Package for $129.99

February 2021 Release will include:

5 - 4 x 6 Stamp Sets
2 - New Die
2 - New Stencils
1 - Freebie 3x4 Stamp

Ala Carte Items available on Friday 12am PST 

NO PREORDERS! NO BACKORDERS!
No waiting WEEKS for your stamps. 
This Package is only available till Wednesday 11:59pm pst, then will be back up on the store on Friday at 12 am pst during our Stamp Release Blog Hop!
*Freebie Stamp- Free While Supplies Last.*

Regular price for the release package is $141.99

Take care and stay safe!
Rachelle

Monday, February 8, 2021

Valentine Slimline Tag


Hi!

I used to make a lot more tags and I’m not quite sure why I stopped (?) but I’d like to share a fun slimline tag with you today! This one measures 8.5” x 3.75” and so there’s lots of real estate for some Valentine creativity!


To start, I pulled lots of pattern papers and ephemera together in rose, kraft, black and cream and then I blocked out the proportions for my banding/strips. I stamped multiple vintage images on the two largest bands and assembled all of the pieces together starting at the bottom. Bits of lace, glitter ric rac and German Scrap pieces were added on top. I glued and trimmed everything to a blank tag and finished it with a bow of hand-dyed silk ribbon. 


You can really make these tags quickly once you get the layout figured out and all of the pieces ready to go! Thanks so much for stopping by and thank you for taking the time to comment!

Challenge Submissions:


Take care and stay safe!
Rachelle

Wednesday, July 22, 2020

Christmas Tags | Christmas Craft Creations - "Characters"


Hello!

Our July Challenge at Christmas Craft Creations is "Christmas Characters!" We would love to see your snow people, reindeer, penguins, Santa, etc. 
I chose to make a trio of gift tags featuring a different snow scene inside of each mini mason jar! I stamped and colored the jars/characters, used pearlized water color to add glass reflections and Stickles snowflakes to create the 'snow globe' effect. I fussy cut the jars and also cut a blank for the back of each as well stamped with "TO: and FROM:"


Ribbon loops were attached to the back with strong glue and the blanks were adhered in place with foam tape. Sentiment strips were stamped, heat embossed and die cut. I punched a hole into each strip, threaded them with red twine and added small bell at the bow.

Additional Challenges:


Thanks so much for joining me!
Rachelle

Friday, November 29, 2019

Christmas Tag | Cut It Up! Challenge #188 Tic-Tac-Toe


Hello!

Today's post features a Christmas Gift Tag designed for the current Cut It Up! Challenge - Tic-Tac-Toe Board. This challenge has so many great combinations and as long as your project includes a die cut, we would love to see what you create! Thanks to our wonderful prize sponsor, Christy Witschie, from Stinkin' Cute Paper Piecings for her generosity! 

 Penguin 6 Cutting Files

I chose "Circles, Purple and Design Paper "as my game squares and started this tag by die cutting a large circle from both heavyweight white card stock and Lawn Fawn plaid paper; these two were glued together. I cut/glued together two of the largest scalloped circles from Avery Elle's Wonky Circle Framed Elle-ments Dies. This frame was glued onto the plaid circle. 

I downloaded the Penguin 6 Cutting File Set into Cricut Design Space, resized/tweaked the file and die cut all of the penguin pieces from white card stock. Each piece was hand colored with water colors and Distress Oxide Inks to give the overall image some depth. After assembly, I gave his face/tuxedo a generous coating of Wink Of Stella for some extra shine, added the small gems as buttons and applied black glaze pen to his eyes. I punched a hole through the scallop frame, tied the ribbon to the tag, glued a white pom-pom to the hat and popped the penguin into place with some foam tape to finish! This tag is quite large (nearly 4" in diameter) and would also make a great handmade ornament as well!

Thanks so much for stopping by and head over to the Cut It Up! Challenge Blog to see the other great projects the Design Team has created! 

Rachelle

Wednesday, October 16, 2019

Wine Bottle Shaker Gift Tag | MFT Stamps - Cheers Die-Namics


Cheers to You!

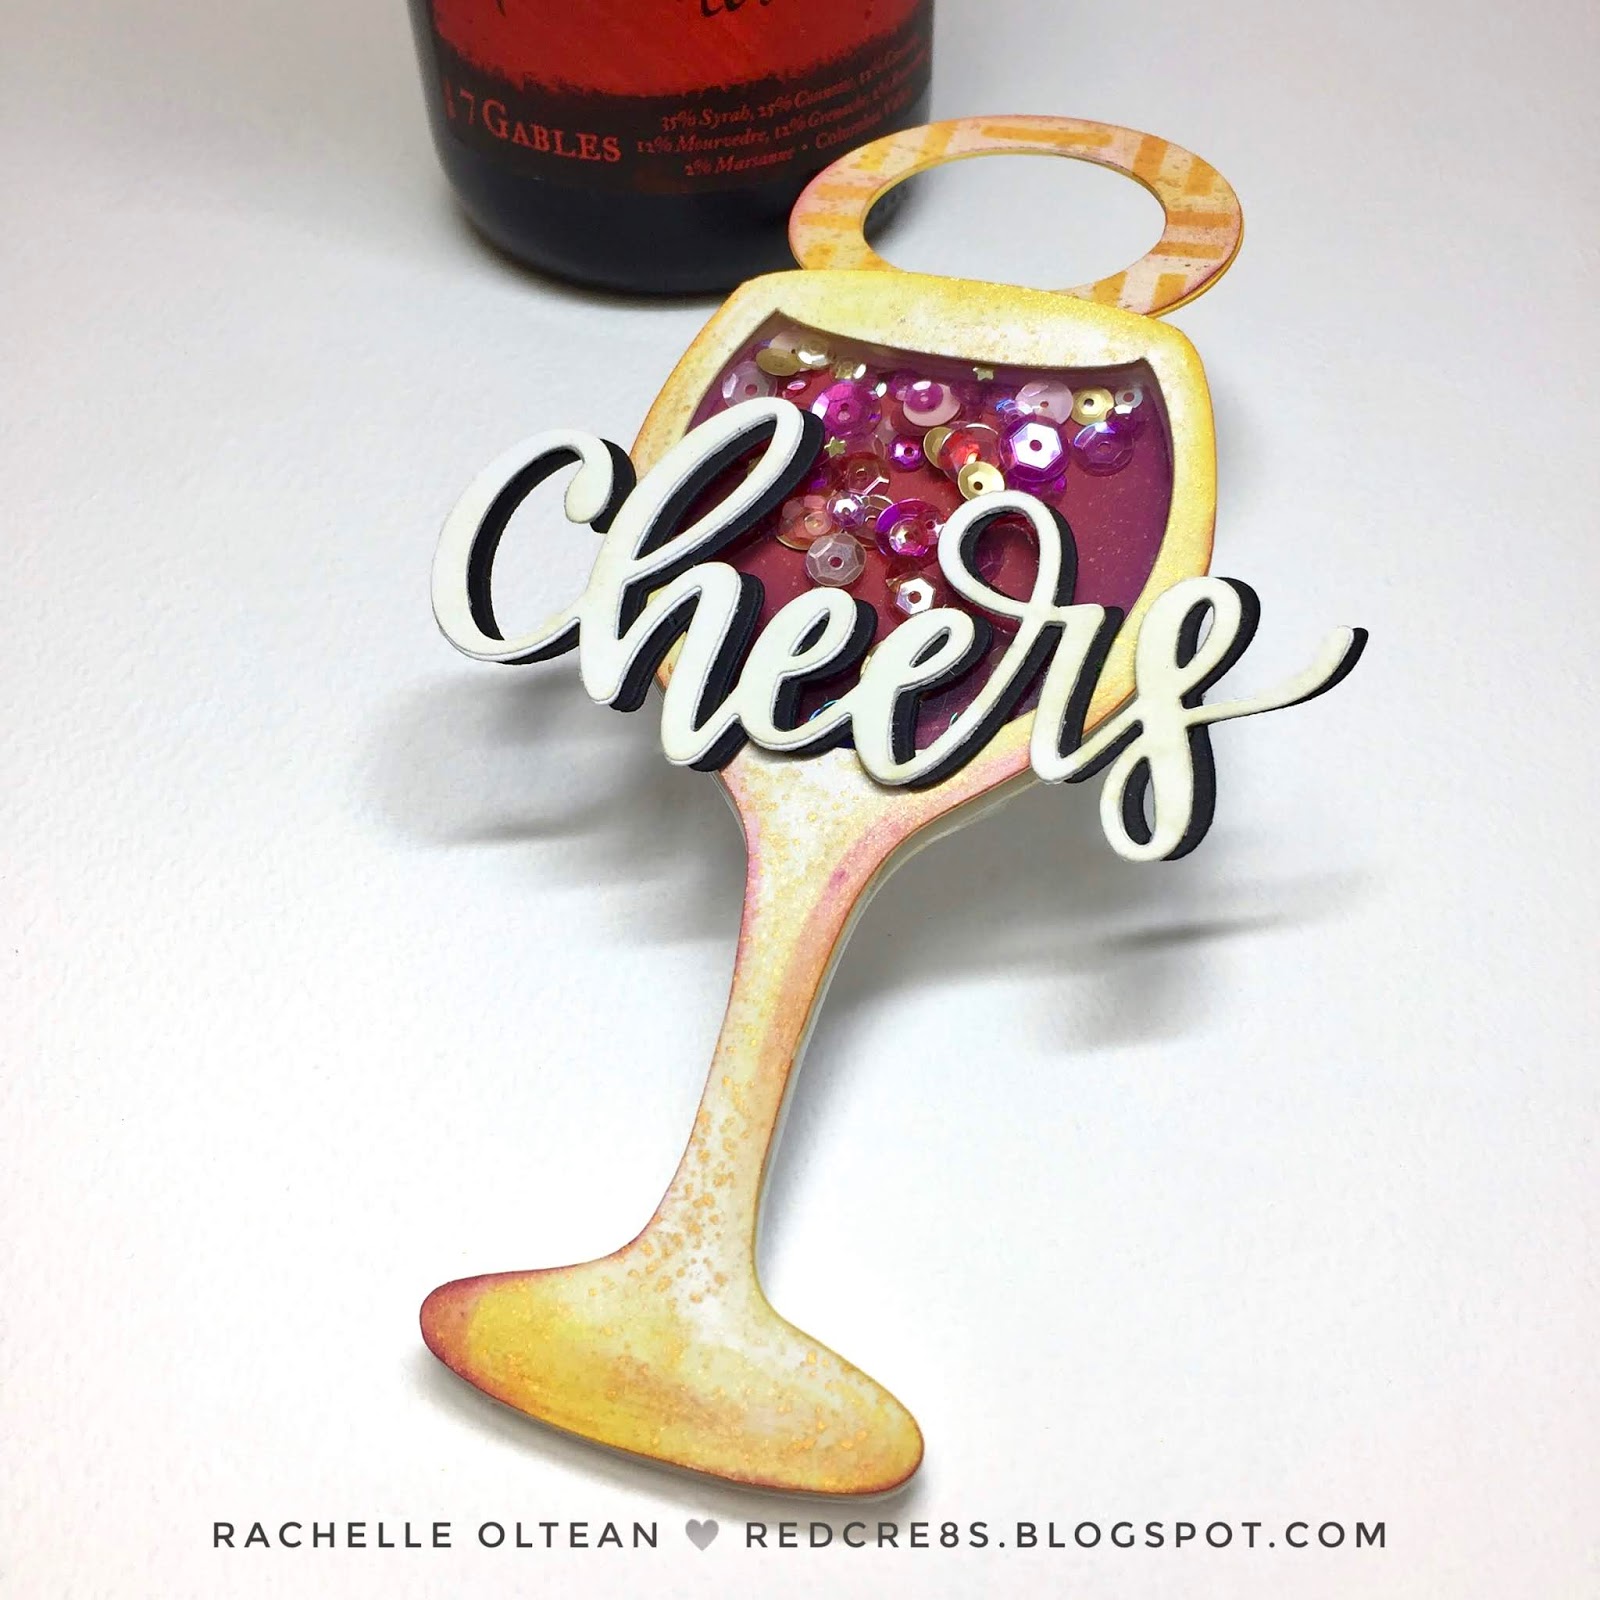
Today's post is a special shaker gift tag designed to hang around a wine bottle. With the holiday season fast approaching, I needed a few tags ready to pair with my hostess gifts! This was pretty easy to put together (after I created the tag in the Cricut Design Space!) I used a simple copyright-free wine glass silhouette SVG I found on the internet as my starting point and created a few extra layers in order to convert it into the pieces needed to assemble the shaker. The basic shapes used for this tag are shown below and here are the # of die cuts needed for each color:

3 - Yellow Ringed Base - Glued together and Colored with Distress Oxides/Metallic Watercolors
1 - Rose Wine Base - Blended with Distress Oxide Inks and spattered with metallic watercolors
1 - Green Shaker Base 
4 - Black Glass Outline - Only the top die cut was blended with Distress Oxide Inks and spattered with metallic watercolors


If you have an electronic die cutting machine, here is a B&W version that you can copy/save as a JPG and then upload to create this shaker tag:


The smaller wine base die was glued into the correct place on the green base and I adhered a piece of acetate behind the the opening of the top black die cut with Scor-tape. I glued the remaining three black die cuts together and adhered them behind the acetate. This gave me a good stability for the shaker and enough depth for the filler pieces. I used really narrow pieces of double-thick foam tape around the back of the acetate and down the stem of the glass. I ran my anti-static powder tool around the foam tape just at the top to keep my filler from sticking to its adhesive residue. Then I added my shaker bits onto the wine base area and carefully placed the acetate piece on top, pressing down firmly so that the entire unit was adhered together. I scored the yellow ringed base along the line shown above and glued the shaker to it. Depending on the weight of your card stock, you may not need quite as many die layers but I like to overcompensate a bit just to make sure the final shaker isn't too flimsy.


Using MFT's "Cheers" die, I cut multiples from both the white and black card stock - the die cuts were glued/stacked together with the black stack slightly offset from the white in order to give it a shadow effect and adhered to the front of the tag. There is plenty of room on the back to write your sentiment or just a simple "To:/From:" would also work! I really like the way this tag looks on the bottle itself! 

I am entering this project into the challenge over at the current Cut It Up! Challenge Blog #184 - Tags, Bags or Boxes.

Additional Challenges:


Thanks so much for stopping by!
Rachelle