Showing posts with label Hello Bluebird. Show all posts

Friday, June 25, 2021

Birthday Card | Coffee Loving Cardmakers Blog - Guest Designer Spot

Hello Everyone!

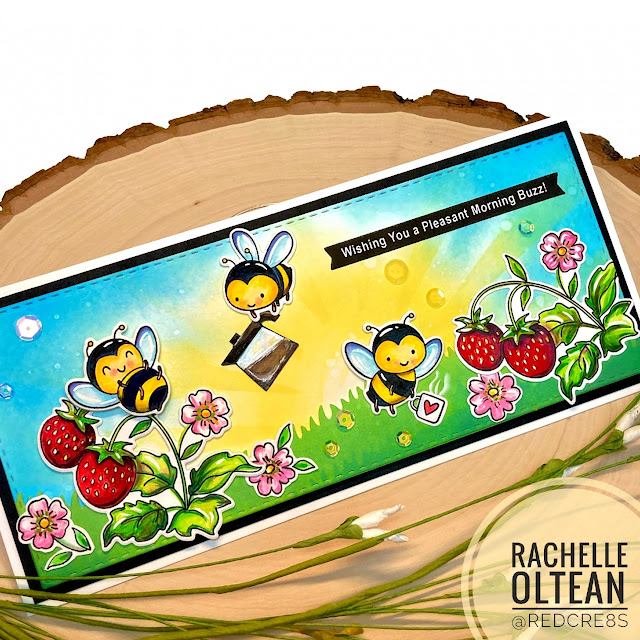
I'm so excited and honored to be the Guest Designer today on the Coffee Loving Cardmakers' Blog! I was chosen as Amanda Wilcox's "Designer Pick" during the recent 2021 Spring Summer Coffee Lovers Blog Hop and I'm so happy to share this card based on my favorite coffee blend, "Pleasant Morning Buzz", from Whole Foods! The old packaging design used to show bees buzzing around a flower garden with their tiny coffee cups filled to the brim and so I decided to try and recreate this scene with one of my favorite stamp sets, "Bee Happy", from Hello Bluebird! Butterfly Reflections, Ink. always carries such a great selection of HB products and is a very generous Super Sponsor of the Coffee Lovers Blog Hops! 


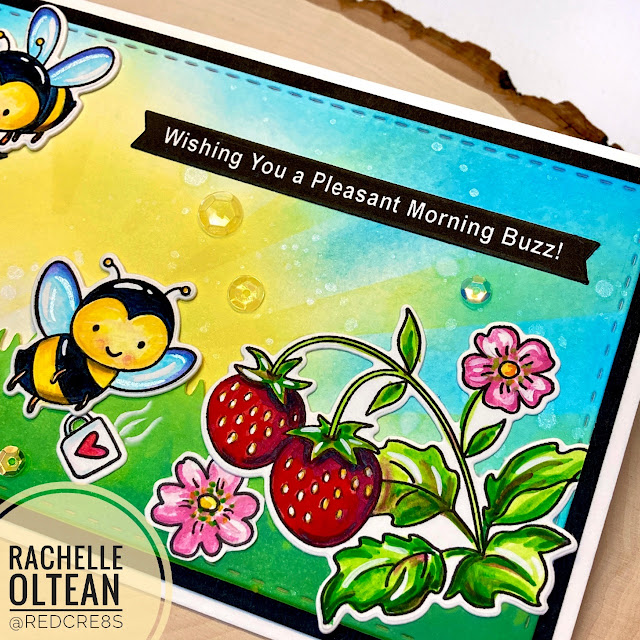
I stamped, water colored and die cut all of my images. I needed a few extra flowers and a glass coffee carafe and so I drew those myself with a black permanent marker and they were colored/fussy cut. I inked a slimline panel with Distress Oxides to create my sunrise background and die cut it with the largest of Pink & Main's "Stitched Slimline Dies" (3.5" x 8.5"). I inked/die cut the grass strip with Sunny Studio Stamps' "Slimline Nature Border Die (rolling grass) and this was glued to the sunrise panel.


I adhered all of the images into place on the top panel and layered this with a black mat before attaching it onto my slimline card base (4' x 9"). I added a computer-generated sentiment strip and sequins to finish up the card front! 


Here's the inside complete with a gift card so that this coffee lover can purchase their own favorite brew!

Challenges:


Thanks so much for stopping by and have a great day!
Rachelle

Friday, January 15, 2021

All Occasion Card | Alphabet Challenge - "U" is for Umbrella


Hi!

I don't know about all of you but I'm looking for any excuse to find some sunshine and rainbows right now! It's been hard to stay positive this past week but this card has reminded me to "Choose Joy!" The new theme at the Alphabet Challenge Blog is "U is for Umbrella" and I put together products from Hello Bluebird, Ellen Hutson and Pink Fresh Studio to come up with this CAS card!

I stamped, colored and cut all of the images. The window omit was die cut from a 130# white card stock panel and backed with craft foam. I die cut a slightly larger circle from the front of a top-folding A2 card base, added the accent paper strips at the bottom and the window panel was glued into place.


I attached the rainbow through the scallop window and popped up the clouds with foam tape. The pig was glued directly to the card front and I love how he's tucked under the overhanging rain clouds! I stamped the sentiment using the MISTI and added a few aqua hearts on the inside, which would show through my window. 

Thanks so much for joining me today and I look forward to seeing your "Umbrella" Projects in our Alphabet Challenge Gallery!

Challenge Submissions:

Try It On Tuesdays - Uplifting or Positive Quote

Unicorn Challenge #61 - CAS

Die Cut Divas - Frame It January 2021

A Bit More Time To Craft - #132 - Anything Goes

Pearly Sparkles Challenge Blog #58 - Beginning With "P" - Pig

Creative Moments - #206 - Anything Goes

Take care! Rachelle

Wednesday, May 20, 2020

One Word Wednesday - "HAPPY" | Hello Bluebird - "Bee Happy" Stamp Set

Hey There!

I'm starting a new Wednesday Series that will feature a large one-word focus and today's word is "HAPPY!" I have paired this large die cut (free image to download below) with Hello Bluebird's adorable images and I hope this card will remind the recipient to BEE HAPPY on their birthday!

I used washi tape to create the pattern border stripes at the bottom of an A2 horizontal fold card base. A piece of 3.25" x 5.5" white card stock was embossed with a honey comb pattern, and glued to the card front. I created the word image in the Cricut DS and glued/stacked together three die cuts to give me dimension/stability. 

I stamped, colored and die cut the bee/dandelion images and then adhered them into place. The "happy" die cut was popped into place with foam tape and iridescent enamel dots finished off the card. I just love the cute expression on this bee's face as he lounges on the dandelion! The inside reads: "Happy Bee-Day - Wishing You a Wonderful Birthday!"


Challenge Submissions:


Thanks so much for joining me today and for taking the time to comment!
Rachelle

Thursday, February 13, 2020

Valentine's Day | Hero Arts - You Are Loved


Happy Heart Day!

I'm sharing a set of Valentine's Day Cards today featuring Hello Bluebird's Gallery Frame #2 Die and Hero Arts' Stamp Set, You Are Loved, from January of 2019. I wanted to make each card just a bit unique so I emphasized the individual colors and values of this Distress Oxide palette: Worn Lipstick, Abandoned Coral, Candied Apple and Picked Raspberry. 

I lightly blended Worn Lipstick around the edges of a top-folding A2 card base. I die cut the Gallery Frame multiple times from heavy 110# card stock. The inner frame was blended with oxides, spritzed with shimmer mist and flecked with pearlized watercolors. Each frame was colored a bit differently and I focused on variations of color/values. I stenciled a sunray pattern onto the inner frame and spattered this section as well. 

I die cut the hearts using  Lawn Fawn's Stitched Heart Stackables after ink blending, The script was stamped using the MISTI with VersaFine Onyx Black Ink. The sentiment banner was die cut, lightly ink blended on the edges and stamped with the same ink. 


To assemble, I started by gluing the outer white scalloped frame into place on the card front; this gave me a guide for all of the remaining pieces. After the frame sections were adhered, I attached the heart and banner and then stamped the bottom scrolls with the Distress Oxide inks. The card was finished off with a few gems. It was fun playing with the color palette for these cards! 


Thanks so much for joining me and I hope everyone has a wonderful Valentine's Day!

Challenge Submissions:


Rachelle 

Thursday, November 14, 2019

All Occasion Card | Hello Bluebird - Bee Happy | Cut It Up! Challenge #187 "Celebrate Fall (or Any Season)"


Hey there!

We've got a fun theme over on the Cut It Up! Challenge Blog...create a project to "Celebrate Any Season" and I chose to celebrate the growing season with these playful pollinators! I used these cute little honey bees from Hello Bluebird's 'Bee Happy' Stamp Set (Summer 2018) and the Mason Jar Set from "The Cutting Cafe" who is our generous prize sponsor for this challenge. My concept was to make a shaped card with an acetate window, fill it with honeycomb and feature these hardworking bees buzzing on the front : ) Make sure to head over to the blog and see the other creative ways the design team members have used these same die cutting/print files!

I loaded the SVG files into the Cricut Design Space and tweaked the sizing/design just a bit to give me a hinged window card base. I die cut multiples of this design, glued/stacked them together (for stability) and then blended Distress Oxide Inks around the edges to create glass reflections. I ink blended the honeycomb background pattern using a Tim Holtz stencil onto one of the negative die cuts, spritzed it with shimmer mist and glued it onto the inside panel. The ruffled fabric topper/ribbon were die cut from pattern paper and adhered  onto the card front. 


I carefully trimmed a piece of acetate to size and adhered it to the back of the window opening. The bees/honey pot were stamped, colored and die cut. I stamped the Hero Arts' banner design and Stampin' Up's Labeler Alphabet Letters onto heavy-weight vellum with VersaFine Onyx Black Ink and heat embossed it with clear powder. After the banner was trimmed, it was adhered onto the acetate panel with tiny pieces of double-sided tape. The bees finished off the card front and I added a sprinkling of gold confetti to the honeycomb.


This project was so much fun to design and the finished window is really effective! Sending a big THANK YOU to Regina over at The Cutting Cafe for furnishing the files and the prize for this fun challenge!

Rachelle

Tuesday, September 3, 2019

All Occasion Card | Simon Says Stamp/Neat & Tangled - Hello Pumpkin


Hello! 

I think I can almost feel a cool down starting in my neck of the woods (or maybe it's just wishful 
thinking considering it was almost 90 degrees this afternoon with a relative humidity of 99% here in North Carolina?) and I believe it may be due to the "Everything Pumpkin" display that I saw today at my local Whole Foods Store! Pumpkin puree - pumpkin flavored tea - pumpkin spice muffin mix - harvest pumpkin craft beer...you get the idea! Well that put me in the mood to get started on some autumn-inspired cards!

This cute bundled bear is a part of Simon Says Stamp's Stamptember 2017 Neat & Tangled Set and is combined with Hello Bluebird and Sunny Studios products. I am basing the card layout on this week's Retro Rubber Stamp Challenge Sketch #118.


I used Distress Oxide Inks and blended them through Hero Arts' Woodgrain Stencil onto a piece of 110# Neenah Solar White card stock, spritzed it with shimmer spray, die cut a panel and adhered it to a top-folding A-2 card base. I ink blended a piece of the same cardstock with Wild Honey and Fossilized Amber and die cut it with Sunny Studios Scalloped Square Dies - a panel was lightly ink blended with a circle/diamond stencil, cut to fit behind the square die cut frame and adhered into place.

I smooshed a mix of autumn-toned Distress Oxide inks onto my craft mat, spritzed them with water and daubed pieces of the Neenah card stock into the inked areas. I tapped the paper numerous times until I got the depth of color and mix that I wanted and I set these pieces aside to dry. Hello Bluebird has so many great stand-alone dies and one of my favorites is the Gallery Frame #3, which has some added leaf and pumpkin die cuts. This is such a wonderful die set and I used it to cut multiple leaves, acorns and pumpkin images from my inked papers. 

I stamped the bear with VersaFine Onyx Black Ink and water colored/die cut the image. I glued it into the scalloped frame and stamped the sentiment using the MISTI. This entire piece was glued onto the wood grain panel (following the sketch) and the autumn die cuts were added to the left-bottom corner. The card was finished with a sprinkling of assorted sequins and a light application of Wink of Stella clear shimmer.


Challenge submissions:


Thanks so much for stopping by!
Rachelle

Monday, September 2, 2019

Birthday Card | Hello Bluebird - Pig Day & Avery Elle - Market Stand Sets | Guest Designer on the AAA Birthday Challenge Blog - Game #5 "Use a Stencil"


Hey There Birthday Fans!

I am thrilled to be the Guest Designer over on the AAA Birthday Blog for their #5 Challenge: "Use A Stencil" and to be sharing these cute Hello Bluebird critters with you! Head on over to the blog and see all of the great ideas that the designers have created for this challenge. I will have to admit that I was a little late to the stencil party (I just starting using them about a year ago!) but now my collection of designs just seems to multiply like magic in my craft closet! 


I love combining products and this card has it all: MFT Stamps' "Geometric Star Stencil" & "Elegant Rectangles Die-Namics", Lawn Fawn's "Happy Happy Happy Stamps", Avery Elle's "Market Stand Set" and the aforementioned "Pig Day" Crew! 

I began by lightly blending Shaded Lilac and Twisted Citron Distress Oxide Inks at the top and bottom of a 4.25" x 5.5" panel of white card stock - leaving a bit of the white showing through in the middle. Salty Ocean and Lucky Clover were then blended through the Geometric Star Stencil on top; diluted inks and shimmer mist were spattered/sprayed and blotted to give the panel texture. This panel was die cut using the second largest shaped die. I blended another panel using the same inks with heavier values to provide a solid color gradation and die cut it with the largest rectangle. The stenciled panel was adhered to the background with foam tape.

I partially stamped the market stand using the MISTI from the bottom up because I didn't want to use the top header board. This left the two tall supports on either side incomplete and I extended them to the height I wanted with a fine-tip black marker. I colored the stand, partially die cut the image and then trimmed the extended supports with my craft knife. I stamped the small banner in the same way - leaving the ends "open" and drew the rest of the "rope" line and fussy cut the image; the banner was colored and glued to the top of the wooden supports.


The Hello Bluebird pig, bird and balloon were all stamped, colored and die cut. I wanted the pig's arm to hang over the edge of the counter so I just made a small slit along the inside edge and slipped him into place, taping him behind the stand. A second blank die cut was glued behind the balloon to give it more stability and then glued behind the pig and onto the market stand. The sentiment die cut was glued into place and then I stamped the word "Birthday" VERY CAREFULLY using the MISTI. :)

The market stand was adhered to the stencil panel with foam tape, a light coating of Wink of Stella was applied to the images and a few sparkling gems were added to finish off the card front. In order to make a shaped top-folding card base, I placed the largest die 1/8" over the top of an A-2 size card base and cut it over the folded edge. I wanted this shaped card to 'stand' on its own but it rocked with a rounded bottom edge; so I just trimmed 1/8" (from the back panel only) and this allowed it to sit perfectly level. The entire front panel was then glued to the shaped card base.

I just love the happy images from this Hello Bluebird Set!


Thanks so much for joining me today and head over the AAA Birthday Blog and check out the other great submissions! I appreciate each and every comment :)

I have also entered this card into the following challenges:


Rachelle

Wednesday, April 3, 2019

Birthday Card | Hello Bluebird Stamps - Bee Happy


Hey There!

Yippee! I was so excited to win the Color Throwdown 535 and be named as "Guest Star Stamper" for this week's CTD537 Challenge! The color palette this week is beautiful (purple, yellow, green & gray) and as soon as I saw it, I had Hello Bluebird's "Bee Happy" images buzzing around my drawing table! 

 ctd537

I knew that I wanted to combine some pattern play with simple images and a die-cut window so I started with MFT's Elegant Rectangle STAX Die-namics as the shape for my scene. The bee and berry images were stamped using VersaFine Onyx Black Ink, colored, die cut and given a light application of Wink of Stella. The bee's flight trail was stamped onto heavy vellum with VersaMark Ink, heat embossed with white powder and die cut. The sentiment strip was stamped and die cut from the same vellum.  


Since the margins were fairly narrow, I die cut the window opening frame from white card stock twice and glued/stacked them together to provide some stability. I blended yellow/gold distress oxide inks onto a separate piece of white card stock and die cut it with the next smaller sized die - thus giving me a yellow framed window. I glued the white and yellow panels together and backed this frame with craft foam. I inked up one side of a Tim Holtz honey comb stencil with the same oxide inks and ran it through my die cut machine, impressing the color and pattern onto one of the negative white die cuts. I sprayed it with shimmer spray and set it aside to dry. I love this technique - you get the color and texture combination at the same time!


A 3/4" strip of gray pattern paper was adhered to the bottom of a 4.25" x 5.5" panel of 110# white card stock; the honey comb piece and foam-backed frame were glued into place as well. I popped up the berry and bee images with foam tape, placed them into the frame and adhered this entire panel onto the front of a top-folding horizontal A-2 card base. I finished it off with a few sequins from Lucy's Little Things "Honey" Sequins Mix. This mix is a gorgeous color blend of warm yellows and was a perfect match with my coloration.

"BEE" sure to head over to the Color Throwdown Blog to see the other great submissions for this week's challenge! 😉

Thanks so much for stopping by! 
Rachelle

Friday, March 8, 2019

Birthday Card | MFT Stamps - Puppy Kisses and Hello Bluebird - Pig Day


Happy Fri-Yay!

Who doesn't love a puppy flying on a birthday balloon? Today's card is a happy blend of MFT and Hello Bluebird products that fit together perfectly. 😉

Using the Gallery Frame #2 Die, I cut two frames each from navy and red card stock; these were glued/stacked together for added dimension. I blended soft clouds onto white card stock with Salty Ocean Distress Oxide Ink, spritzed the panel with shimmer spray and die cut it with the same frame die. All of the pieces were then glued into place on the front of a top-folding A-2 card base.

The other images (MFT's "Puppy Kisses" & Hello Bluebird's "Pig Day") were stamped, colored, die cut and finished off with a generous application of Wink of Stella (WOS). I glued/stacked multiples of the balloon images together to provide additional stability since they would be floating freely on the card front. These images were then adhered to the card front.


I created a template for the 3-D banner and hand-cut it from a piece of gold card stock. I applied WOS to the front, added a sentiment using the MISTI and then glued it into place. I ♥ love  how this banner turned out! It folds perfectly flat when put into the envelope but because of the zig-zag folds, it pops right off of the card, creating wonderful dimension.

This card was submitted for the "Seize The Birthday" Anything Goes Challenge.

 Seize The Birthday

Have a great weekend!
Rachelle

Thursday, March 7, 2019

Birthday Card | Hello Bluebird - Pig Day

Hey!

Sharing this adorable party pals card with you today courtesy of Hello Bluebird’s “Pig Day” stamp/die set! This is such a fun, happy set and the critters are so well drawn – just like all of the Hello Bluebird images. 😊

I wanted this card to have several layers and I started by creating the party scene with MFT’s Stitched Dome STAX Die-namics. I taped the two largest dies together to form a frame and then ran it through my die cutting machine several times on both light yellow and white card stock. I glued/stacked 3 yellow frames together and set it aside. I then lightly blended the blue sky with distress oxide ink onto one of the white dome die cuts. On the second white dome, I blended greens at the bottom and die cut the grass border – I glued this down to the sky dome. The images were stamped, colored and die cut. I glued/stacked multiple die cuts together for the pig and balloons. I wanted the little peep to have her own party hat so I drew a teeny tiny one, colored/cut it and glued it to her head. The party hats were finished with tiny jewels for a bit of sparkle. Once my scene was arranged, I glued all of the pieces into place or popped them up with foam tape.

I didn’t have a plaid that really matched my color scheme for this card and so I created one in PowerPoint! It’s really easy to design your own plaids and here’s what mine looked like:


I adhered the printed plaid to the front of a 5.5” x 5.5” top-folding card front. I then lightly blended a blue sky onto a piece of white card stock measuring 3.75” x 5.5”, backed it with craft foam and glued it to the top of the card front. The sentiment was stamped using the MISTI and the dome scene was glued to the sky panel. The card was finished off with a generous application of Wink of Stella on all of the images. This card just makes me smile!


Thanks for stopping by!
Rachelle

Friday, January 25, 2019

All Occasion Card | Hello Bluebird - Rainy Day


Happy Fri-YAY!

Today I would like to share a card that uses Hello Bluebird’s wonderful “Rainy Day” stamp set.

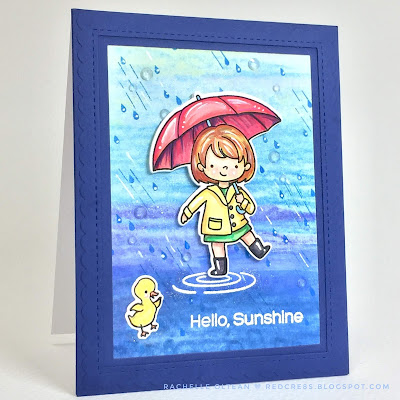
The rainy watercolor background was created with Caran d-Ache Neocolor II Artist's Crayons. I taped down a piece of 130# Neenah Solar White card stock onto an Epicurean cutting board and lightly sketched bands of overlapping color onto paper. I sprayed it with plain water, recolored certain areas and sprayed again with shimmer spray. I dried the paper with my heat gun and went back in to add some additional colors. Because I had taped the paper down it remained fairly flat, even with all of the water that I sprayed onto the surface! The raindrops were randomly stamped onto the background and highlights were added with my Uni-Ball Signo White Pen. I stamped the little girl/duckling onto the same 130# Neenah cardstock with VersaFine Onyx Black Ink, water colored and die cut the images. I glued and stacked three of the little girl die cuts together to provide some dimension to the image.


I die cut multiples of Hello Bluebird’s Gallery Frame #1 & 2 on navy cardstock and glued/stacked different pieces together to create a simple frame. The rainy background was adhered onto the front panel of an A-2 top-folding card base and prepped with an anti-static powder tool. The sentiment/puddle were stamped with clear embossing ink using the MISTI and heat embossed with detail white powder. The navy frame was glued down onto the background and the puddles were highlighted with a heavy coat of Wink of Stella Shimmer Pen. The duckling was glued directly onto the background and the girl was popped off using some foam tape. The card was finished with little raindrops using Lucy’s Clear Ice Cube Jewel Mix.

Thanks for joining me!
Rachelle