Showing posts with label Lawn Fawn. Show all posts

Monday, August 2, 2021

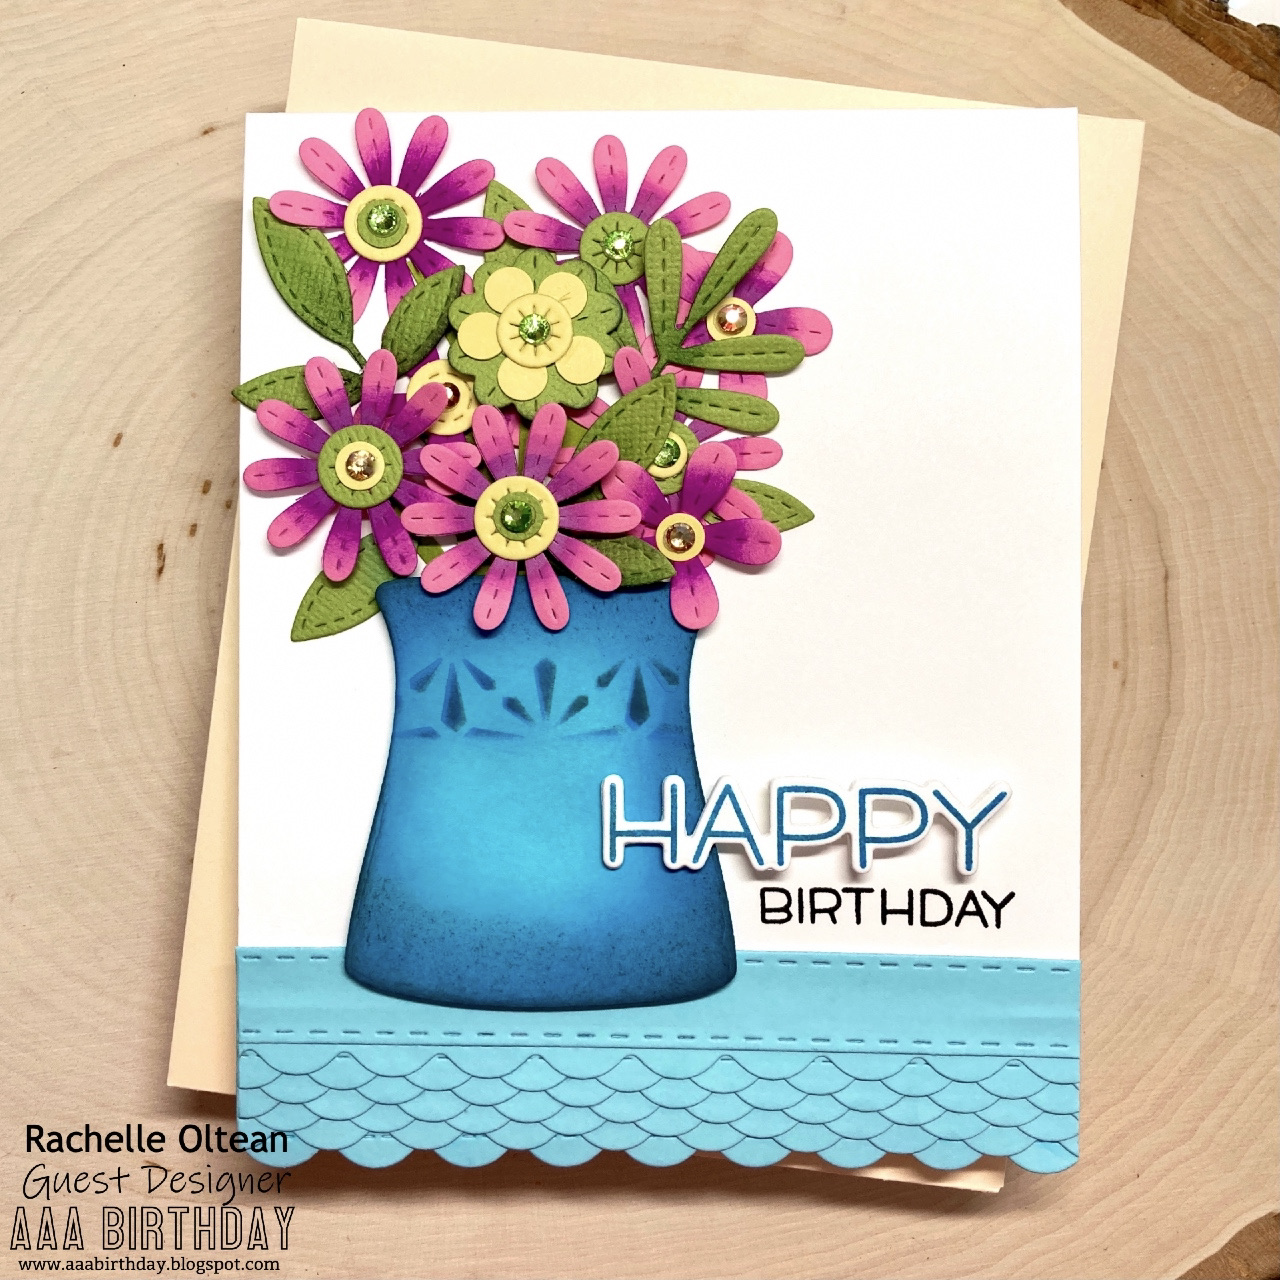
Birthday Card | Guest Designer Spot - AAA Birthday Challenge "Game #28 - Photo Challenge"


Hello and Happy Monday!

I'm so excited to be joining the AAA Birthday Challenge Team this month as the Guest Designer and we've got a great photo challenge for Game #28! Here's the inspiration pic - isn't it pretty?!


I chose to focus on the beautiful ceramic vase filled to the brim with those gorgeous pink flowers and the ruffled edge on that perfectly iced cake! It's almost too pretty to cut into! I began by die cutting lots of flowers and ric rac using retired MFT Die Sets. I inked the edges of the flowers/leaves to give them a bit more detail and stenciled a pattern onto one of the Altenew Vase dies. 

Then it was time to assemble! I began by gluing the aqua ric rac pieces to the bottom of an A2-sized card front. I attached the vase on top with foam tape and this gave me room to create my die cut bouquet, which was adhered into place with glue/foam tape. I stamped/die cut the word "HAPPY" from Lawn Fawn, stamped the rest of sentiment using my MISTI and added some gems from Picket Fence Studios to finish up this floral birthday card! I hope you'll join us for this AAA Birthday Card Challenge!

Thanks so much for stopping by and I hope you have a wonderful week!
Rachelle

Tuesday, November 17, 2020

Birthday Card | Guest Designer Spot - Retro Rubber Challenge #148 | Ellen Hutson - "Snow Buds"


Yippee!

I'm the Guest Designer over on the Retro Rubber Challenge for #148 - They Said It's Your Birthday - and we would love to see your birthday cards! I went for a Brrr-thday Card this time with Ellen Hutson & Julie Ebersole's 2018 release of "Snow Buds"!


I wanted a lot of texture on this card so I ink-blended & spattered the background panel and die cut it with Pink Fresh's Braided Tag arch.  The next card stock layer was embossed with Sunny Studios' Cable Knit pattern and adhered to an A2 stitched rectangle die cut panel. I die cut/ink blended the snowflakes from Ellen Hutson's now-retired "Pop-Up Mittens" and glued/stacked several together for dimension. A little glitter was added for extra shine!


I die cut the bottom stitched hillside strip, stamped the sentiment, coated with edge with glitter, backed it with craft foam and attached it to the front. The snowman and Lawn Fawn's "Happy" sentiment were stamped, colored and die cut. I assembled/adhered all of the remaining pieces with glue, attached the silver string around the snowflake birthday "balloon" and wrapped it around the snowman's arm! This card is really bright and sparkly since I used two kinds of glitter! : ) I can't wait to see your BIRTHDAY projects over at the Retro Rubber Challenge and just remember to show some love to those older stamps in your collection!

Thanks so much for joining me today and I really appreciate you taking the time to comment! 

Additional Challenges:


Rachelle

Sunday, November 1, 2020

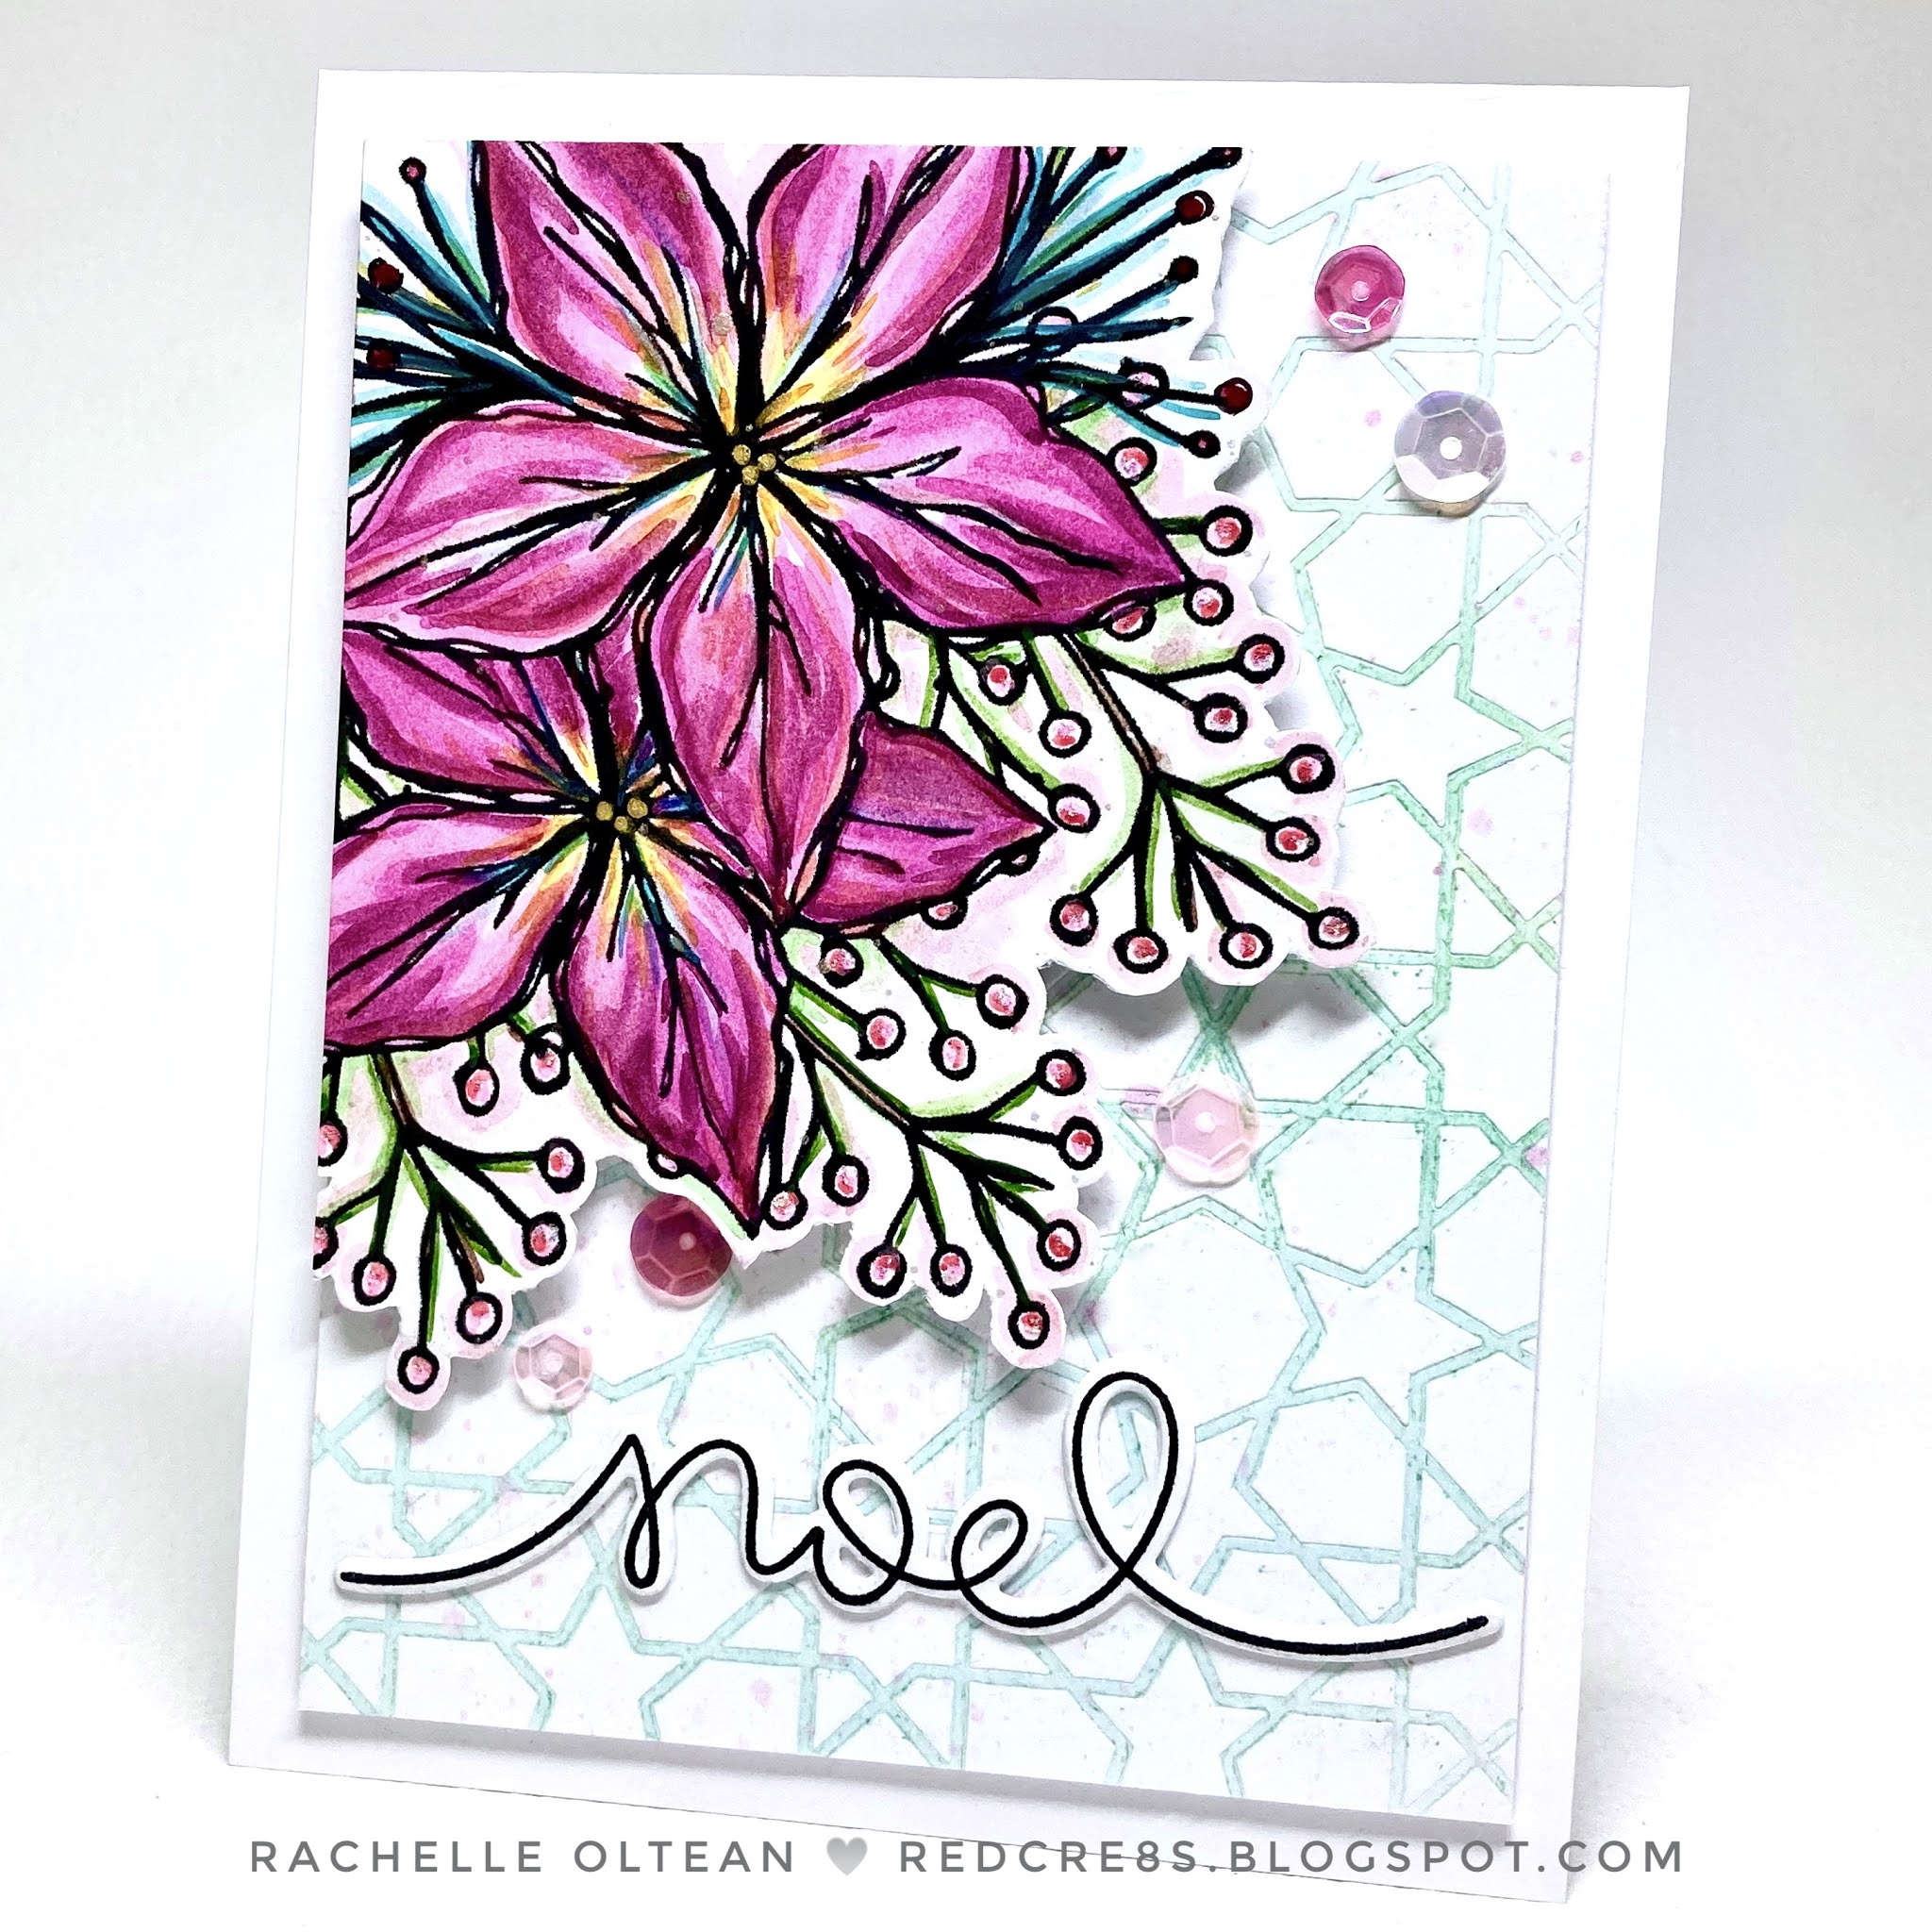
Christmas Card | Merry Little Christmas Challenge | Graciellie Design - "Wonderful Winter"


Hello!

Well...all of the Halloween stuff has been stashed away and I'm in full Christmas mode from this point on! (At least for the next few weeks so that I relax and enjoy the season when it actually gets here!) This card features the "Wonderful Winter" Set from Graciellie Design.  I actually made this card before I was asked to be a guest designer last month for Graciellie! We hope that you will join us for our November Anything Goes Challenge over at the Merry Little Christmas Challenge Blog!


As you can tell by checking out the original floral/pitcher image above, I was a cropping maniac with this design! I pulled the png into PowerPoint, sized it and printed it onto 100# card stock. I decided to go with a bright plummy jewel-tone palette, which gives this card a softer, less-traditional feel! The image was watercolored, spattered with gold paint and fussy cut. 


I chose a stencil (I liked how this pattern echoed the 5-point shape of the poinsettia), ink-blended it with Distress Oxide Inks and used this to make my background pattern by running it through my die cutting machine. This technique leaves both color and the imprint texture on the card stock! I spattered this panel with diluted ink/paints and set it aside to dry in a heavy book! This background was trimmed to 5" x 3.75", backed with craft foam and adhered to a top-folding A2 card base; the poinsettias were backed/adhered in the came way. The stamped/die cut sentiment and sequins were glued in place and a touch of Diamond Stickles was added to the winterberries to finish off the card!


Thanks so much for stopping by and for keeping me inspired by your comments! ♥ 

Challenges:


Rachelle 

Thursday, August 6, 2020

New Home | Cut It Up! Challenge #206 - Shaped Card | Ellen Hutson - "Backyard Bird Friends"


Happy Fri-YAY!

Our challenge over on the Cut It Up! Blog this time is a "Shaped Card" so we would love to see anything other than a standard rectangle! I needed a card to congratulate my wonderful nephew on the purchase of his first home and I decided to use an arch shape! This card features lots of die cuts (MFT Stamps/Lawn Fawn) and cute stamped images from Ellen Hutson's "Backyard Bird Friends".

I created the folded arch card base and covered the front with Lawn Fawn gingham paper. The birdhouse was die cut multiple times from different cards stocks and glued/stacked together, which gave this image lots of dimension. The wooden post was stenciled with a wood grain pattern and all of the birdhouse pieces were glued to the card front. The green grass strip was die cut, ink-blended along the bottom and adhered to the front of the card with foam tape. I added a heat-embossed sentiment banner, small jute bow and the pretty stamped/colored Cardinal to complete the card front. I used more of great images in this stamp set for the inside greeting!


We can't wait to see your shaped card projects over in our Cut It Up! Challenge Blog Gallery - and remember, don't forget the die cut!

Additional Challenges:


Thanks so much for stopping by and for all of your comments!
Hugs - Rachelle

Friday, May 15, 2020

Birthday Card | Sparkles Monthly Challenge "Use a Real Stamp" - Lawn Fawn


Hola!

Sharing a festive bridge card card with you today that mixes Hero Arts, MFT Stamps and Lawn Fawn products together! I did some friendly bargaining with one of my neighbors and traded some homemade face masks for hand crafted birthday cards; this special creation was designed for her daughter! This is also my DT submission for the new challenge over on the Sparkles Monthly Blog - "Use a Real Stamp (Non-Digi)." 

Using a stencil, I ink-blended a large cloud panel with Salty Ocean DO Ink and spattered it with water. This card ended up being 5.5" x 7" and I trimmed the cloud panel to fit the 5 sides of my scored bridge card base and adhered them in place. I really like how this creates a continuous sky in this scene!

I colored two sets of Hero Arts' Tree Arch Fancy Die and glued stacked them together. Once I determined where I wanted my piñata to hang, I trimmed and scored the trees in order to fit inside. Similarly, I die cut/ ink blended two grassy border panels the scored them the same way to fit behind the trees to give me more dimension. I began the assembly by adhering the grassy panel in place inside the niche using strong two-sided tape and then added the trees in the same way. I LOVE the shadows and depth created by these trees!


The Lawn Fawn piñata was stamped/colored/die cut and hung from the tree with a piece of twine. I cut stitched Ric Rac strips using MFT Stamps' Die in colors to match my piñata and glued them together to create my bottom border. The ric rac band was reinforced by gluing it to a smaller piece of white card stock before adhering it to the card front. This really helped keep the card together since this is the pressure point necessary for stability. The sentiments and sequins were added to finish up the card. 

We can't wait to see your stamping skills over in our Sparkles Monthly Gallery!

Additional Challenges:


Thanks so much for taking the time to comment!
Rachelle

Friday, February 7, 2020

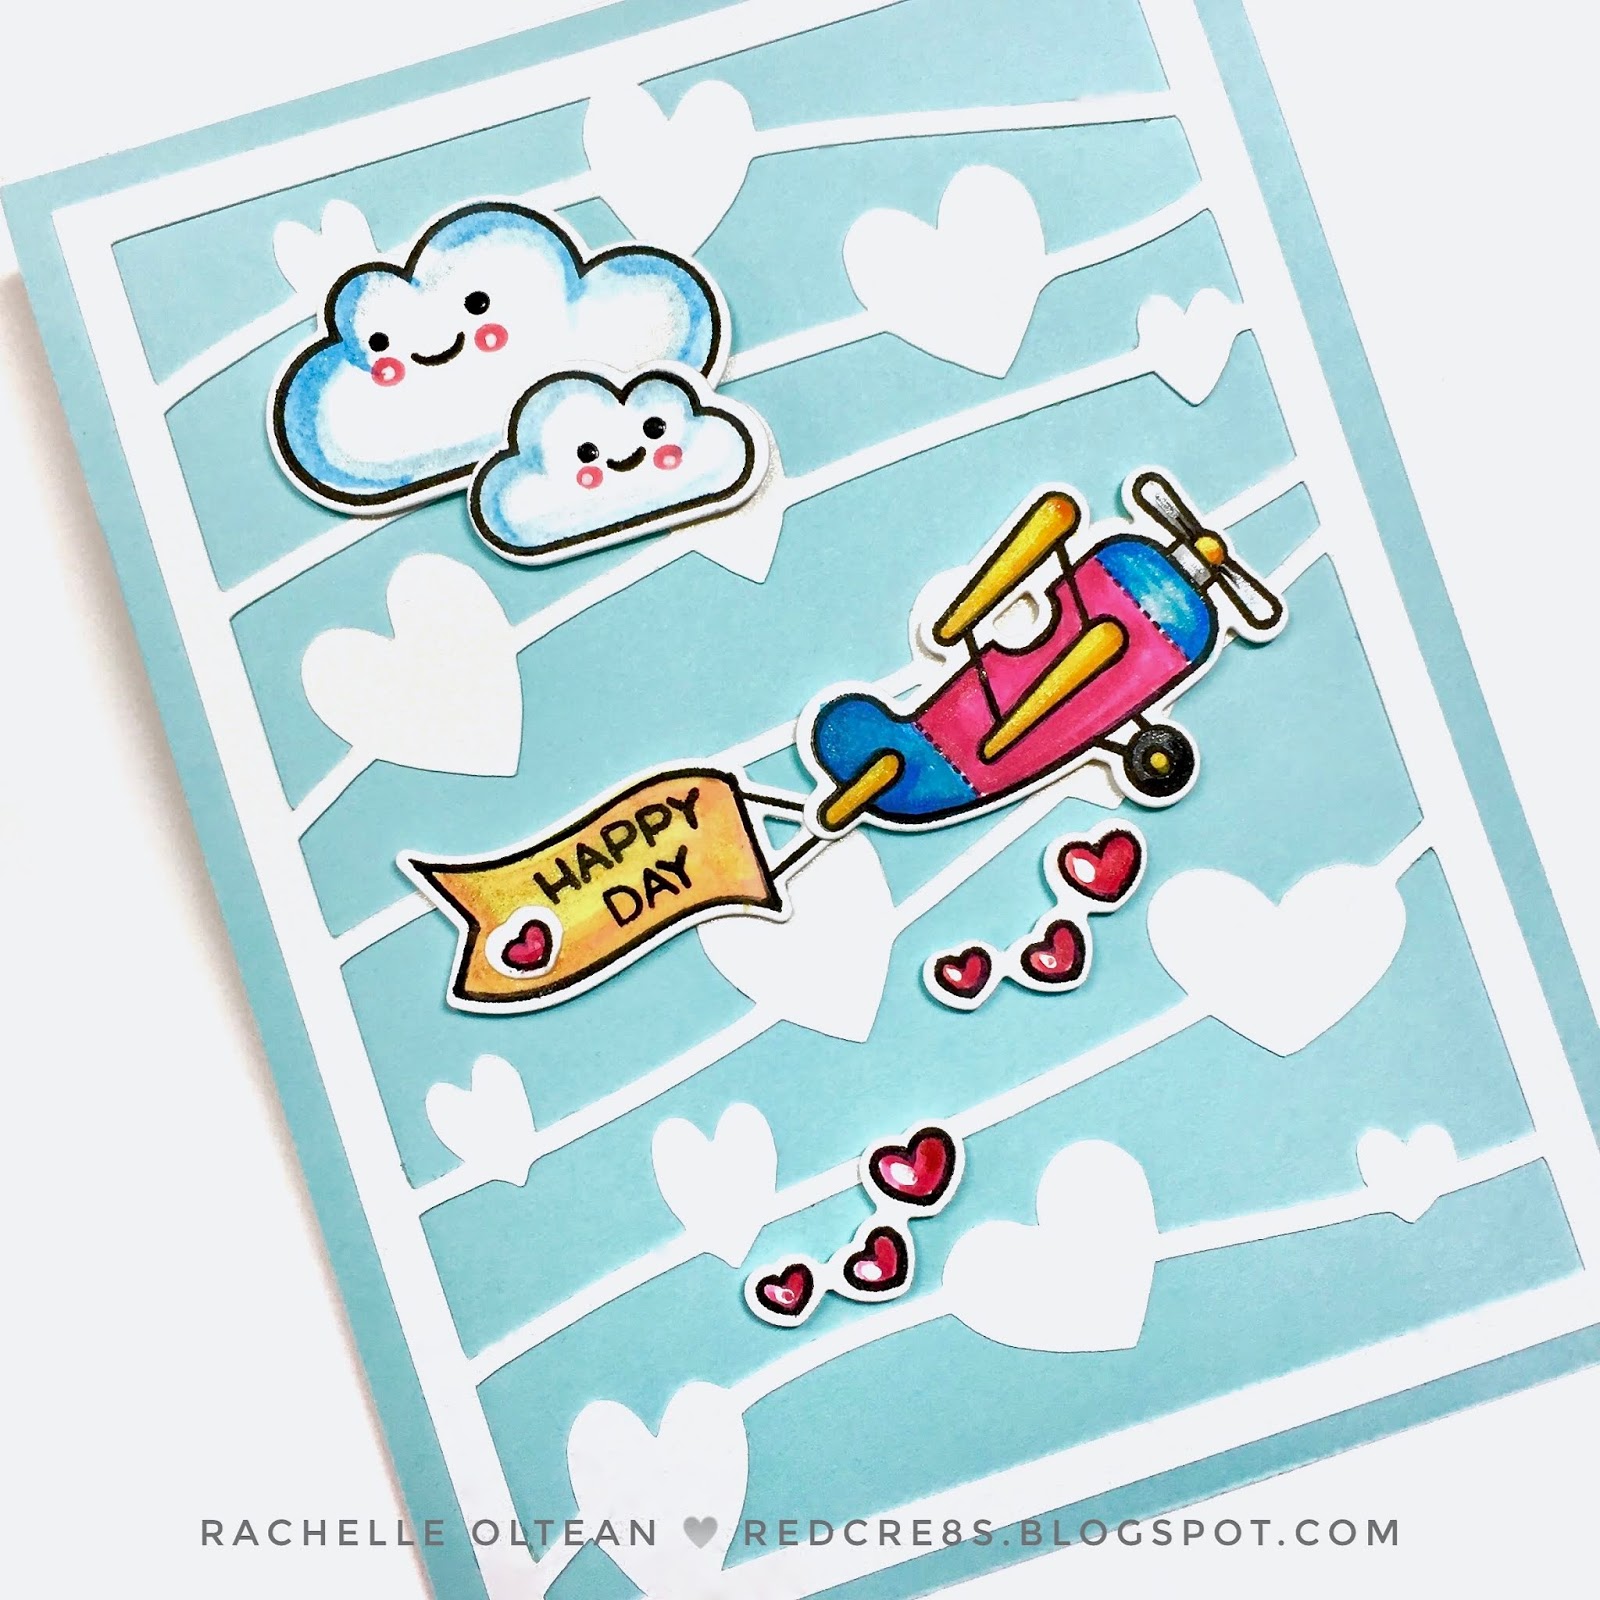
Valentine's Day | Lawn Fawn - Plane and Simple | Cut It Up! Challenge #193 - Love Is In The Air!


Hi!

We've got another great challenge for you over on the Cut It Up! Blog..."Love Is In The Air!" We would love to see your Valentine/Love creations in our gallery and don't forget the die cut! Our wonderful sponsor for this challenge, Michele Gross over at CAS-ual Fridays Stamps, has generously offered a $20 prize code for her on-line store! Her designs are sassy, fun and always on point and we truly appreciate her continued support! We can't wait to view your projects and check out the design team's awesome inspiration!

I adhered a 4.25" x 5.5" panel of sky blue cardstock to the front of a top-folding A2 card base. The floating cloud/hearts background was die cut on the Cricut (from a piece of pearlized white card stock) and carefully glued onto the blue panel. I stamped, watercolored and die cut all the images from the Lawn Fawn Set, "Plane and Simple". I die cut extra 'blanks' and glued them behind the images to provide a bit of dimension and adhered them all into place on the card front. I added a touch of black glaze pen to the eyes on the clouds and WOS to provide a bit of shimmer on all of the images! Hope to see your creations over on the Cut It Up! Challenge Blog!

Additional challenges:


Thanks so very much for stopping by and for taking the time to comment! It's greatly appreciated! : )
Rachelle

Thursday, August 29, 2019

All Occasion Card | Freshly Made Sketches #400 Milestone Celebration | Lawn Fawn - You Are Sublime


Hello!

Thanks so much for joining me today as I celebrate with the wonderful team over on the Freshly Made Sketches Blog! They are celebrating a HUGE Milestone - their #400th Sketch - and to commemorate this accomplishment, a long list of great manufacturers have been very generous and donated lots of prizes for this challenge. Please head over and check out the wonderful ideas that the design team created for this very special sketch!

I have wanted to do a pastel color way for Lawn Fawn's "You Are Sublime" for a long time and this was the perfect opportunity to combine the Lawn Fawnatics current challenge (Something See-Through) with #FMS400! I began by lightly ink blending a background using Distress Oxide Inks (Wilted Violet, Salty Ocean and Cracked Pistachio) and a bubble/wave template. I sprayed the panel with shimmer mist, spattered it with diluted inks and set it aside to dry. I also blended these same three colors on a thin strip of scrap paper and cut it in half (this gave me 2 smaller strips measuring 1/2" x 5.5"). I trimmed the stenciled panel down to 3.25" x 5.5" and die cut the frame in the middle with Lawn Fawn's Shadow Box Theater Add-On. I added more ink blending to the small positive die cut since I was going to pop it back in the middle of my underwater scene. I determined the stencil panel's placement on the front of an A-2 horizontal top-folding card base and glued the small center die cut in the correct spot. I adhered my two ink blended strips on the outside edge of the stencil panel (in reverse color order) in order to frame it with a border and backed the entire panel with craft foam.


I stamped, colored and die cut all of my Lawn Fawn images. I decided that I didn't like the white die cut edge popping off of the darker ocean background so I colored the edges to match the background tones and the images were glued into place. I really like the way this turned out - it looks more like you are peering into an aquarium with the softened image edges. I lightly ink blended Wilted Violet onto the back of heavy vellum, prepped the opposite side with my anti-static powder tool, stamped the sentiment with VersaMark Ink and heat embossed it with white powder. I die cut the sentiment and adhered it into place with a very small piece of vellum adhesive at either end. I wanted a semi-transparent effect for this sentiment strip and this technique worked very well.


I glued my little lobster into place holding onto my sentiment strip and adhered the entire front panel into place with the submarine scene lining up in the middle. The card was finished off with an assortment of iridescent bubbles from Lucy's Little Things - I love how they play off the other colors used in the card!

Thanks a million for stopping by and make sure you enter in the #FMS400 celebration!

Challenges:


Rachelle

Friday, August 23, 2019

All Occasion | Lawn Fawn - Yay Kites | Inside Shadow Box Card | Guest Designer on the Cut It Up Challenge Blog


Hello!

I am SO excited to share this card with you today as the guest designer over at the Cut It Up Challenge Blog! This challenge is entitled "Outdoor Fun" and the main rules are to use dies & follow the challenge theme. Head on over to the blog to see all of the other great ideas created by the fabulous design team!
"Yay Kites" is one of my favorite older Lawn Fawn Sets (an "oldie but a goodie" - released in Summer 2016) and I used it to create this inside shadow box card based on Jennifer McGuire's popular blog post. Thanks to Jennifer for being such a generous teacher and for sharing the tips & tricks on how to make this awesome card!

I die cut cloud stencil edgings using Lawn Fawn's "Puffy Cloud Borders" Die Set and ink blended cloud banks using Salty Ocean Distress Oxide Ink onto a panel of 100# white card stock; the panel was cut with the largest (4.25" x 5.5") Lawn Fawn "Stitched Rectangle Die." Two additional cloud banks were die cut using the largest puffy cloud border and then again with the same stitched rectangle die in order to form a seamless layered panel when adhered together! Before I glued the cloud banks to the sky panel, I added a bit of fine glitter to the outer edges of the clouds. I wanted to keep the card front simple since the scene on the inside is more detailed and I needed a kite that was a bit larger than either of the kites in the stamp set in order to get the proportions correct. So I created my own kites (see below) in PowerPoint which were similar to the stamps, printed them on cardstock, paper pieced the main kite with assorted papers and hand cut the image. 


All of the "Yay Kites" images were stamped with VersaFine Onyx Black Ink using  the MISTI, colored and die cut. I finished the front sky panel by gluing all of the images into place and set it aside to dry in a heavy book.

Next, I cut/scored both pieces of card stock needed to construct the shadow box; here are a couple of quick sketches that show the measurements/scoring instructions: (please note: card front score is a valley fold and all the score lines on the card interior are mountain folds)


I die cut my interior shape and used a 1/4" pink stitched rectangle frame as an outline. Then I put the shadow box together per Jennifer's instructions. Using the same puffy cloud stencil edging, I ink blended another sky panel (3.5" x 5.5") on white card stock with the same distress oxide ink and glued it into place on the background panel. A piece of heavy-weight vellum was die cut with the puffy cloud border and fine glitter was added to the edging; when it was dry, this die cut was adhered behind the pink frame. The rolling hillside and grassy foreground border were ink blended with Distress Oxide Inks, die cut using Lawn Fawn's Stitched Hillside Borders and Grassy Border, and adhered into the scene. 


I die cut 3 additional kite strings/rabbits from white card stock and glued/stacked them behind the stamped images; this gave me the stability I needed to assemble the rabbit holding the kite in the sky. I used strong liquid glue to adhere all of the pieces together and stuck the bunny in place with foam tape. The top of the kite was attached to the vellum cloud with a couple of small glue dots. 

The bird/kite/sky panel was attached to the card front and crystal sequins were added to the inside scene to finish up the card. I folded/refolded the card's score lines several times to make sure that the shadow box would work correctly and it held together perfectly. 


Thanks so much for joining me today - I really appreciate all of your comments!

I would also like to enter this card into the following challenges:


Rachelle

Tuesday, June 25, 2019

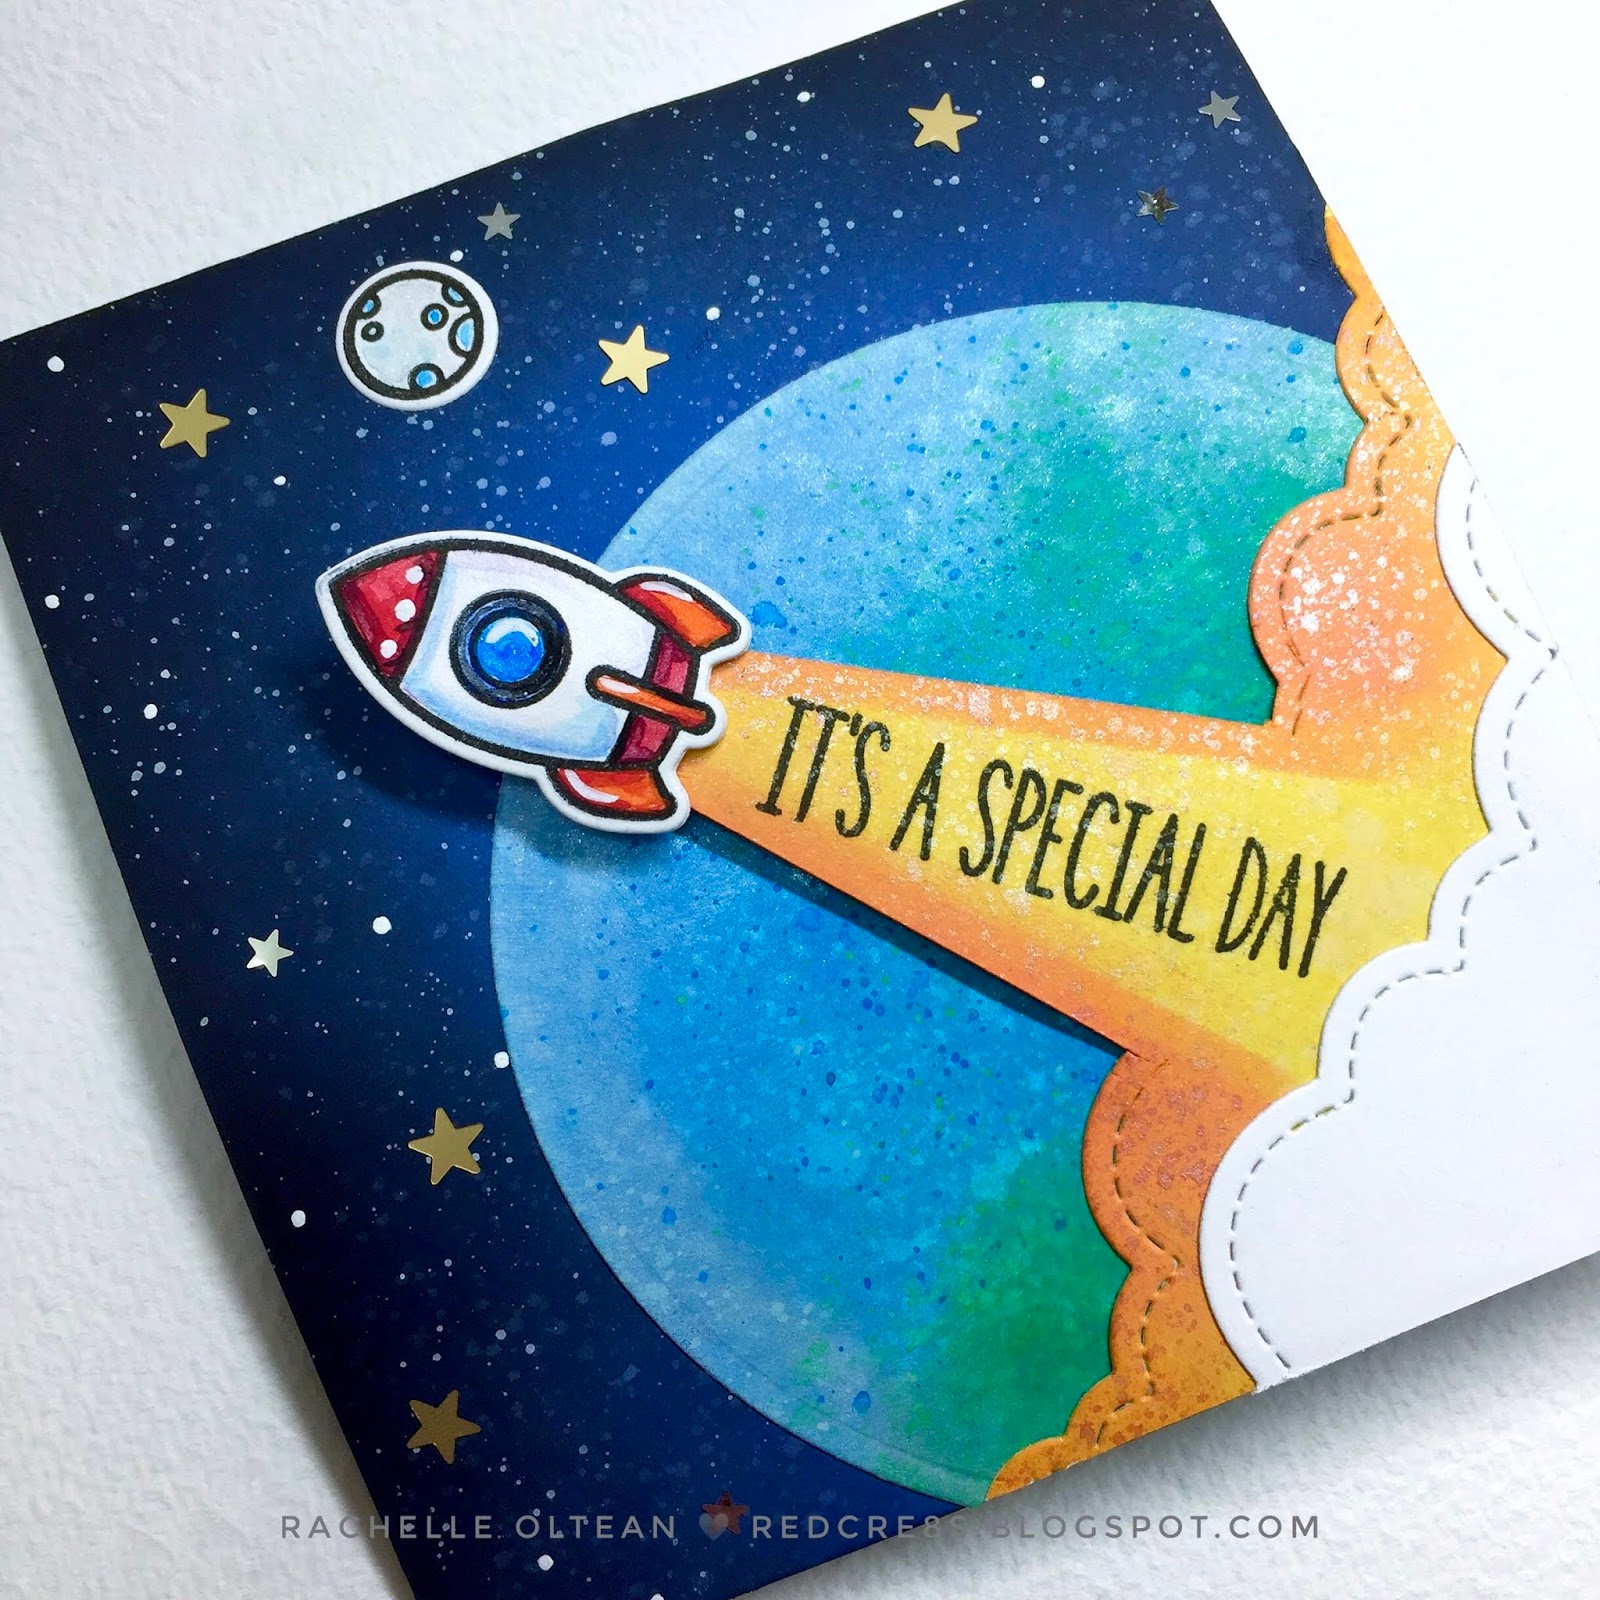
Birthday Card | Lawn Fawn - Out of This World / Explosion Pop-Up


Hello!

Thanks for stopping today...this is my first attempt at a pop-up explosion card and it's my Design Team example over at the Back To Basics and Beyond Challenge Blog. Be sure to check out the other wonderful versions of this really dynamic pop-up design this week! I used one of my favorite Lawn Fawn Stamp Sets - Out of This World, which is still as wonderful as when it was released in Spring 2017. I have always wanted to travel into space but this is probably as close as I will ever get!


This card started out as a 4.25" x 9" piece of white card stock, which was scored at 4.5", leaving the finished top-folding card sized at 4.25" x 4.5". Two letter-sized pieces of black card stock were randomly blended with Distress Oxide Inks (Salty Ocean, Blueprint Sketch, Shaded Lilac & Black Soot) to create a deep space background. Diluted inks and white watercolor were spattered to create stars and everything was spritzed with shimmer spray. I cut one piece to size and glued it to the card front. A 3.5" circle was die cut from white card stock, ink blended to look like the earth, glued to the bottom right front corner and trimmed along the edge. The space ship was stamped, colored and die cut so that I could figure out how large the rocket flame and smoke clouds should be. 

The rocket flame was ink blended using Distress Oxide Inks (Fossilized Amber & Carved Pumpkin) and partially die cut with Lawn Fawn's Puffy Cloud Borders Die. This is a great utility die set and I have used it for clouds, waves, rocket blasts, landscape shapes, tree canopies, etc. I finished cutting the flame with a craft knife and glued it into place over the earth. A piece of white card stock was die cut with the same cloud die, sprayed with shimmer mist, adhered on top and everything was trimmed from the back with a craft knife. The sentiment was stamped onto the flame and the space ship was popped into position with foam tape for added dimension. I finished the front with a sprinkling of matte gold and shiny silver stars from Lucy's Little Things and a mini moon from the Lawn Fawn set.


I cut 2 more pieces of the space background to 4.25" x 4.5" and glued them to the interior of the card. To create the pop-up explosion folding piece, I cut the other blended panel to a 6" x 6" square. This piece was folded in half one way and then the other (with the ink blending facing up) and each time the folded score line was reinforced with a teflon bone folder. This piece was folded one more time on the diagonal - see the diagram below. This diagonal score was gently coaxed into a mountain fold, which caused this entire mechanism to collapse into itself and ended up as a 3" x 3" square. The mechanism was then glued into the center of the interior on the top and bottom, making sure to leave enough room in the middle for the card to close. 
This is a good side-view photo that shows the folding pop-up.


I stamped/colored all of the planets in the stamp set and fussy cut them right next to the black outline. Using a black marker, I inked the edges of each so that when they were glued onto the space background, they would essentially disappear into sky. I did leave the outside "white" edge of the die cuts showing on the astronaut/flag/cake because I wanted that area on top of the moon landing to stand out a bit more. I die cut another 3.5" circle from white card stock and cut it in half; using a stencil with many small circles, I ink blended craters onto the surface of the moon, spritzed it with shimmer mist, stamped the sentiment and glued it into place. The spaceman and his birthday accessories were adhered onto the moon and additional gold stars were glued into the scene. There is so much visual depth inside because of the pop-up/ink blending combination!


I LOVE  how this card turned out!


I have entered this card into the following challenges:


Thanks so much for stopping by!
Rachelle 

Sunday, June 2, 2019

Anniversary Card | My Favorite Things - In Paris | CTS#324


Bonjour!

Sharing an anniversary card today that was created for CAS(E) this Sketch #324 and used a mix of MFT and Lawn Fawn Products. Here is the sketch:


So excited to announce that this card won for the CTS #324! Yippee!


I started by blending Salty Ocean Distress Oxide Ink onto white cardstock and die cut it with MFT's Stitched Dome STAX Die-namics. Two clouds (from the "Love Bugs" Set) were stamped with the same ink and die cut. The balloon and Eiffel Tower (from the "In Paris" Set) were stamped, watercolored and die cut. The word "happy" from Lawn Fawn's "happy happy happy" set was stamped/die cut; all die cuts were cut/glued/stacked together multiple times to create dimension. 

All of the pieces were placed onto the front of an A-2 top-folding card card base to determine their final layout. The dome was glued into place followed by the Eiffel Tower. The sentiment was stamped onto the card base using the MISTI and the remaining pieces were either glued or adhered onto the card with foam tape.

This card was also entered into the following challenges:


Thanks for stopping by!
Rachelle

Wednesday, March 6, 2019

All Occasion Card | Lawn Fawn - i love you(calyptus)


Hi There!


Here with an all-Lawn Fawn card today! February was my birthday month and I took advantage of Lawn Fawn’s offer of the free “Party Koala” stamp-die set. I added the recent “i love you(calyptus)” set to the order so that I could double the “Koala” fun and these two adorable sets work perfectly with each other!


I stamped, colored and die cut the bear; adding some black glaze pen for his eyes/nose and a light touch of Wink of Stella. I knew that I wanted to create a small tree-climbing scene off the right edge of my top-folding A-2 card and so I die cut a circle from a piece of 4.25” x 5.5” white card stock to get started. I used the die cut shape as my guide and built the scene on top of it. I blended two grass backgrounds with distress oxide inks and die cut them using Lawn Fawn’s “Stitched Hillside Borders” and “Grassy Border” dies. I then cut the trees using the “Birch Trees” dies and shaded then with some oxide inks, too. I cut a piece of 'Elsie' blue gingham paper from Lawn Fawn’s “Gotta Have Gingham” petite paper pack for the sky and glued that onto the circle die cut. I then continued to arrange my scene within that shape. I made a couple of small slits on the bear’s arms so that I could position him hugging onto the tree and popped him off of the background with foam tape. I adhered this scene onto the card base and trimmed off the excess from the right side. I backed the die-cut piece of card stock with craft foam and attached it onto the card front overlapping the koala scene. I stamped/die cut the banner onto pink paper with the “Bannertastic” sets and then stamped the sentiment. I stacked/glued several banner die cuts together to give it stability and glued it into place on the front. I really like how it waves into the scene! I added a die cut heart and some pink bling from Lucy’s Little Things "True Love" Crystal Collection.

Thanks for stopping by today!

Rachelle

Wednesday, January 9, 2019

Thank You Card | MFT's - Captivating Mandala


Hello!

I was lucky enough to have a bit of extra time during the Christmas holiday and was able to get out all of my thank you notes pretty quickly. This pretty snow-inspired card features the MFT’s Captivating Mandala Die. This wonderful die can be used in so many different ways but its "snowflake-look" was perfect for these thank you cards.


I started by randomly blending a background using distress oxide inks (Salty Ocean, Cracked Pistachio, Peacock Feathers, & Wilted Violet). The background was spritzed with shimmer spray, flecked with metallic watercolors and blotted with a paper towel. I created the shaped card base by partially die cutting a horizontal A-2 top-folding card base with MFT’s Elegant Rectangle Stax Die-namics. The inked background was die cut with the same shape and adhered to the card base. The mandala image was die cut once from white glitter paper and twice from heavy white card stock; these die cuts were glued/stacked together to create dimension. I wanted a simple sentiment to stretch along the bottom of the card front and chose one from Lawn Fawn’s “Simply Sentiments”. The mandala “snowflake” was glued onto the card front and it fit perfectly into the heat-embossed sentiment! The card was finished with a bit of ‘bling’ with Lucy’s Little Things’ Clear Iridescent Jewels.

Thanks for stopping by!
Rachelle

Friday, December 14, 2018

Christmas Card | MFT Stamps - Lawn Fawn - Sunny Studio Mash-up


Happy Fri-YAY!

Who doesn't love a good Christmas Card Mash-Up??? And this one features some of my favorite products from MFT, Lawn Fawn and Sunny Studio!

I started off by creating the interactive card panel (4.25" x 5.5") with Distress Oxide Inks and pearlized watercolor, which was lightly sponged through MFT's "Snowfall" Stencil. The slider mechanism was cut using Sunny Studio's Sliding Window die and the score lines reinforced using a bone folder. I adhered a piece of white shimmer card stock onto the front of an A-2 top-folding card base and blended a little oxide ink at the bottom where the sliding window would reveal the sentiment. I placed the panel over the shimmer paper and lightly marked the margins of the opening with a pencil. The sentiment was then stamped using a MISTI.

I die cut all of my snowman pieces (hat, scarf, and head) and then die cut a circle slightly larger for his body. I wanted to keep the background simple so I blended a piece of cardstock with darker oxides and cut it with Lawn Fawn's Forest Border die at the top. I adhered this to only the bottom half of the slider window so that it would pop-up when the panel was pulled.  I cut a snow drift using Lawn Fawn's Hillside Border die, blended it with the same Oxide inks and glued it to the bottom of the background panel. The snowman was assembled/glued down and finished off with black jewels for his eyes and buttons. I cut a piece of black card stock to use as the slider piece and rounded the top corners with a punch.  Two punched circles were glued to the top of the card and a piece of baker's twine finished off the pull tab.


♥ LOVE ♥ this simple interactive card!

Thanks for stopping by!
Rachelle

Monday, November 5, 2018

Birthday Card | Lawn Fawn - Out of This World


Hi!

Are you up for an ‘out-of-this-world’ color challenge? I was determined to create a space scene featuring a fiery color palette fit for birthday astronaut!

The background was blended with Distress Oxide Inks (Fossilized Amber, Wild Honey, Abandoned Coral, Wilted Violet, Seedless Preserves.) I cut a sun ray stencil from 130# card stock with my craft knife/straight edge, lightly sponged rays with pearlized white ink, moved the stencil slightly and then spattered additional rays with gold metallic water colors; this gives a real depth to the background. The background was spritzed with water and shimmer spray and blotted dry. I blended just the yellow/coral oxides onto a piece of white card stock, created heat “waves” by sponging of a curved stencil, and die cut a 4” circle from the panel. The circle was cut in half and the sentiment was stamped onto the sun using the MISTI.

Using Lawn Fawn's "Out of This World" set, I stamped, colored and die cut all of the images, keeping in mind that the lighter sides (which were all highlighted with gold metallic/pearlized watercolors) would be leaning toward the sun. A 4.25” X 5.5” piece of black cardstock was adhered to an A-2 top-folding card base and the background panel was glued down on top. The sun was backed with a piece of craft foam and adhered to the bottom of the background and all of the planets were popped up with foam tape. I glued a mix of “Itty Bitty Stars - Rainbow Delight” from Little Thing’s By Lucy onto the background and attached the astronaut onto the card with an action wobbler.


This card almost glows with a vibrant warmth and shimmer thanks to the complimentary color palette and metallic paint! Hope you like this unconventional space colorway!

Thanks!
Rachelle