Showing posts with label Avery Elle. Show all posts

Monday, July 6, 2020

Birthday Card | Avery Elle - Fairy Happy | AAA Birthday Guest Designer - Game #15 - "3D" Challenge


Yippee!


I am so excited be the Guest Designer over on the AAA Birthday Card Challenge and especially for this month's theme: "3D"! 


I decided on a 3D Easel Card design and chose the adorable "Fairy Happy" stamp set from Avery Elle to inspire my fairyland scene! This card showcases a ton of ink blending and ended up being a somewhat unusual size - 4.5" x 7" - but it still fit into an A7 envelope! 

I began by ink blending the front panel stenciled clouds with Distress Oxide Inks (Antique Linen, Tattered Rose, Warm Honey and Abandoned Coral) and used these same colors on the inside of the card. The front was scored 2.75" from the bottom to create the easel fold. The dark green panel was blended with a grass stencil, die cut with a scallop edge border and adhered to the bottom of the card front with strong 2-sided tape. 

Several stitched ovals were die cut, glued together and ink blended to provide the focal point of my scene. The Avery Elle images were all stamped, colored and die cut. I needed a few extra images and so I drew/colored my own mini mushrooms and leaves to add to the design. I glued all of the images into place and attached the completed oval panel just below the fold and only to the grass at the bottom. The flying fairy at the top was attached from behind with a small piece of acetate and I love how she hovers above the coral bells!

The word "HAPPY" was die cut 5 times, glued/stacked together and colored with a bit of ink to match the base. Once I determined the easel angle, I stamped the sentiment using the MISTI and glued the die cut stack in place. I was really pleased with this green/rose/gold color palette and the finished pop-up easel design! Hope you like it, too!


We can't wait to see your 3D creations over in the AAA Birthday Card Challenge Gallery!

Additional Challenges:


Rachelle

Friday, June 12, 2020

Birthday Card | Cut It Up! Challenge #202 - The Perfect Pet | Avery Elle - "More Furry Friends"


Yappy Birthday!

We've got some adorable critters over on the Cut It Up! Blog as we start our new challenge, "The Perfect Pet!" We would love to see your finned, feathered or furry friends in our gallery - and don't forget the die cut! The Design Team has created some amazing inspiration so be sure to check it out!

Our very generous sponsor for this challenge is Jen Jackson of Newton's Nook Designs who is offering a $20 gift code to the winner. She has a catalog of wonderful pet images!

This fluffy poodle has lost his birthday balloon but is still ready to paw-ty! I began by die cutting a hemstitched panel in kraft card stock and glued it to the front of a top-folding A2 card base. I then die cut 4 colors of card stock using the now-retired Avery Elle "Photo Mat" die. I cut a piece of white card stock just slightly smaller that the white frame and covered it with tape runner. Then I reassembled the scene like a puzzle - easy-peasy! The balloon was die cut 2X on white card stock and 1X on red. I just cut off the top and glued it onto the double-stacked white base.

The images from Avery Elle's "More Furry Friends" Stamp Set were stamped, colored & die cut. I cut a panel of turquoise paper the same size as the photo mat and used it as a shadow and then all of the components were glued into place on the front. The sentiment was stamped then I added a few gems and twine to finish the card!


Additional Challenges:


Thanks so very much for your comments - they make my day!
Rachelle

Friday, June 5, 2020

Mini Gift Bag | Avery Elle - "Peek-A-Boo Pals" | Alphabet Challenge - "E" is For Earth Bound Animals


Skadoosh!

I LOVE the Kung Fu Panda movie series and have been watching it non-stop during the pandemic lockdown - there is something uplifting about each of the movies and they just make me happy! So today I would like to share a mini tree house gift box that I designed for a panda-style birthday party!  The theme of our new Alphabet Challenge is "E" for Earth Bound Animals and we can't wait to see your critters in our gallery! The Design Team has created some beautiful projects to inspire your creativity for this challenge!

I have attached a free template of this gift box for you below! This is a versatile design because it could be used for a Thanksgiving theme (with a fall color palette and foxes or squirrels) or for a Spring/Easter gift box (with pastels and bunnies/chicks). 

I designed this box in the Cricut DS and began by cutting the following:
1 - Brown Tree Base - Sized at 11" x 5.63"
2 - Medium Green Tree Tops
2 - Dark Green Tree Tops
Multiple Leaf Colors

I think stenciling is my favorite technique and so I ink blended a wood grain pattern on all sides of the base with Gathered Twigs DO Ink, adding a bit more color along the edges for shading. I scored it (using the white dashed lines as a guide - see below) and die cut a circle about 3/4" from the top, centered in one of the larger panels. Multiple stitched scallop circles were glued/stacked and placed over the opening as a frame. 


I glued the medium/dark green tree tops together because I wanted to give this a bit more stability and to have a lighter color on the outside. I scored the leaf die cuts to give them a bit more dimension and adhered them into place with glue dots. The banner/bows were die cut, stamped and attached with foam tape to the front tree top; rosy red gems were added for a bit of sparkle. I left the back tree top panel blank. I determined the placement of the front tree top just overlapping the framed opening and drew an outline on the back side. Using this a my guide, I lined up the back tree top to mirror the front. Both pieces were then attached to the base with lots of Scor-Tape and I assembled the box.


I stamped, colored and die cut Avery Elle's "Peek-A-Boo Pals" Panda; two additional blank die cuts were glued behind the colored images to add stability. I trimmed a piece of heavy weight black card stock to fit behind the box front and lightly drew the circle opening onto it, giving me a guide for my panda placement. I popped up the bear with a little foam tape on the black panel, added 2-sided tape to the edges and pressed it to the inside of the box. I attached the balloon and paws with foam tape. I LOVE how he looks like he is popping his head out of the tree!


I punched a small hole in the top of each tree top and tied the top of the gift box together with heavy twine. Here's a side view...you can really see how I layer/stack my component images together!


Here is the template for you to copy/paste:
Additional Challenges:


Thanks so much for joining me today!
Rachelle

Friday, January 24, 2020

Get Well Card | Avery Elle - More Furry Friends & MFT Stamps - Rainy Circle Die-Namics | Cut It Up! Challenge Blog #192 "Get Well Soon!"


Hey There!

Just in time for cold and flu season, we have a very appropriate theme over on the Cut It Up! Challenge Blog:"Get Well Soon!" Our generous sponsor, Digital Delights by Louby Lou, will be offering a digital prize to the winner of this challenge and provided a great set of sentiments for the design team to use. Head on over to the CIU Blog to see the other wonderful projects that my team members have created! We hope you will join us for this challenge and don't forget the die cut! : )

I chose the "Under The Weather" sentiment for this challenge and knew that I wanted to use the MFT Die-Namics set, "Rainy Circle", to create my scene! I printed the sentiment onto 100# white card stock and die cut it with an A-2 rectangle die. The Rainy Circle was die cut above the sentiment and I ink blended this piece with Distress Oxides (Stormy Sky, Faded Jeans & Black Soot.) Using these same inks, I blended another piece of card stock to create my storm cloud and die cut it with MFT's "Cute Cloud Outlines Die-Namics". The little schnauzer from Avery Elle's (now-retired) great pet set, "More Furry Friends", was stamped, colored and die cut. The final piece of the scene was an ink blended grassy border die cut.

I lightly inked the center of an A-2 Top-Folding card base with Salty Ocean and Tumbled Glass Oxides, attached the grassy border behind the circle opening and backed the sentiment panel with craft foam. The raindrop circle, sentiment panel and storm cloud were all glued into place; the puppy was threaded through the grass and popped up with foam tape. I really like how the raindrop omits work to create a very dimensional background with this die set!

I would like to enter this card in some additional challenges:


Thanks so much for stopping by and I hope you will join us for this challenge over on the Cut It Up! Blog!

Rachelle

Monday, September 2, 2019

Birthday Card | Hello Bluebird - Pig Day & Avery Elle - Market Stand Sets | Guest Designer on the AAA Birthday Challenge Blog - Game #5 "Use a Stencil"


Hey There Birthday Fans!

I am thrilled to be the Guest Designer over on the AAA Birthday Blog for their #5 Challenge: "Use A Stencil" and to be sharing these cute Hello Bluebird critters with you! Head on over to the blog and see all of the great ideas that the designers have created for this challenge. I will have to admit that I was a little late to the stencil party (I just starting using them about a year ago!) but now my collection of designs just seems to multiply like magic in my craft closet! 


I love combining products and this card has it all: MFT Stamps' "Geometric Star Stencil" & "Elegant Rectangles Die-Namics", Lawn Fawn's "Happy Happy Happy Stamps", Avery Elle's "Market Stand Set" and the aforementioned "Pig Day" Crew! 

I began by lightly blending Shaded Lilac and Twisted Citron Distress Oxide Inks at the top and bottom of a 4.25" x 5.5" panel of white card stock - leaving a bit of the white showing through in the middle. Salty Ocean and Lucky Clover were then blended through the Geometric Star Stencil on top; diluted inks and shimmer mist were spattered/sprayed and blotted to give the panel texture. This panel was die cut using the second largest shaped die. I blended another panel using the same inks with heavier values to provide a solid color gradation and die cut it with the largest rectangle. The stenciled panel was adhered to the background with foam tape.

I partially stamped the market stand using the MISTI from the bottom up because I didn't want to use the top header board. This left the two tall supports on either side incomplete and I extended them to the height I wanted with a fine-tip black marker. I colored the stand, partially die cut the image and then trimmed the extended supports with my craft knife. I stamped the small banner in the same way - leaving the ends "open" and drew the rest of the "rope" line and fussy cut the image; the banner was colored and glued to the top of the wooden supports.


The Hello Bluebird pig, bird and balloon were all stamped, colored and die cut. I wanted the pig's arm to hang over the edge of the counter so I just made a small slit along the inside edge and slipped him into place, taping him behind the stand. A second blank die cut was glued behind the balloon to give it more stability and then glued behind the pig and onto the market stand. The sentiment die cut was glued into place and then I stamped the word "Birthday" VERY CAREFULLY using the MISTI. :)

The market stand was adhered to the stencil panel with foam tape, a light coating of Wink of Stella was applied to the images and a few sparkling gems were added to finish off the card front. In order to make a shaped top-folding card base, I placed the largest die 1/8" over the top of an A-2 size card base and cut it over the folded edge. I wanted this shaped card to 'stand' on its own but it rocked with a rounded bottom edge; so I just trimmed 1/8" (from the back panel only) and this allowed it to sit perfectly level. The entire front panel was then glued to the shaped card base.

I just love the happy images from this Hello Bluebird Set!


Thanks so much for joining me today and head over the AAA Birthday Blog and check out the other great submissions! I appreciate each and every comment :)

I have also entered this card into the following challenges:


Rachelle

Sunday, June 30, 2019

Birthday Card | Avery Elle - Photo Mat Die Set & Peek-a-Boo Pals


Hey!

Head on over to A Place To Start Challenge Blog to see all of the great Design Team examples for this month's "Anything Goes" Challenge!

I would like to share this cute lil' critter from Avery Elle's Peek-A-Boo Pals today! I combined it with the Photo Mat Die Set for a special Birthday Greeting. A piece of white card stock was trimmed for 5.5" x 3.5", lightly blended with Salty Ocean Distress Oxide Ink toward the upper middle area and backed with a piece of craft foam. I used both Salty Ocean and Twisted Citron Inks and blended two additional 4" x 4" panels - everything was spattered with diluted inks and spritzed with shimmer spray. 

The little monkey & party hat were stamped, colored and fussy cut. The photo mat was die cut from white card stock twice and the mat/clouds were stacked and glued together. The mat was die cut again from dark orange card stock, which was used as a layering shadow. I also used the photo mat die to cut the ink-blended panels in order to create the sky/grass background pieces. The monkey was glued into place behind the stack photo mat and the the background/clouds were adhered beyond him. This entire panel was backed with a piece of craft foam and set aside. The sentiment was stamped with VersaMark Ink, heat embossed with white powder and cut with a banner die; it was adhered onto the photo mat with foam tape.


A 1" strip of pattern paper was glued onto the left side of a top-folding A-2 card base and the large panel was glued on top. All of the remaining components were glued into place on an angle and the card was finished with an assortment of sequins.

I have also entered this card into the following challenges:


Thanks so much for stopping by today!
Rachelle

Monday, June 24, 2019

Birthday Card | Avery Elle - Splash

Happy Summer!


This is the first time I have used this great stamp/die set from Avery Elle, "Splash", which was introduced last summer. It had been on my wish list for months and when they had a recent sale, I snatched it up! I also used a great generic linear stamp from MFT, Whimsical Waves Background

I heat embossed the wave background stamp with white powder onto a piece of 110# Neenah Solar White Card Stock and trimmed the image in half horizontally. I ink blended over the embossing with Distress Oxide Inks (Salty Ocean, Peacock Feathers and Blueprint Sketch) keeping the ink value very light; the panel was spritzed with shimmer spray and set aside. I stamped the Avery Elle images with VersaFine Onyx Black Ink and heat embossed them with clear powder; the images were then watercolored and die cut. I glued one additional die cut to each of the bathing beauties to give them a bit more dimension and added a bit of gloss to their shades with some black gel pen.

I cut two more small panels of white card stock and ink blended along the edges with the same distress oxide inks - one had a bit more Peacock Feathers and the other more Blueprint Sketch. I then dripped small droplets of water and spattered diluted inks onto the surfaces to give it a splashy watered effect; both panels were spritzed with shimmer mist. I cut a thin strip of the darker blue color and glued it directly to the bottom of a 4.25" x 5.5" piece of card stock. I trimmed the wave panel down to 2.5" in height and glued that 1/8" above the blue strip. The aqua panel was then glued into place at the top of the card and all of the excess was trimmed from behind using a craft knife. 


I heat embossed the sentiment with white powder to a piece of light aqua vellum and trimmed it down to size. The sentiment strip and die cut images were all glued into place and the card was finished with a sprinkling of assorted sequins from Lucy's Little Things. She always has the best selection of bling and if you order directly from her website, it's almost 40% lower in price when compared to several US-based retailers. She's in England so it takes just a bit longer to arrive (and there is a monetary currency conversion to consider) so I usually wait until the dollar goes up against the British Pound and then place my order - she always throws in a free item as well!

I have submitted this card in the following challenges:

Stamping Sensations - June 2018 - Show Us Your True Colors

Dies R Us Challenge #123 - Summertime

Tinker Dream - #78 Summer

Sweet Stampin' - Summer - June 2019

C.R.A.F.T. Challenges - #518 - Summer

Daring Cardmakers - Midsummer's Day

Ellibelle's Crafty Wednesday Challenge - June /July 2019

Little Red Wagon - 6/2019 - Summer Fun

Thanks so much for joining me today!
Rachelle

Monday, June 17, 2019

Birthday Card | Avery Elle - Phonomenal / Wiper Card - A Place To Start Stencil Challenge


Hello!

I'm so excited to share my first interactive wiper card today, featuring Avery Elle's 'Phonomenal" stamp/die set! This card uses two stencil patterns and is my DT submission for the mid-month challenge over at A Place To Start Challenge Blog - head on over to see what the rest of the designers have created.

Using Ground Espresso Distress Oxide Ink, I stenciled the wood grain pattern onto a piece (4" x 8") of medium brown card stock with  Hero Arts' "Woodgrain Stencil". I spritzed the card stock with water, set it aside to dry and then glued it to a piece of 80 lb. white card stock for stability. I hand-cut my own large sun ray stencil out of 130 lb. card stock (8.5" x 11") using an Xacto knife and protractor. I blended Squeezed Lemonade Distress Oxide Ink onto a piece of 5" x 7.5" white card stock, spritzed it with water/shimmer spray and spattered it with pearlized watercolors. Here are the final cut measurements for the stenciled components:

Woodgrain - 2" x 7" - Scored at 1.5" & 2.25" | Sun Ray - 4.25" x 7" - Scored at 4.75" & 5.5"

I glued the left side of the woodgrain to the bottom of the sun ray piece and set aside to dry. I stamped/die cut all of the phonomenal images and then made a small slit in the soup bowl, which allowed me to slip a few of the toppings down into the noodles! HOW CUTE is this set??? After I determined location, I glued/popped the pieces into place with foam tape. Then I went to work on the wiper mechanism, which would hold the steam rising above the soup bowl. I experimented with a right-angled wiper arm until I came up with the correct length/height for this piece and it looked something like this: (mountain score line - the "X" is where the glue goes and it's positioned heading toward the bottom of the card base)

I did a few dry placement runs fitting the steam/wiper mechanism & finished bowl onto the card with Removable Tombow Adhesive until everything worked correctly and then all off the pieces were glued into place. The right side of the card panels were glued together and some sequins were added to the background. I heat-embossed the sentiment onto black card stock, die cut the strip and it was glued into place. "Have a Souper Birthday" was stamped onto the back of the card!

Here is short clip that shows the wiper in action! 

This card has also been entered in the following challenges:


Thanks so much for stopping by today!
Rachelle

Monday, January 14, 2019

Birthday Card | Avery Elle - Shut the Front Door


Hey There!
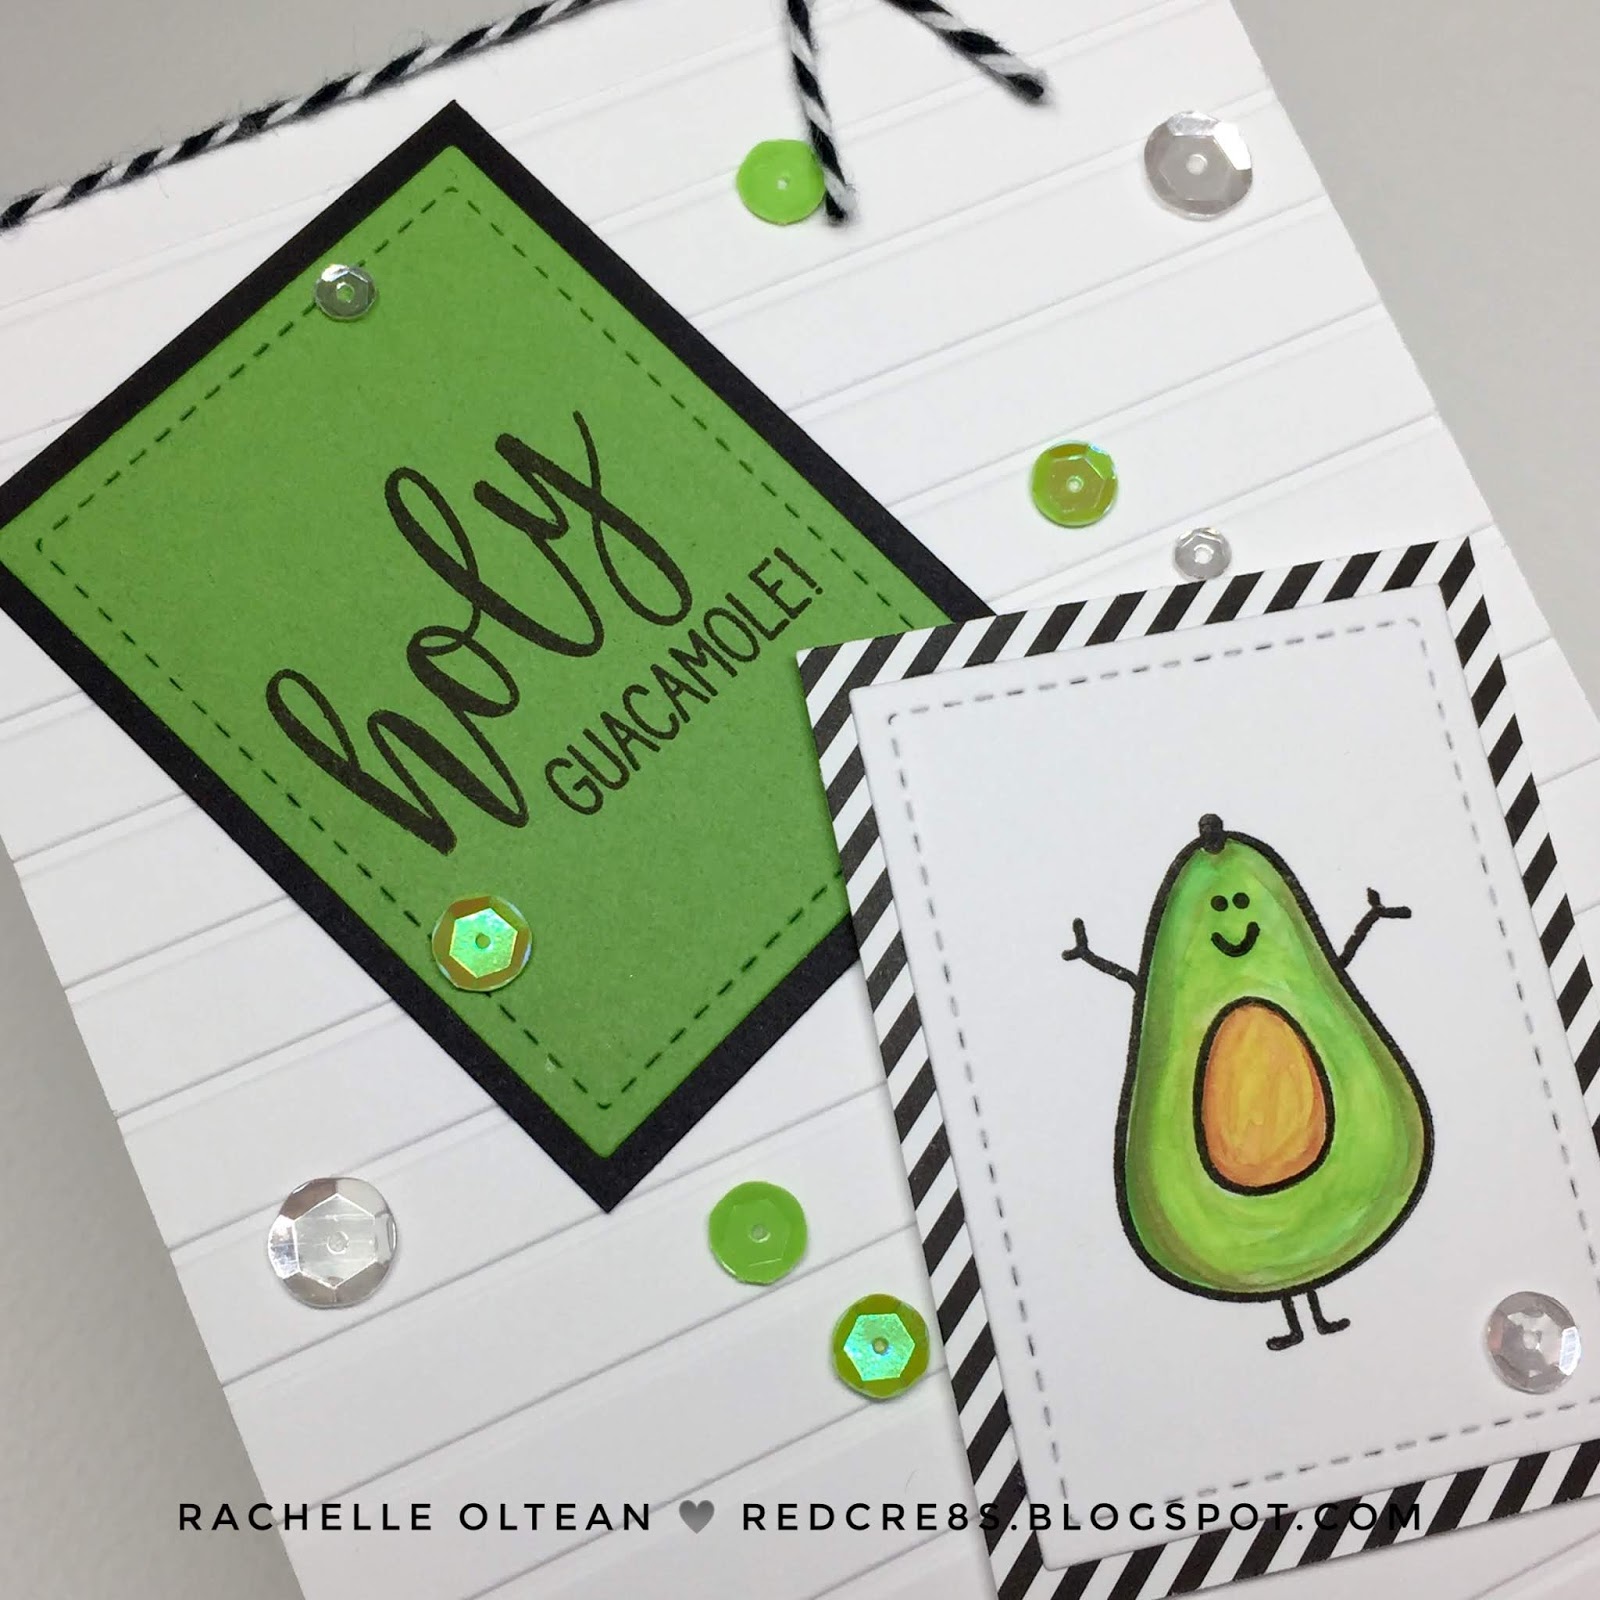
Sharing one of my favorite foods with you today…GUACAMOLE! And I love it even more when it’s featured in a birthday card using Avery Elle’s punny “Shut The Front Door” stamp set!
This CAS card starts with a top-folding A-2 white card base with a simple embossed stripe on the front. The avocado was stamped, water colored, die cut and given a bit of shimmer with a Wink of Stella. The sentiment was stamped onto green card stock and die cut. Both of these small die cut panels were then mounted onto contrasting papers. Once I had determined their placement on the card front, the sentiment was stamped using the MISTI.  The green panel was glued directly to the card front and the avocado panel was popped up with foam tape. The card was finished off with a sprinkling of assorted sequins and baker’s twine.


This card was entered into the Seize the Birthday #156 Challenge “Confetti” Topping.

Thanks for stopping by!
Rachelle

Monday, December 31, 2018

New Home Card | Avery Elle - Happy Home

Hey There!

The card today is for my niece who just bought her first home! She is a young nurse (at 24) who has been saving every penny to put towards a down payment on a house and kudos to her - she did it! This square Z-Fold card measures 5.5" (short folds 2.75") and features the Avery Elle "Happy Home" dies and "Shut the Front Door" stamp set.

The dark blue card base was scored at 2.75" & 5.5". I used Lawn Fawn's "Cloud Border Die" to create a template from heavy weight card stock, sponged the clouds onto a piece of white card stock, sprayed it with shimmer mist and cut the following pieces: (2) 2.5 x 5.25" (1) 5.25 x 5.25". These cloud background pieces were adhered onto the coordinating scored panels. The grass panel was die cut with Lawn Fawn's "Grassy Border Die" and scored at 5.5 & 8.25". Both sentiments were stamped into place with the MISTI.

The pieces for the house were die cut, embossed, and glued together onto a piece of white card stock to ensure stability. The flowers were embellished with small floral sequins and a tiny brad was added as the door "knob". The house was then glued onto the center of the large grass section and the entire piece was glued onto the left card panel only with very strong liquid adhesive. The opposite side of the grass border was aligned and glued as well to the right edge of the card - thus creating the "Z"-Fold mechanism. I created an additional interior tab behind the house, adhered MFT's "Stitched Sun" to one end of a 1/2" piece of acetate and taped the other end to the tab to create the floating sun in the sky behind the house. 

I submitted this card in the "Celebrate - Friends - Family - Life" Challenge on the "time out" CHALLENGES site.


Thanks for stopping by today!

Rachelle