Showing posts with label Anniversary. Show all posts

Tuesday, March 26, 2024

Anniversary Card | Concord & 9th - "Sweet As Pie" Bundle


Hello!

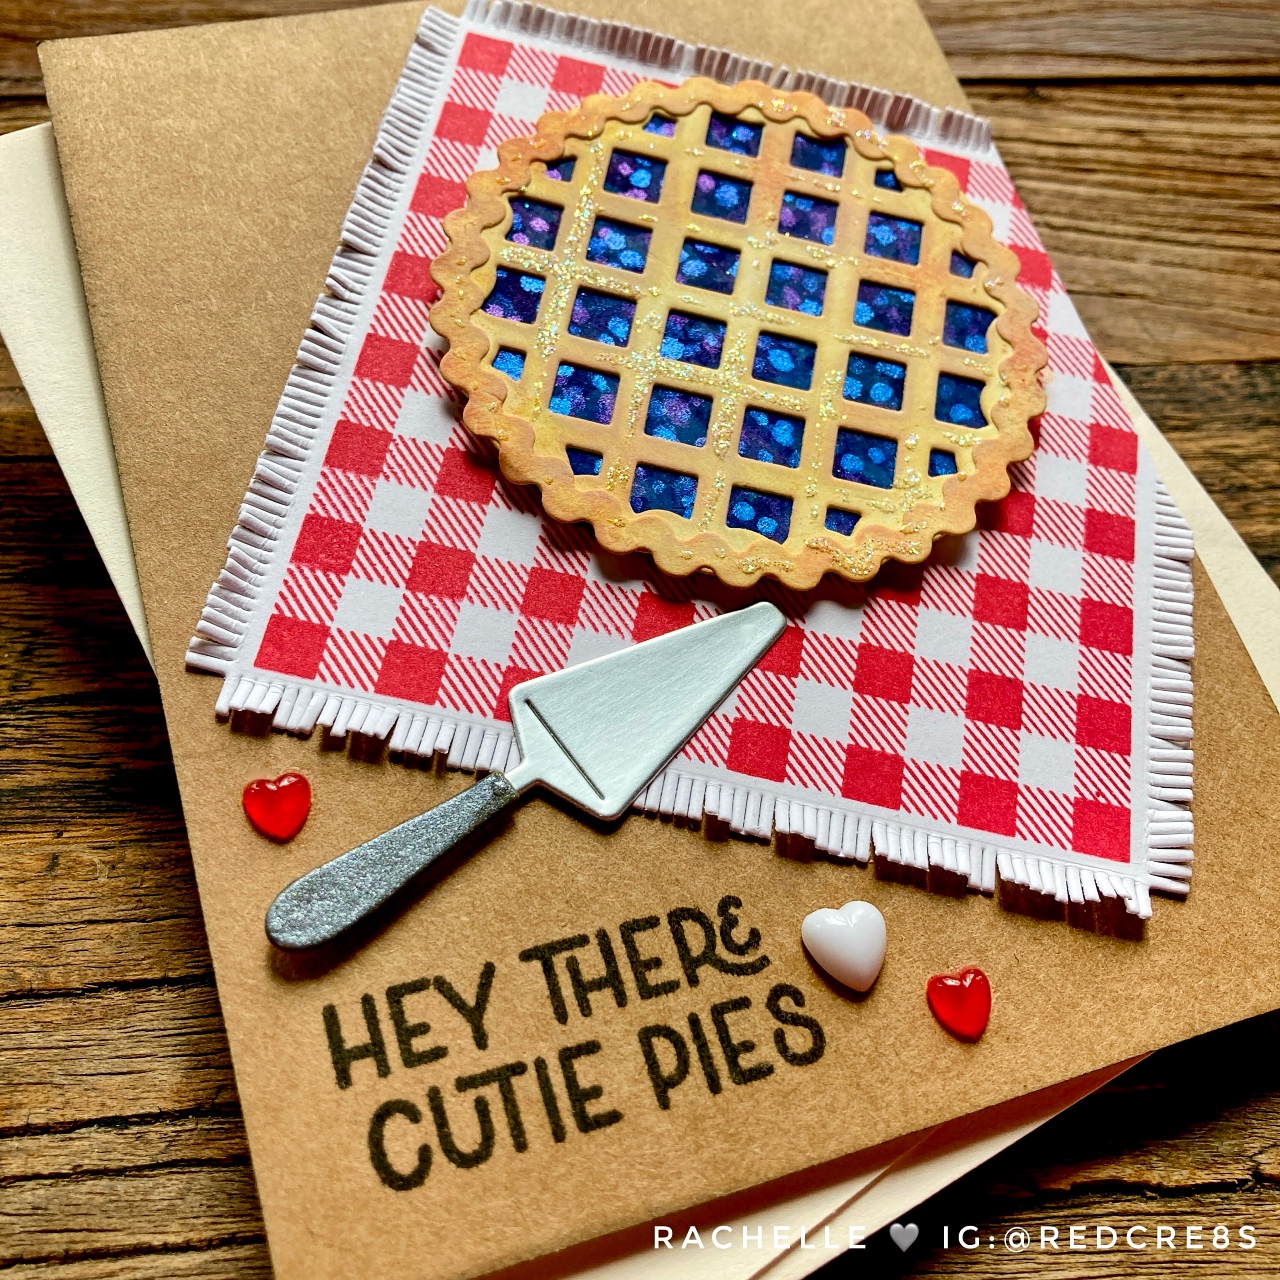
I've got a cute anniversary card for you today! This creation went out to a very special couple who celebrate their anniversary on Pi Day - 3/14/15! I couldn't resist this punny design which showcases Concord & 9th's adorable bundle, "Sweet As Pie." 

I stamped the gingham background with red die ink onto white card stock and cut it with the fringed tablecloth die. I brushed the small fringe pieces in different directions to give it more dimension and glued it to a kraft card base; the overhanging edge was cut with scissors.

I die cut the pie pieces and inked them with Distress Oxides. I added lots of tiny blueberries with pearlized watercolors on the base circle so they would show up through that detailed latticed pie crust! (see below!) The three pie pieces were glued together and a bit of sparkling glitter was added on top to highlight a sugar dusting! The pie was popped up with foam tape on top of the table cloth and the sentiment was stamped onto the background.

I die cut/assembled/attached the two small pieces for the pie server and added the small heart embellishments to finish up the card! I was so happy with the finished design on this one! YAY!


Thanks for stopping by and happy crafting!
Rachelle

Tuesday, June 27, 2023

Anniversary Card | Ellen Hutson - Whimsy Stamps - Simon Says Stamp


Hello!

I've got a real product mash-up for you today using some of my favorites from Ellen Hutson, Whimsy Stamps and Simon Says Stamp! The Mondo Gerbera Daisy Stamp Set from Ellen Hutson has long been a favorite and I watercolored it in a palette of pinks & peaches! The flower was die cut and I added an extra die cut to the back for strength.

Next, I stamped the background circular pattern on an A2 card panel using the Simon Says Stamp's "AMAZING" clear stamp set and my MISTI. The panel was spritzed with shimmer mist and spattered with gold metallic watercolor for a bit of sparkle!

I glued the background panel onto the front of an A2 top-folding card base and popped up the flower stem with foam tape. I cut the "HAPPY" Large Word Die, from Whimsy Stamps, from both black card stock and hot pink glitter paper, glued them into place and stamped the word sentiment underneath to finish up the card! I really like the abstract circle pattern in the background - it looks like both flowers and fireworks! in this design!

Thanks so much for joining me today and happy crafting! 

Rachelle 

Friday, April 9, 2021

Anniversary Card | Alphabet Challenge - "A" is for Anniversary


Hello!

Thanks so much for stopping by today as we flip the page at the end of the Alphabet once again! We are back at the letter "A" and this time it stands for "Anniversary!" I've got a special card to share with you that uses lots of my hoarded floral embellishments and pattern paper!

This is an A7 card and I began by gluing a burgundy card panel to the front. I added a Robin's Egg Blue pearl paper at the top and a gorgeous screen-printed damask pattern at the bottom. Where the two panels met, I layered horizontal bands of ribbon and lace. I adhered silk, paper and wooden flowers in place and added a hand-folded sentiment banner to finish off the card. The inside reads "Happy Anniversary" and is going to someone celebrating their 50th wedding anniversary! 

We hope to see a full gallery over at the Alphabet Challenge Blog as we begin our new trip from A-Z!

Have a great weekend and take care!

Challenges:


Rachelle

Tuesday, March 2, 2021

Anniversary Card | Hero Arts - My Monthly Hero Kit - January 2021


Hello!

As soon as I saw the first sneak peek for this Hero Arts' Kit, I knew it would go into my cart when it was available! The images are so well drawn and the sentiments are wonderful! I decided to use this set for an upcoming 6th wedding anniversary card!

I ink-blended an A2 panel along 2 sides, added a bit of extra ink through a sun ray stencil in a couple of places and splattered it with lots of water. When the panel was dry, I trimmed 1/8" off of each side and attached it to a black card base. 


The blossoms were stamped, watercolored and die cut. I heat embossed the bees with clear powder and they were all watercolored/die cut. This heat embossing really made the bees look fuzzy and intensified the illustration. I selectively combined two sentiments from the set to create my own stamped image on the front. 


I used my extra die cuts to embellish the inside panel and stamped the "Happy Anniversary" sentiment to finish up the card! I can't wait to use this set again and again - so there may be a few more bees in upcoming blog posts! Take care and thanks so much for joining me here today! I appreciate your time and encouraging comments!

Challenges:

Crafty Sentiments Designs - AG

Through The Craft Room Door - 2/23 - AG

Try It On Tuesday - Say It With Flowers

A Bit More Time To Craft - #135 - AG

A Perfect Time To Craft - #03-2021 - AG

Dream Valley Challenge #242 - Hand Colored Image

Allsorts Challenge #613 - Feminine

Crazy 4 Challenges #573 - Flowers

Krafty Chicks #548 - All Occasions Week

Simon Says Stamp - Wednesday Challenge - AG

Stay Safe! Rachelle

Thursday, July 16, 2020

Anniversary Card | Ellen Hutson - "Mondo Succulent Pot" by Julie Ebersole


Hello!

I recently snatched up some of Julie Ebersole's "Mondo" Stamp Sets over at Ellen Hutson and wanted to share this pot of beautiful succulents with you! My great-aunt and uncle are celebrating their 70th Wedding Anniversary next week and this is the card I made for them! My Aunt Phoebe is a small, sprightly Will-o'-the-Wisp who has never forgotten to send me (or anyone else in our entire family) a birthday card each and every year! I don't know about you, but those folks make it to the top of the card receiving list every time! : )

I stamped this well-drawn image onto a piece of heavy-weight kraft card stock and then enjoyed an hour or so of peaceful watercoloring. I know I've mentioned this before but I don't own a single Copic Marker and so I hand paint all of my images! The finished panel was spattered with brown and white paints and the sentiment was stamped. I glued the panel to a top-folding A-2 card base and adhered some raindrop embellishments to finish off the card. 


Thank you for stopping by today and I hope you will join me again soon! I really appreciate the time you take to comment!

Challenge Submissions:


Take care - 
Rachelle

Friday, March 20, 2020

Birthday Card | Cut It Up! Challenge #196 - "Spring Fever: Use at Least 3 Butterflies"


Here Comes Spring!

Hey Everyone! Today we are starting a new challenge over on the Cut It Up! Blog: "Spring Fever - Use at Least 3 Butterflies." I decided to go with a mix-n-match combination of several die cuts as my focus for this challenge! Our prize sponsor, Wendy from Digital Delights by Louby Loo, is offering a $5 gift code to the on-line store. The design team has designed some stunners for this challenge so head over to the Cut It Up! Blog to see their creations. We hope that you will join us and don't forget the die cut! 

Truth be told, I was a bit stumped with this challenge but once I got rolling, everthing just came together and I ended up making THREE Butterfly Cards! ; )

Card#1: 
I ink blended an A-2 sized background panel with Distress Oxides, stamped the sentiment with VersaMark Ink and heat-embossed it with white powder; this was adhered to the front of the card front. I smooshed several Distress Oxides Inks onto my craft mat, sprayed it with water and then tapped my white cardstock into the inks. Once I was happy with the coverage, I flecked it with metallic watercolors and set it aside to dry. 

I die cut the largest butterfly from white card stock several times and glued/stacked the images together. The same butterfly was cut from vellum and using my Scor-Pal, I gently scored along each side of the body - the middle-sized butterfly was cut from Louby-Lou's Digital Checked Paper and scored the same way. The vellum and pattern paper die-cuts were then glued down to the center of the base butterfly.

Using Avery Elle's Wonky Circle Frames Die, I cut/glued/stacked four die-cuts together to create some dimension. I also cut a frame from the ink-smooshed background panel and used the interior circle for the center. The frame pieces were glued into place on the card front and the triple butterfly was popped up with foam tape. A few sequins finished up the card. The mix of vellum and card stock is really effective together and the smooshed background looks like an abstract floral background!


Card #2:
I used the outside ink-smooshed frame die-cut from Card #1 as the base for this next card! I added another detailed circle frame and lightly colored the vellum with Work Lipstick DO Ink. The angled white card stock panel was die-cut with Pinkfresh Studio's "Classic Edger Die". I used the leftover smooshed background for the bottom piece and using my Scor-Pal Board, scored vertical lines on the reverse side every 1/4" to give it some textural interest. This card was assembled much in the same way as the first one and I added a small word die-cut as my sentiment.


CARD #3:
I wanted to enter the "Twofer Card Challenge #25: Spring Animals" and so I designed a totally different butterfly layout for this card! First, I ink-blended a spring-y background panel and spritzed it with shimmer spray. Then I die-cut multiples of all three butterfly dies and glued/stacked two of each size together. After the die-cuts were arranged as you see below, I took a quick picture and then used that as my guide to start adhering them down. After they were all glued into place, I simply cut the overhanging pieces off from the backside, leaving a flush edge. This panel was adhered to the front of an A-2 top-folding card base.


Using Honey Bee Stamps' "Smile" Die Set, the shadow was cut from light blue vellum and the top from a textured gold metallic card stock; the pieces were glued together and into place on the card front. Using the MISTI, the coordinating sentiment was stamped onto the butterfly die-cut and a few matte gold sequins finished up the card.


Thanks so much for sticking with me for this longer-than-usual post! 
Please stop by the Cut It Up! Challenge to check out all of the great projects and we can't wait to see all of your butterflies fluttering into our gallery!

Additional Challenges:


Thanks so much for joining me and for taking the time to comment! 
Rachelle

Sunday, June 2, 2019

Anniversary Card | My Favorite Things - In Paris | CTS#324


Bonjour!

Sharing an anniversary card today that was created for CAS(E) this Sketch #324 and used a mix of MFT and Lawn Fawn Products. Here is the sketch:


So excited to announce that this card won for the CTS #324! Yippee!


I started by blending Salty Ocean Distress Oxide Ink onto white cardstock and die cut it with MFT's Stitched Dome STAX Die-namics. Two clouds (from the "Love Bugs" Set) were stamped with the same ink and die cut. The balloon and Eiffel Tower (from the "In Paris" Set) were stamped, watercolored and die cut. The word "happy" from Lawn Fawn's "happy happy happy" set was stamped/die cut; all die cuts were cut/glued/stacked together multiple times to create dimension. 

All of the pieces were placed onto the front of an A-2 top-folding card card base to determine their final layout. The dome was glued into place followed by the Eiffel Tower. The sentiment was stamped onto the card base using the MISTI and the remaining pieces were either glued or adhered onto the card with foam tape.

This card was also entered into the following challenges:


Thanks for stopping by!
Rachelle

Wednesday, May 30, 2018

Anniversary Card | Lawn Fawn - Out of This World


This card was featured on Lawn Fawn's "Fawny Flickr Friday" series on {6.1.2018}


Happy Wednesday!

I am lucky enough to have two wonderful younger sisters (who are also redheads) and they both celebrate spring wedding anniversaries. This year I decided to make similar cards for each of them using Lawn Fawn’s “Out of This World” stamp/die sets. I love the little astronaut and wanted to find a way to use it to represent the happy couples! This large 5 x 7-inch card gave me plenty of room to design my own colorful galaxy!

I arranged all of the Lawn Fawn images onto my MISTI (allowing enough room for die cutting) and stamped them onto Strathmore Smooth Bristol using VersaFine Onyx Black Ink. I stamped these images on 6 separate pieces of Bristol so that I would have ‘extras’ for later use. I heat set the ink, water colored & die cut all of the images.  I taped down a large piece (about 7 x 8”) of cold press watercolor paper onto a cutting board and blended Distress Oxide Inks (Twisted Citron, Wilted Violet, Salty Ocean & Picked Raspberry) in separate areas, leaving white spaces in between. I flicked large water droplets onto the paper to activate the inks and dried it with a paper towel after about 20 seconds. I then used a combination of Faded Jeans and Black Soot inks to darken my space sky by blending them onto the other colors. Water and Black Magic Glimmer Mist were sprayed onto the background, dried and sprayed again until I achieved the color I wanted. Gold metallic and white opaque paint were lightly flicked onto the paper using a stiff brush, creating the stars. I like using the textured watercolor paper for this technique because of the velvety matte finish and the amazing amount of depth you can achieve with a slightly textured paper.

I wanted to provide some depth at the bottom of the card (and I also needed a place to stamp my sentiment) so I die cut cloud banks out of both velum and gray card stock from the Puffy Cloud Border die set. I lightly blended Black Soot Ink around the edges of the card stock, flicked it with silver watercolor and stamped my sentiment in VersaFine Ink. After the black and galaxy panels were adhered to the card front, I started arranging my die cuts. I wanted a way to connect the two space sweethearts together and decided to use the looped kite string from the Yay, Kites! stamp/die sets. The heart loop was stamped onto silver card stock and then die cut. I think it tethered them perfectly together in space! 

Some of the planets were glued directly to the galaxy background and others were popped up with foam tape. The cloud banks were glued down with strong double-sided tape and Wink of Stella was used to add shine to the helmets and planets; the card was finished off with a selection of Lucy's Rainbow Sparkle Jewels. The inside of the card simply read "Happy Anniversary" and included the rocket ship blasting off from the sentiment.


Here is version #2 of the card featuring my blonde brother-in-law!


Thanks for joining me and have a great day!

Rachelle