Showing posts with label My Favorite Things Stamps. Show all posts

Thursday, July 18, 2024

Birthday Card | Krafty Chicks Challenge #725 CAS


Hi!

I'm back with another CAS design for this week's theme over at the Krafty Chicks Challenge and as usual, I needed a few more birthday cards! This older monster set from MFT needed a little love and I chose to pair this happy guy with a variegated washi tape border underneath and a simple stamped sentiment to finish the cards! Easy Peasy! Sometimes I just need a well-designed birthday card that doesn't require special padding and extra postage - this one fits the bill! (I know I could have added googly eyes for my little great-nephews, but I restrained myself!)


I love seeing your CAS creations so please and link them up over at challenge #725 this week and be sure to head over to the Krafty Chicks' Blogs and leave them some love!

Thursday, April 25, 2024

Valentine's Day Card | MFT - Pure Innocence "Love You Bunches" | Krafty Chicks Challenge #713 - All Occasions


Hello!

Here's a CAS paper piecing project for "All Occasions" week at the Krafty Chicks Challenge! This 'Pure Innocence' cutie is entitled  "Love You Bunches" and while this card could be used for lots of different reasons, I sent out several of these for Valentine's Day!

The image was stamped both on white and polka dot papers with VersaFine Ink. The dotted dress was fussy cut and set aside. I watercolored and die cut the PI image, adding one additional blank die cut to the back. The dotted dress was glued onto the watercolor image and backed with foam dots.

I die cut the pink card stock strip with a border die. trimmed it to fit an A2 card front and adhered it into place. I popped the image on top, stamped the sentiment and added several translucent pink hearts to finish up this card! I hope you'll head over and join us this week with your All Occasion Projects!

The Krafty Chicks'!

Tuesday, January 16, 2024

Birthday Card | MFT Stamps Color Challenge #227


Hello!

Here's a "RAWRSOME" birthday card featuring the palette from the MFT Stamps Current Color Challenge! I used a now-retired stamp set, "Delightful Dinosaurs",  and paired it with lots of die cuts to create this window design! This great challenge color palette was perfect for this adorable brontosaurus hanging on to his bright red balloon!


Thanks for stopping by today and happy crafting!
Rachelle

Tuesday, July 4, 2023

Birthday Cards | MFT Stamps - "Picture Perfect Party Animals" Stamp Set


Hello!

I've got tons of late summer birthdays and so it's time to start cranking out the cards! I shopped my stash for some fun kids' imagery and landed on the older MFT Stamps' "BB Perfect Party Animals" Stamp Set! I've had this set for a few years and don't know why I waited so long to use it because I had a blast coloring these cuties!! 


I began by inking the background with Pink & Main's "Rainbow Fun" Stencil and four Catherine Pooler Inks. I sprayed the background panels with shimmer mist and spattered them with several colors of metallic watercolors - they really shine in the light! The panels were trimmed to 4" x 5.25" and adhered onto a top-folding A2 card base.


The party animal images were stamped onto 100# white card stock, watercolored and trimmed around the square frame. I die cut the photo frames with an inset window, inserted the colored images into the opening and stamped the sentiment at the bottom. 


I stamped/die cut the words "Happy", glued them each to a black die cut and attached them to the top of the photo frames. A black shadow frame was adhered to the card front, the party animal toppers were popped up with foam tape and a few rainbow sequins finished up this fun card set!

Thanks for stopping by & happy crafting!
Rachelle

CHALLENGES:


Friday, October 29, 2021

Picket Fence Studios - MFT Stamps Collaboration


Happy Friday! 

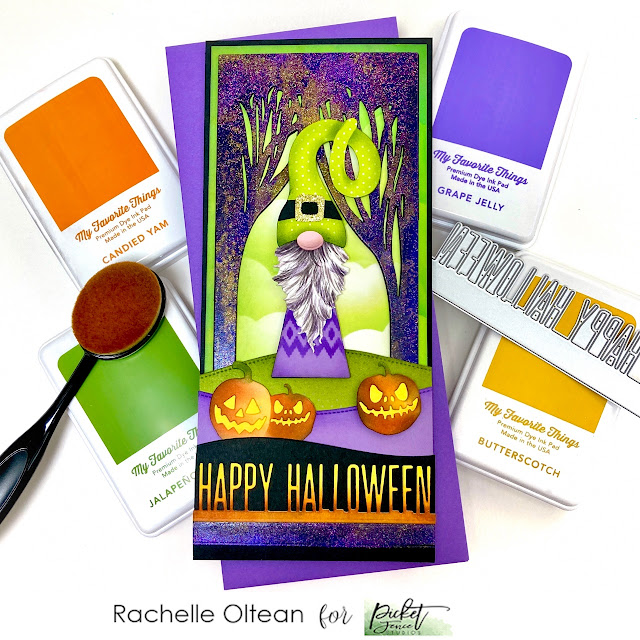
Picket Fence Studios has joined forces with MFT Stamps today for a creative collaboration! The PFS Design Team received ink pads/pattern paper to use and I had so much fun ink blending on both of my projects! I have been an MFT customer for many years and love their stamps/dies/pattern paper but I had never purchased any of their inks - now I can't wait to add more to my collection! The colors are so intense (with really juicy ink pads) and they blend beautifully with Picket Fence's "Life Changing Blender Brushes".

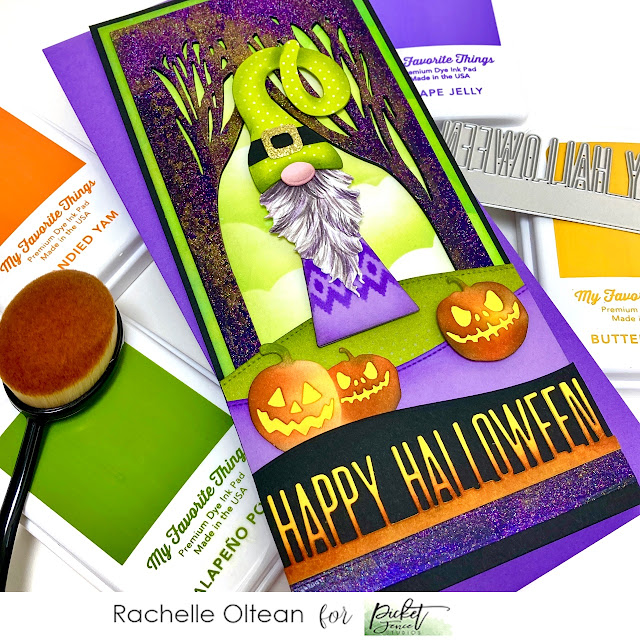
I have had this idea for a spooky forest scene ever since I saw the "Billy The Gnome" Die Set and this was the perfect opportunity to add some great detailing with MFT's "Premium Dye Inks! This ink quartet - "Candied Yam", "JalapeƱo Popper", "Butterscotch", and "Grape Jelly" - created the perfect Halloween palette!  
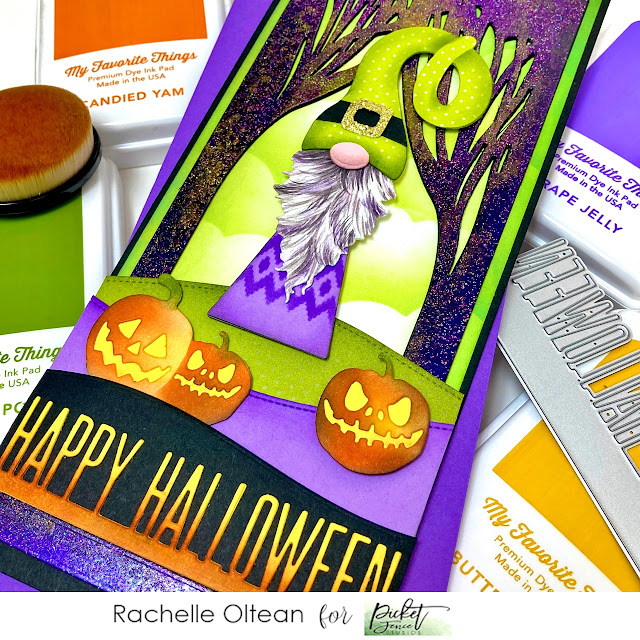

I began by die cutting "Billy" from several different card stocks and his hat from MFT's lime green pattern paper from the "Poppin' Polka Dots" Paper Pad. I added ink shading/pattern to the various pieces and painted the beard details with watercolors; all the pieces were assembled together with liquid adhesive. Using the "Scarecrow Cover Plate Die", I die cut just the row of pumpkins from the image and fussy cut them apart. The pumpkins were blended with the MFT Inks and backed with yellow card stock pieces to cover the omits. Sloped pieces of black, purple and green card stock were die cut; ink blended shading was added. I also ink blended the green sky background, trimmed this finished panel down to 3.75" x 8.75" and attached it to a black slim line card base. My final ink blending was on the "Happy Halloween" Word Topper Die.


To create the sparkly purple forest, I randomly blended two Paper Glitz colors (Purple Prism & Fall Gold) around the edges of a piece of black card stock measuring 10" x 6" and set it aside to dry. After about 30 minutes, it was ready to cut using the "Slim Line Trees Silhouette Cover Plate Die". The purple tree silhouette was glued onto the green sky panel.


Then it was time to assemble all of the remaining die cuts in the scene from the back to the front ending with the "Word Topper" on the black sloped piece at the bottom! I just love Billy as a bewitched Halloween gnome!


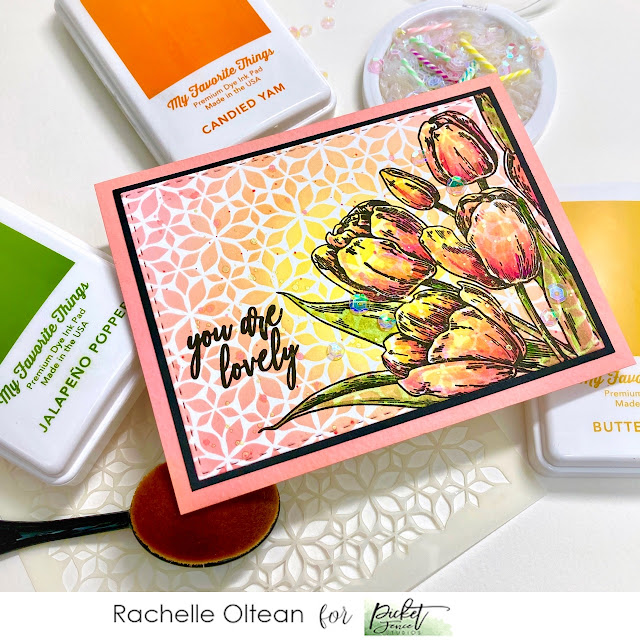
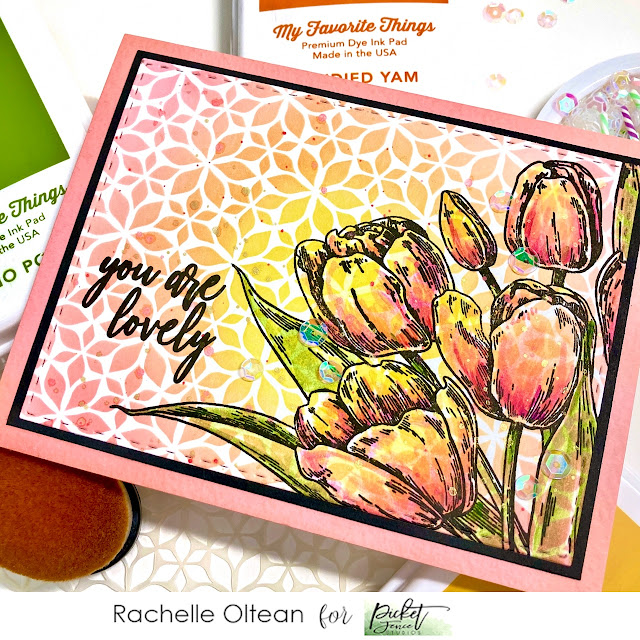
For my second project, I used the MFT Inks to stencil a soft background ("Flowers Stencil") with a warm glow in the center. I then stamped the large floral image from the "Early Tulip Bouquet" Stamp Set on top of the background and added touches of transparent watercolor so that the pattern would come through. The finished panel was die cut and attached to a skinny black mat, which was glued onto a pale peach card base. The sentiment was stamped using my MISTI and a sprinkling of sequins from the NEW "Birthday Candles" Sequin Mix Plus finished up this card.


Thanks so much for stopping by today and be sure to check out all of the great projects created by both Design Teams! There's also a great giveaway - each company is giving away a $50 gift certificate to use in their respective stores so be sure to leave a comment or two for a chance to win! Here are the links:


Have a great weekend and happy crafting!
Hugs - Rachelle

Monday, August 2, 2021

Birthday Card | Guest Designer Spot - AAA Birthday Challenge "Game #28 - Photo Challenge"


Hello and Happy Monday!

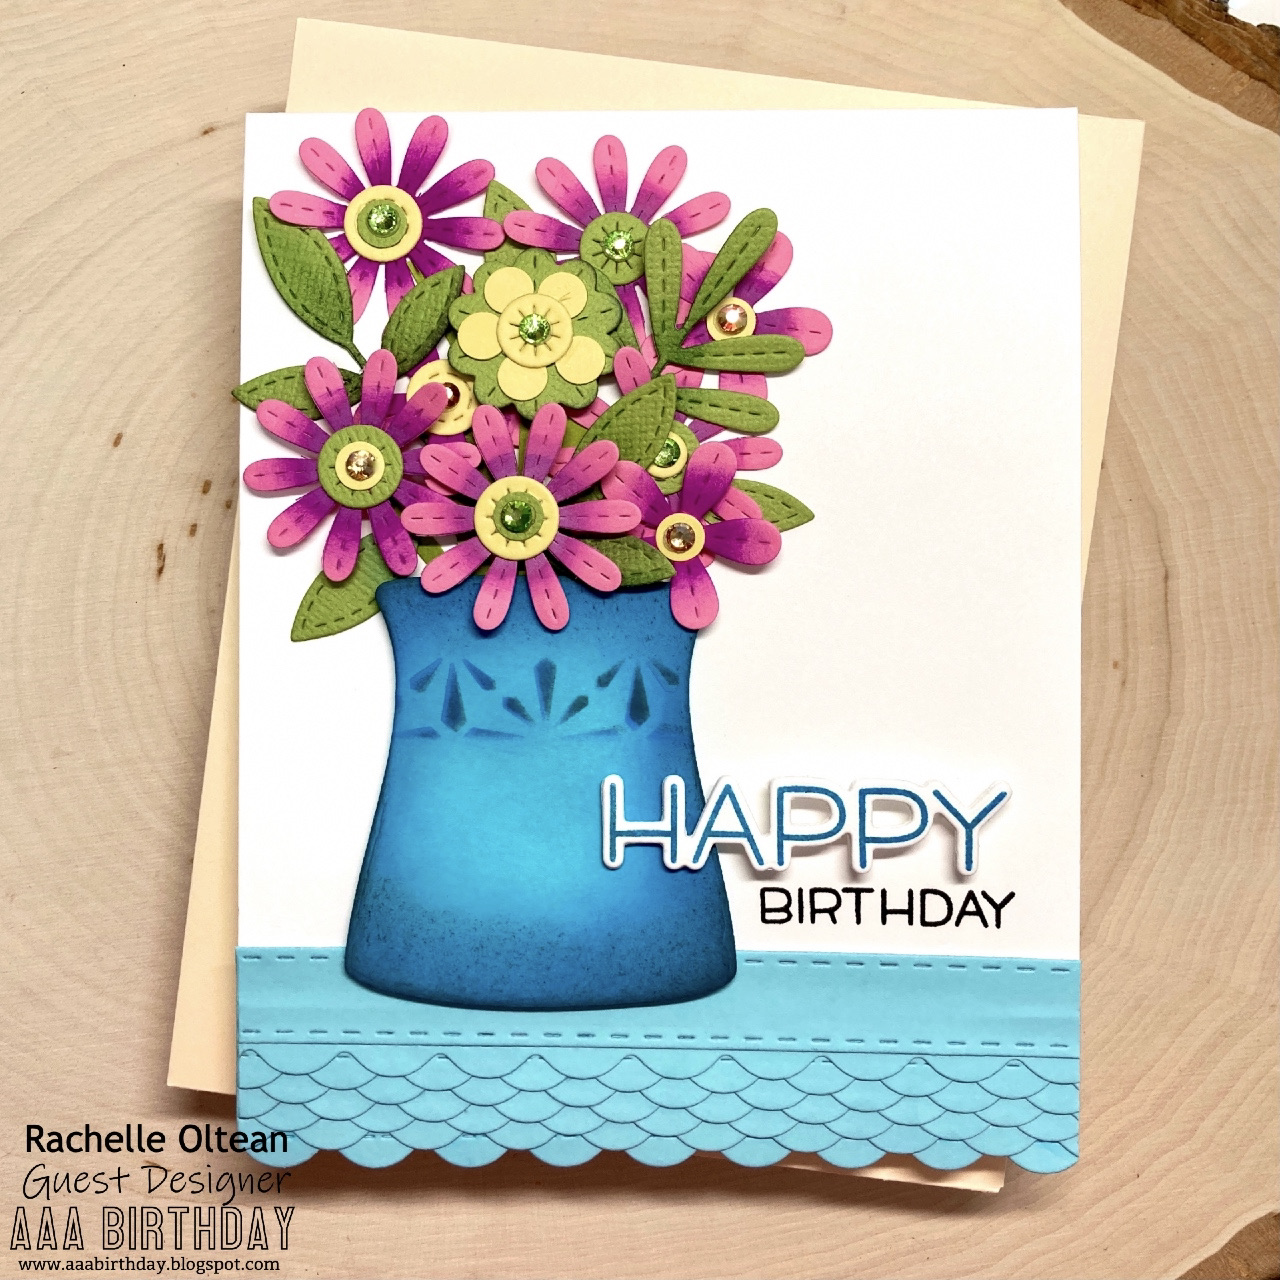
I'm so excited to be joining the AAA Birthday Challenge Team this month as the Guest Designer and we've got a great photo challenge for Game #28! Here's the inspiration pic - isn't it pretty?!


I chose to focus on the beautiful ceramic vase filled to the brim with those gorgeous pink flowers and the ruffled edge on that perfectly iced cake! It's almost too pretty to cut into! I began by die cutting lots of flowers and ric rac using retired MFT Die Sets. I inked the edges of the flowers/leaves to give them a bit more detail and stenciled a pattern onto one of the Altenew Vase dies. 

Then it was time to assemble! I began by gluing the aqua ric rac pieces to the bottom of an A2-sized card front. I attached the vase on top with foam tape and this gave me room to create my die cut bouquet, which was adhered into place with glue/foam tape. I stamped/die cut the word "HAPPY" from Lawn Fawn, stamped the rest of sentiment using my MISTI and added some gems from Picket Fence Studios to finish up this floral birthday card! I hope you'll join us for this AAA Birthday Card Challenge!

Thanks so much for stopping by and I hope you have a wonderful week!
Rachelle

Monday, July 26, 2021

All Occasion Card | Die Cut Mash Up!


Happy Monday!

Here's a card that mixes-n-matches products from Ellen Hutson, MFT Stamps and The Greetery! It's so much fun when you have an idea for a design and you are able to dig through your stash to find everything you need to make it happen! 

I started by ink blending five bases for my rainbow with Distress Oxide Ink mid-tones - Fired Brick, Spiced Marmalade, Peeled Paint, Broken China, and Dusty Concord. I also blended the background from a mix of Tumbled Glass/Salty Ocean and all of the panels were sprayed with shimmer mist and spattered with water. I just love how the rainbow colors look together on these inked panels!


I cut the entire rainbow from each color (using a retired MFT Stamps stitched rainbow die) and saved all of the extra pieces for future projects! The heart from the Ellen Hutson's "High Five" Die Set was cut from a scrap piece of the Fired Brick panel. The frame was cut three times using the largest "Crimped Frame Die" from The Greetery and the pieces were glued together for strength and dimension. This frame was backed with the Salty Ocean panel and attached to the front of an A2 card base.

The largest hands from Ellen Hutson's "Hands" Die Set were cut, lightly inked and attached at the bottom only, leaving the hands free. I glued the pieces of my rainbow to a scrap piece of card stock and carefully fussy cut around the entire shape. The rainbow was adhered into place behind the open hands and the heat embossed/die cut sentiment from Ellen Hutson's "Hang On" Stamp Set was attached on top of the frame. The heart was popped into place with foam tape and I added some sequins to finish up the card!

Challenges:


Thanks so much for stopping by and I hope your week is off to a great start!

Happy Crafting - Rachelle

Friday, December 18, 2020

Christmas Card | Alphabet Challenge - "S" is for "Snow Scene"


Happy Friday before Christmas!

I've got a great mixed product mash-up for you today as we start a new challenge over on the Alphabet Blog! This time "S" is for Snow Scene and this little yeti is chillin' with a warm beverage on a cold winter's day! 

There was quite a bit of prepping all of the pieces to get this card to come together because I pulled so many things from my stash! I stamped, colored and die cut the images from the now-retired "To My Beastie" from MFT Stamps and Ellen Hutson's "Lil' 'Squatch". The slimline panels from Sunny Studios were die cut/inked with Distress Oxides (Spun Sugar, Tumbled Glass & Dusty Concord) and the sentiment was stamped onto the snowbank. I also ink-blended the front of a slimline card base with DO "Evergreen Bough". The scripty word from MFT Stamps' "Believe" Die-Namics and nativity star from MFT Stamps' "Little Town of Bethlehem" Die-Namics were die cut from heavy white card stock.

Then it was time to assemble! I glued all of the slimline panels together first, added a couple of smaller pine tree silhouette die cuts to the left side and then attached the large trees/yeti with foam tape. The scripty word/star die cuts were glued onto the sky panel and I added an iridescent gem to dot the "i". The completed front panel was glued onto the slimline card base to finish things up! 


We can't wait to see your SNOW SCENES over on the Alphabet Challenge Blog! Thanks so much for stopping by and stay safe!

Additional Challenges:

Simon Says Stamp Wednesday Challenge: Christmas Critters

Sisterhood of Crafters - Anything Goes - Christmas/Winter

Watercooler Wednesday #302 - Anything Goes 

A Perfect Time To Craft #12 - 2020 - AG

Crafter's Cafe #257 - Holidays

Sparkles Forum Christmas #119 - Non-Traditional Christmas Colors

Christmas With The Cuties #45 - Have Yourself a Merry Little Christmas

Rachelle

Friday, December 4, 2020

All Occasion Card | Alphabet Challenge - "R" is for Rainbow | Picket Fence Studios - Sunshine Friends "Great Day"


Happy Fri-YAY!

We have a positively radiant theme beginning today over on the Alphabet Challenge Blog - "R" is for RAINBOW! We can't wait to see your interpretation of a multicolored project! I chose to color one of Picket Fence Studio's Sunshine Friends - "Great Day" - with rainbow-inspired petals!

I stamped, colored and fussy cut the image. The sunny background was ink-blended onto the front of an A2 top-folding card base and spattered with gold watercolors; a strip of pattern paper was added at the bottom.


I stenciled a sunray pattern onto a piece of white card stock measuring 4 x 4.5" and die cut the circle opening. This panel was backed with craft foam and adhered onto the card front. The rainbow girl was popped into place with layers of foam tape and the heat embossed sentiment strip/sequins were added to finish the card. I think we could all use a some rainbows in our lives right now and this little cutie fits the bill perfectly! We hope to see lots of color in our Alphabet Challenge Gallery!

Additional Challenges:


Rachelle ♥ 

Wednesday, November 25, 2020

One Word Wednesday - "Peace" | MFT Stamps - "Little Town of Bethlehem" Dienamics


Hello!

Thanks so much for stopping by today - I haven't done a "One Word Wednesday" for a while and decided to share this die cut Christmas card featuring the "Little Town of Bethlehem" Die-namics Set from MFT! I created the scripty "Peace" frame in the Cricut Design Space to highlight the die cut layers and that image is shown below for you to copy and paste for your own use!

I began by doing some very basic ink blending on a piece of medium gray cardstock using Salty Ocean and Blueprint Sketch Distress Oxide Inks. The A2 panel was spritzed with shimmer mist and flecked with white pearlized paint in the upper right corner. The Bethlehem layers were cut from three values of brown card stock and glued to the blue panel. 


The white script frame was attached on top of the scene and a pearlized die cut was added to accent the star. This panel was adhered to a top-folding A2 card base and a few sequins finished up the card. This night sky really sparkles down onto the city below! Here is the frame image:


Thanks so much for stopping by today and for sharing your comments - they truly brighten my day! : )

Challenge Submissions:


Rachelle

Sunday, November 15, 2020

Christmas Card | Sparkles Challenge #134 - "Use A Stencil"


Hi!

Our November theme over at the Sparkles Monthly Challenge is one of my favorites - "Use a Stencil"  and  I decided to use one of my tried-n-true patterns...a random dotted snowfall in this pink and green winter scene! 

The pink background was blended with Spun Sugar Distress Oxide Ink, the dots with Picked Raspberry and the entire piece was spritzed with shimmer mist. Once dry, I attached the circle die cut panel on top and glued everything to the front of a top-folding A2 card base. 

The mouse and tree were stamped, colored and die cut. I added a paper-pieced present to the mouse instead of the basket that is attached to the original image to fit into my Christmas scene! The die cut sentiment strip was glued to the front and the tree/mouse were adhered into place on top. I glued an iridescent star to the tree top and die cut snowflakes/assorted gems were added last.  

We can't wait to see your stencil projects in our Sparkles Challenge Gallery!

Additional Challenges:

A Gem of A Challenge #23 - Anything Goes

Aud Sentiments #264 Christmas/Winter Animals + A Sentiment

Craft Rocket #76 - Christmas/Winter


Friday, November 6, 2020

Birthday Card | Alphabet Challenge - 10th Year Birthday "P" is for PARTY!


Oooh La La - It's PARTY TIME!!!

We are celebrating a giant milestone at the Alphabet Challenge - it's our 10th birthday and we're still going strong!!! So our "P" is for PARTY and we hope that you will celebrate with us for this special challenge! I "Cased" my friend Michele Ferguson over at "I Card Everyone" for this French-themed scene! Michele is on the Ellen Hutson Design Team and she created this adorable Frenchie Dachshund entitled "Bone Jour" - - - -> 


I decided to take it one step further so this "Clever Sausage" is enjoying a sunny day in front of the Eiffel Tower! I combined the now-retired MFT Stamp Set "In Paris" (released in January of 2018) with Ellen Hutson's "Clever Sausage" for this slimline card. The black scallop panel was cut with the Cricut and glued to the white 9" x 4" card base. I ink-blended the background with Distress Oxides, trimmed it to size and glued that onto the scallop panel. All of the images were stamped, colored and die cut - then everything was adhered onto the blended background. I also added my own beret and red handkerchief to this dashing dachshund! : )

I die cut/glued on the "Oooh La La" letters, added the heat embossed sentiment and a scattering of turquoise sequins to bling-up the finished card! 

Thanks so much for joining me today and I hope that you will come to our PARTY over on the Alphabet Challenge!

Additional Challenges:

Crafty Creations #415 - Anything Goes

Little Red Wagon #574 - Colour Me Happy!

Cardz 4 Guys #257 - Birthday for an Adult Male

Retro Rubber #147 - Anything Goes

2 Crafty Critter Crazies #44 - Anything Goes

Mix It Up Challenge #43 - Make Your Own Background

613 Avenue Create - November 2020 - AG/Opt Twist - Cute Critters

Krafty Chicks Challenge #532 - Stamp Act

Rachelle

Sunday, November 1, 2020

Christmas Card | Merry Little Christmas Challenge | Graciellie Design - "Wonderful Winter"


Hello!

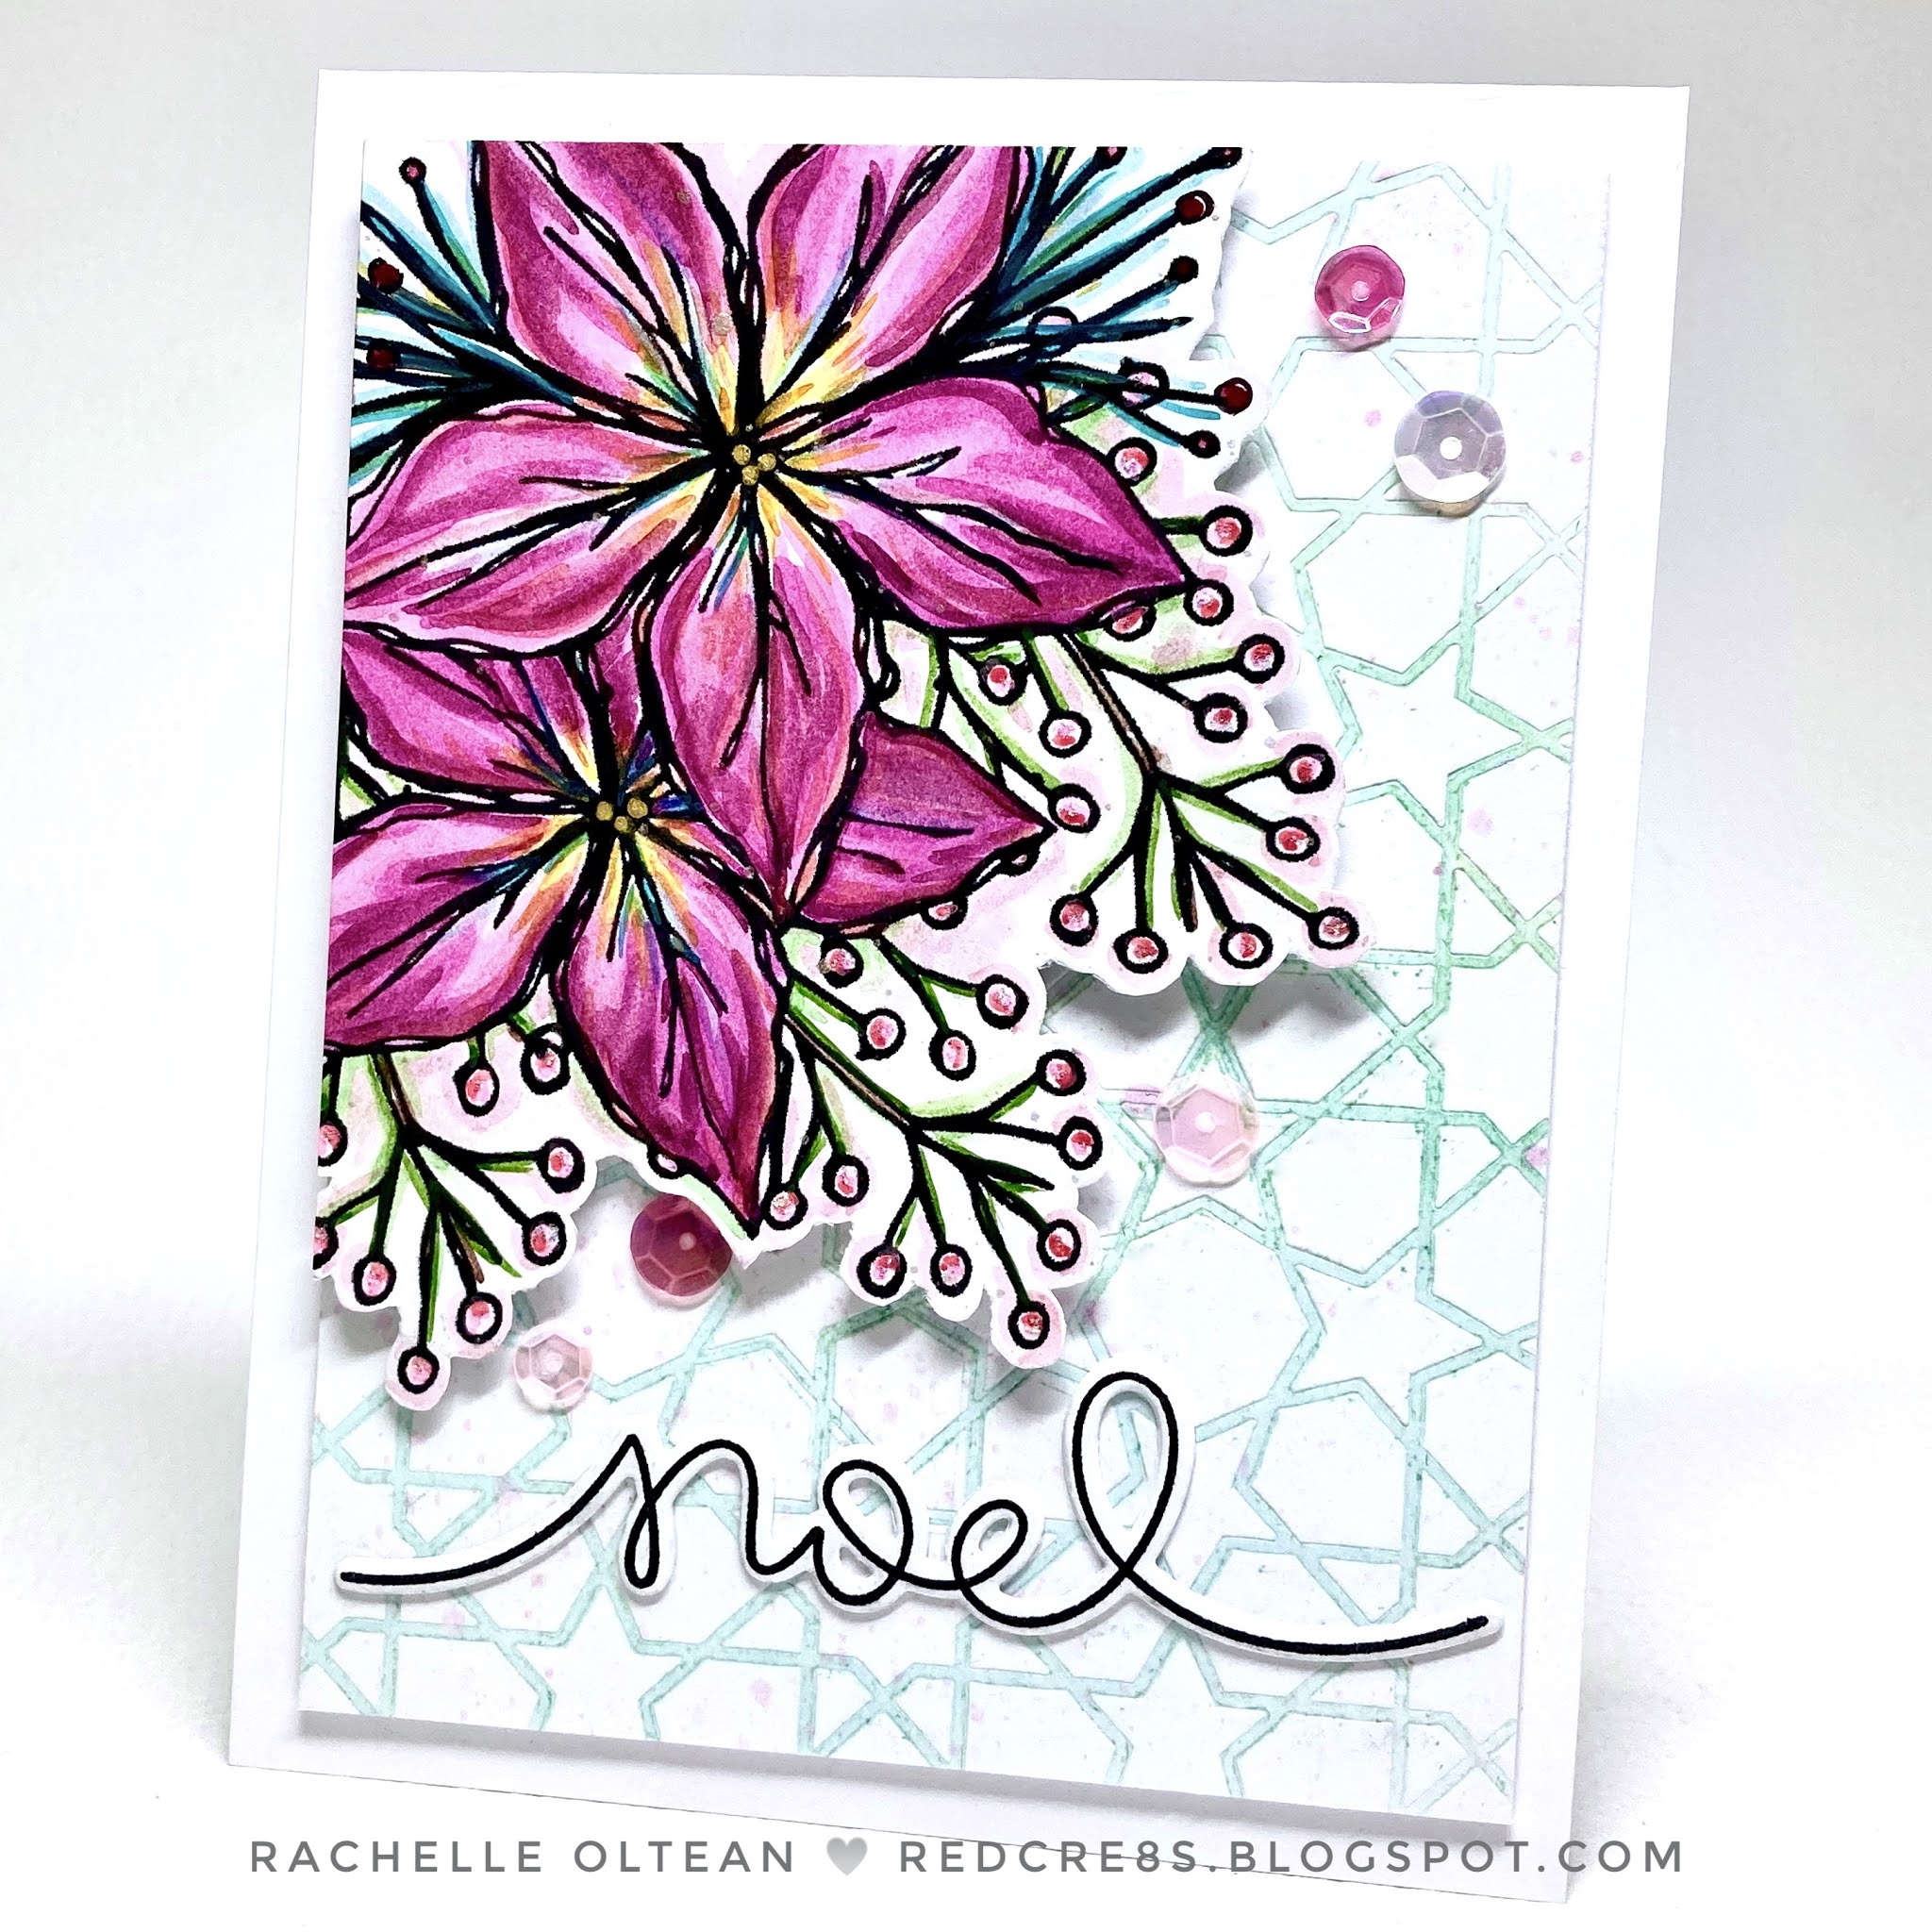
Well...all of the Halloween stuff has been stashed away and I'm in full Christmas mode from this point on! (At least for the next few weeks so that I relax and enjoy the season when it actually gets here!) This card features the "Wonderful Winter" Set from Graciellie Design.  I actually made this card before I was asked to be a guest designer last month for Graciellie! We hope that you will join us for our November Anything Goes Challenge over at the Merry Little Christmas Challenge Blog!


As you can tell by checking out the original floral/pitcher image above, I was a cropping maniac with this design! I pulled the png into PowerPoint, sized it and printed it onto 100# card stock. I decided to go with a bright plummy jewel-tone palette, which gives this card a softer, less-traditional feel! The image was watercolored, spattered with gold paint and fussy cut. 


I chose a stencil (I liked how this pattern echoed the 5-point shape of the poinsettia), ink-blended it with Distress Oxide Inks and used this to make my background pattern by running it through my die cutting machine. This technique leaves both color and the imprint texture on the card stock! I spattered this panel with diluted ink/paints and set it aside to dry in a heavy book! This background was trimmed to 5" x 3.75", backed with craft foam and adhered to a top-folding A2 card base; the poinsettias were backed/adhered in the came way. The stamped/die cut sentiment and sequins were glued in place and a touch of Diamond Stickles was added to the winterberries to finish off the card!


Thanks so much for stopping by and for keeping me inspired by your comments! ♥ 

Challenges:


Rachelle 

Friday, October 23, 2020

Birthday Card | Alphabet Challenge - "O" is for "Old People"


Happy FRI-YAY!!!!

I'm back to introduce another great theme over on the Alphabet Challenge..."O" is for "Old People"! I had to go the sassy route with this sentiment-focused card since I don't have a single stamp of an old person! However, the design team has some great examples for you over on the blog!! 

I chose a primary palette and stamped the Concord & 9th birthday cake image. The MFT Stamps' sentiments were added on top and this panel was die cut. I glued a red scalloped die cut to a black card base, adhered the cake panel on top, added sparkling star designs to the candles and the card was finished! This will be a great card to mass produce since it came together pretty quickly and can be sent to either guys or gals! 

We can't wait to see your take on our theme over in our Alphabet Challenge Gallery!

Additional Challenges:

Little Red Wagon #572 - Things Starting with "B" - Birthday

Tuesday Throwdown #468 - Use a Funny Sentiment

The Paper Players PP513 - CAS - Cookies, Cupcakes and Cakes (My favorite trio!)

Allsorts Challenge #594 - Birthday Cake or Cupcakes

Thanks for stopping by and have a great weekend!

Rachelle

Thursday, October 15, 2020

Thank You Card | Sparkles Monthly Challenge #133 - "Hello Autumn!"


Hello Autumn!

Our new challenge over at the monthly Sparkles Challenge is in keeping with the season and we would love to see your "fall-inspired" projects in our gallery this month! 

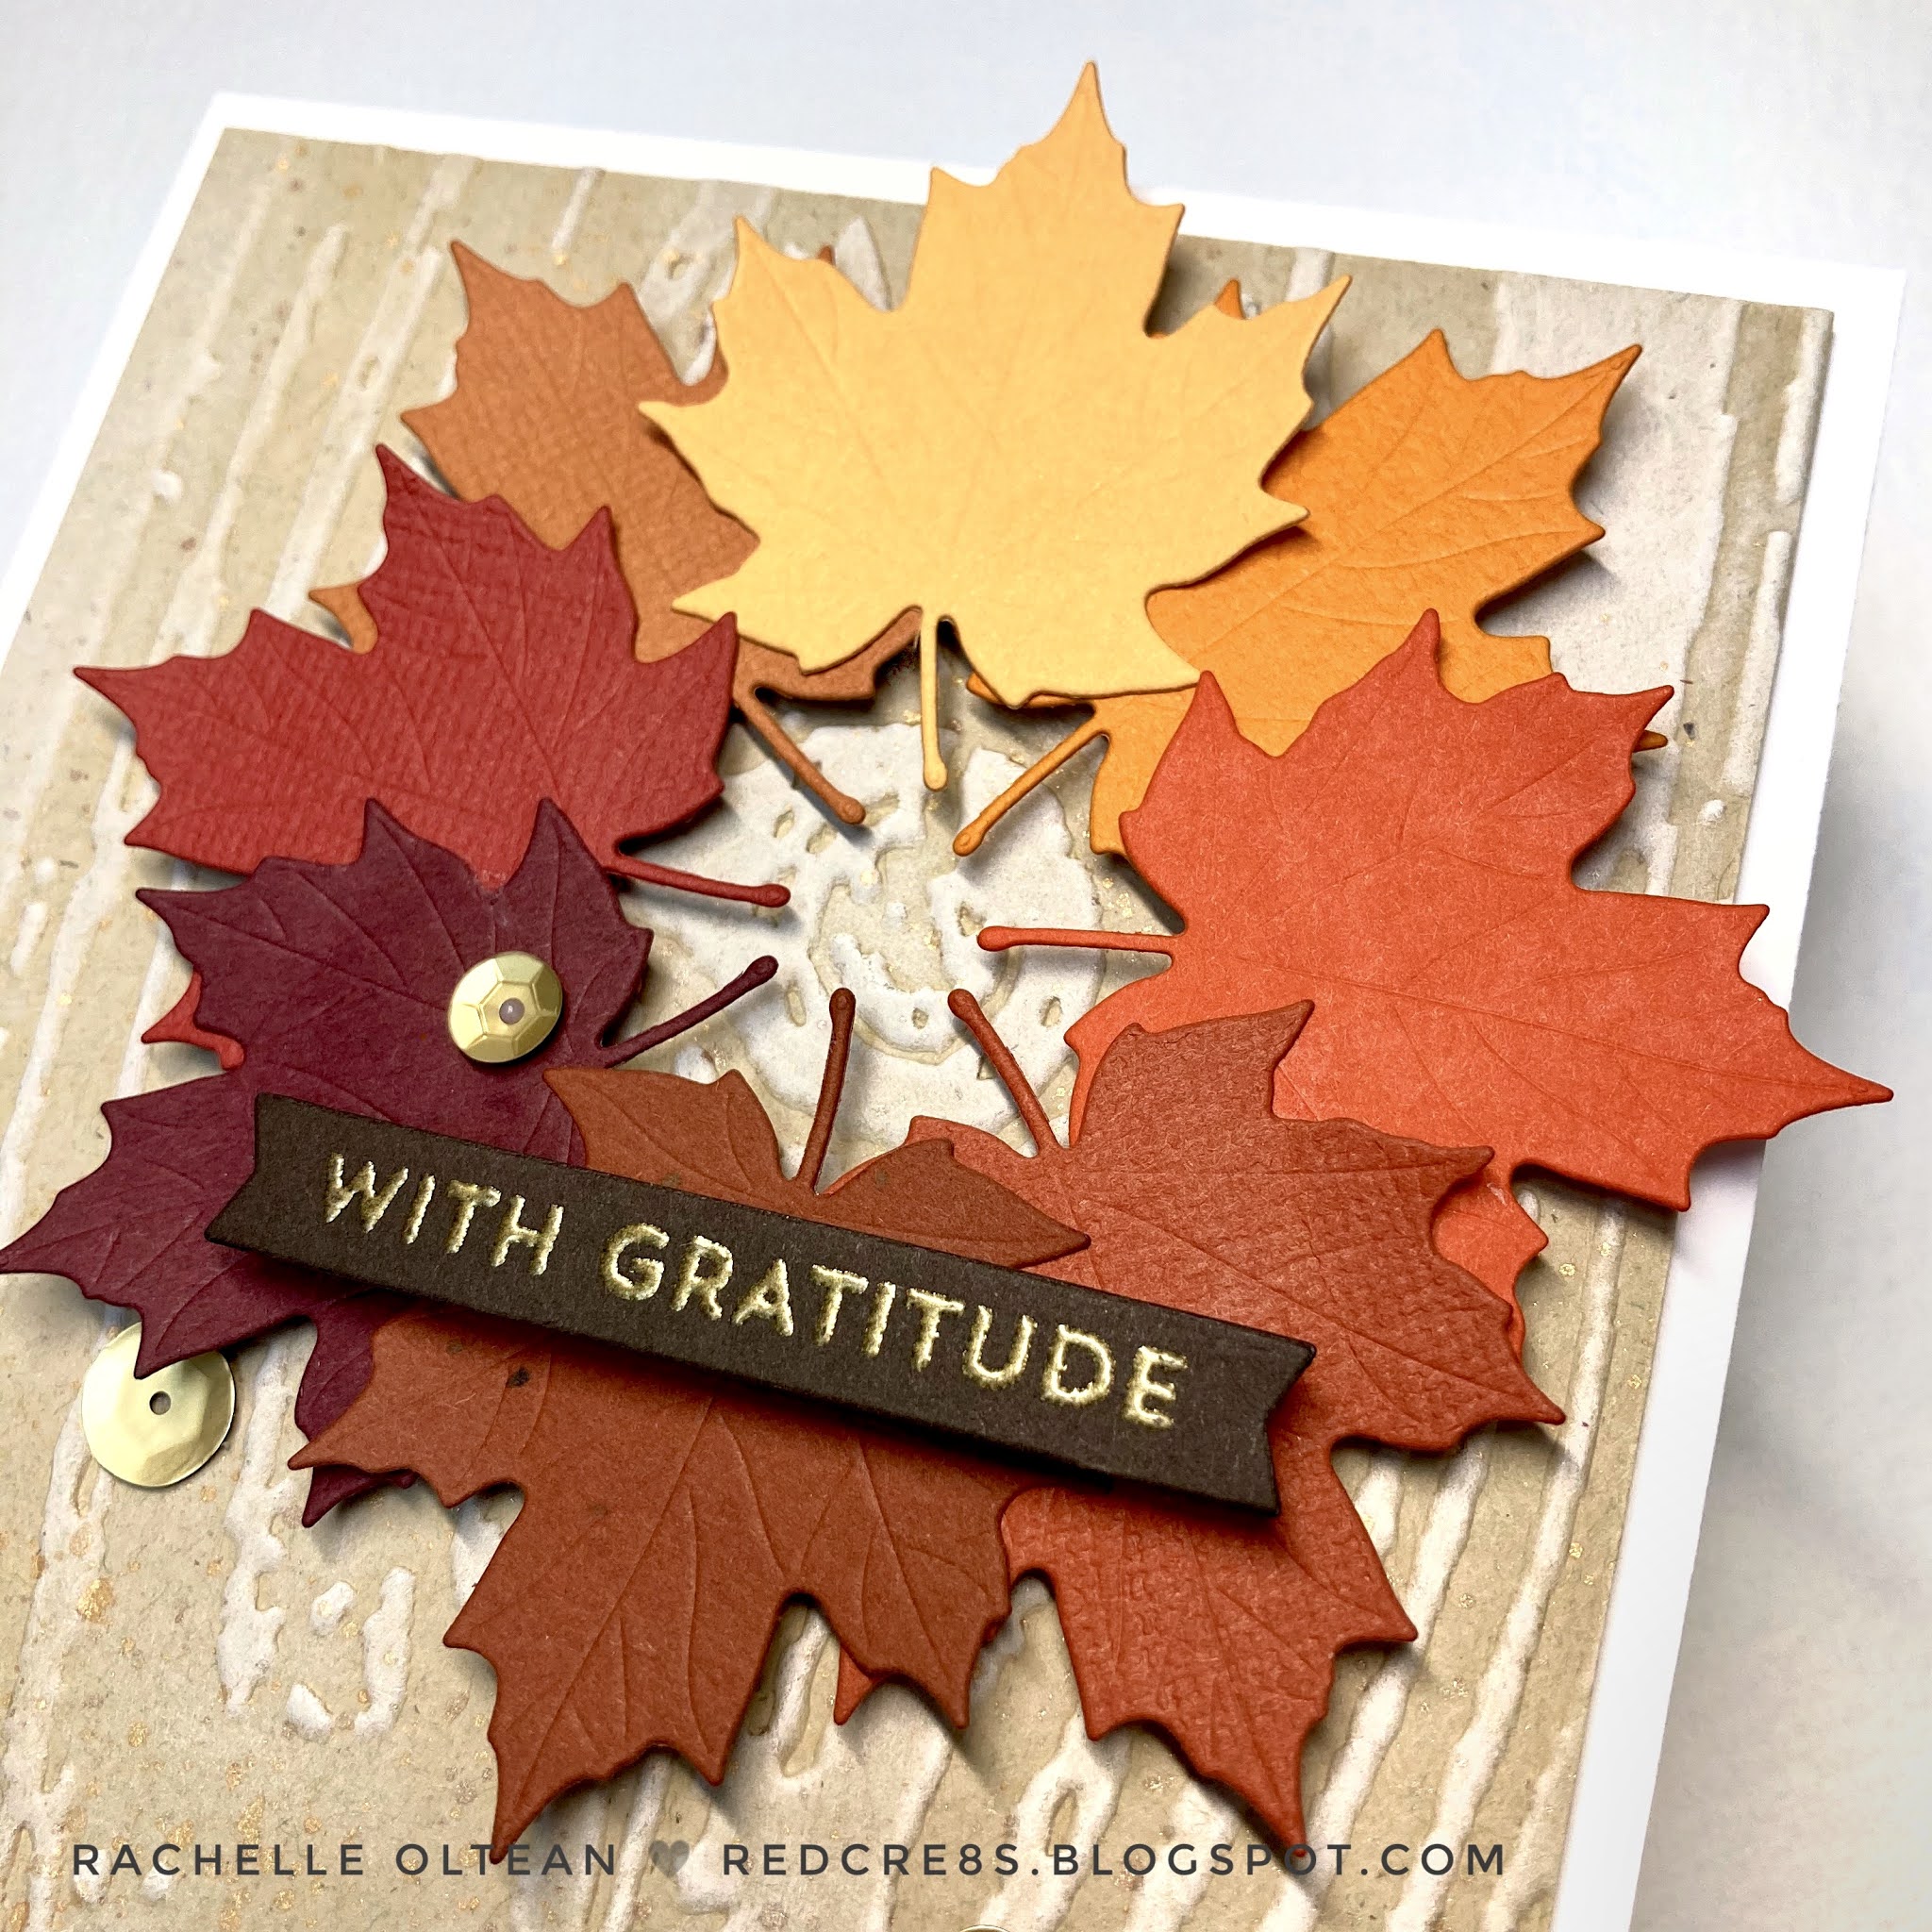
This CAS leaf wreath was created by die cutting a warm rainbow of maple leaves from assorted card stock and gluing them to a circular die cut. I created the woodgrain background by running a piece of Desert Storm card stock through an embossing folder and highlighting the top with white ink. The panel was spattered with copper paint and attached to the front of a top-folding A2 card base.


The wreath was popped onto the card front with foam squares and the heat-embossed sentiment strip/sequins were added on top to finish the card! We can't wait to see your "Autumn" projects over on the Sparkles Monthly Challenge!

Additional Challenges:


Thanks so much for joining me and for taking the time to comment!
Rachelle

Friday, September 25, 2020

All Occasion Card | Alphabet Challenge "M" is for Anything Starting with M! | MFT Stamps - "Harvest Mouse"


Hi!

I can't believe we are already at "M" over at the Alphabet Challenge Blog and this time it's for anything starting with the letter M! I made a giant list of M-starting items...man - milk - moon - monkey - mud - mutt - mocha - Mom - monarch - money - morning glory - mum - macncheese - mirror - moped - map - meow - holy mackerel - you get the idea!  Then I had to cross reference this list with my craft stash and landed on "M" is for mice! I pulled out one of my all-time favorites, the 2015 "Harvest Mouse" stamp set from MFT. 

I created some slimline card base components in the Cricut Design Space, die cut the pieces and layered everything together. The images were stamped, colored, die cut and adhered into place inside the top/bottom windows. The sentiment was heat embossed, cut to size and adhered to the card front. I added a couple of pumpkins and fall-toned sequins to finish up the design. 


The Design Team has come up with some great "M"-spiration so go check out their wonderful projects - we can't wait to see your creations over in our Alphabet Challenge Gallery! : )

Additional Challenges:


Friday, September 11, 2020

All Occasion Card | Alphabet Challenge - "L" is For Ladybug | MFT Stamps


Hi There!

We are starting a great new challenge over on the Alphabet Blog today..."L" is for Ladybugs and I decided to create a scene using some of my favorite MFT Stamps products! I've been seeing lots of great jewel tone colorations as we head into the fall season and pulled this palette together - teal, plum, olive, maroon, curry and sienna brown. All of my favorites together in one place!

I stenciled the background with Distress Oxide Inks - Tumbled Glass, Squeezed Lemonade, Peeled Paint and Forest Moss - creating the grass sky areas. The images were stamped, colored, die cut and then either glued directly onto the background or popped up with foam tape. Stamped the sentiment (using the MISTI) and added some iridescent gems to finish up the card front. I really love how these MFT images worked together! We can't wait to see your "Ladybugs" over in our Alphabet Challenge Gallery!


Additional Challenges:


Thanks so much for stopping by and for taking the time to comment!
Rachelle 

Friday, August 28, 2020

New Home | MFT Stamps - In Paris & Town Bear | Pop-Up Card | Alphabet Challenge - "K" is for Kraft Paper

Hi there!

My nephew and his wife just bought their first house and here is the congratulatory card I sent to celebrate this happy event! I created a CAS design using two now-retired MFT Stamp sets - "In Paris" & "Town Bear". This card features a simple kraft paper palette and easy pop-up surprise inside! I chose this palette for our new theme over at the Alphabet Challenge "K" is for Kraft Paper and we would love to see how you use it in your projects!

I cut an A2-sized panel with a hemstitch die and glued it onto a side-folding white card base. After I stamped & die cut a selection of trees/houses on both white and kraft card stock, I started to play with the pieces. I decided to focus in on one house, keeping it white and adding a color pop with one mini red heart; all of the components were glued into place and the sentiment was stamped directly on the card front.


I used additional MFT Dies (all retired) to create the pop-up feature on the inside by die cutting the "Our Town" silhouette on both kraft/white card stock and gluing the pieces together. This panel was trimmed to 4.5" x 3.75". I glued/stacked two of the large MFT "You" die cuts together and adhered it to the town panel - the sentiment was stamped just below.


To create the folding pop-up box, I cut an 11" long strip of white card stock 2.5" high and scored it at 1", 5", 6" & 10". I burnished all of the folded score lines and glued the two end pieces together to create my box. Two sides of this box were adhered into the middle fold (one to each side) and even with the bottom. Here's a quick sketch : ) 
All that was left was to glue the town panel to the front of the box! You get a lot of bang for the buck with this pop up! Thanks so much for joining me and we can't wait to see your kraft-y projects over in our gallery!

Additional challenges:


Thanks so much for taking the time to comment!
Rachelle