Showing posts with label Altenew. Show all posts

Thursday, April 11, 2024

Christmas Card | Altenew "Poinsettia" Dies | Krafty Chicks Challenge #711 | Week 2 Christmas


Hello!

We are at Week 2 over at the Krafty Chicks Challenge and that means "CHRISTMAS!" I have had these Altenew 3D Poinsettia Dies for a while now and decided it was the perfect time to pull them out for this project! 
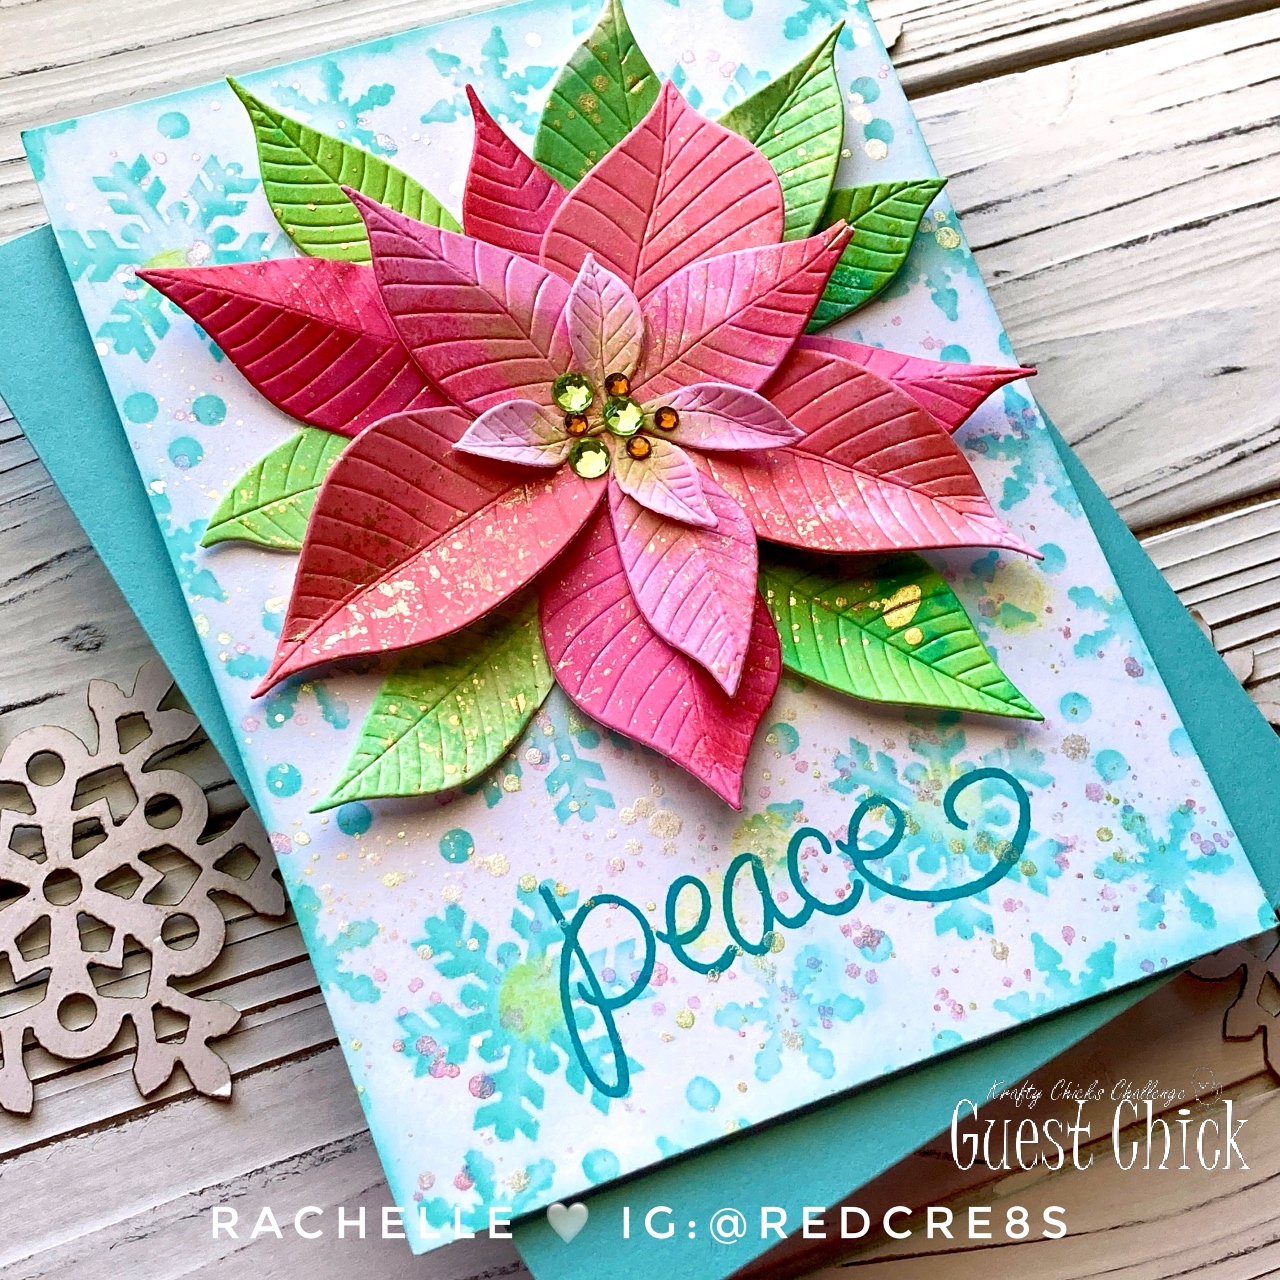
 

The snowflake background was stenciled using Distress Oxide Ink: Salvaged Patina, Peacock Feathers and a bit of Twisted Citron. The panel was cut down to fit an A2 card base, spattered with pearl watercolors and a little bit of ink shading was added to the edges. I attached the panel to the card base and stamped the one-word "Peace" sentiment at the bottom.

To create the flower petals, I ink smooshed Distress Oxides onto several panels of white cardstock in different color/value combinations using Spun Sugar, Abandoned Coral, Festive Berries and Candied Apple. I copied this same technique for the leaves using Twisted Citron, Mowed Lawn and Peacock Feathers. Once all the panels were dry, I spattered them with gold watercolor and spritzed them with Shimmer Mist. I allowed them to dry again and then started die cutting.

Once all of the shapes were cut, I began to dry fit the pieces together on the card front. When I liked the layout, I took a photo with my cell phone, removed the top layers and started gluing all of the pieces back together, (using my reference photo) and gently folding each petal along the score line before the final attachment. By using a combination of both mountain & valley folds, there is so much dimension in this design! To finish off the card, I added some gems to the middle of the poinsettia.  


I hope you will join us this week at Krafty Chicks with some Christmas creations!

CHALLENGES:


Thanks for stopping by and happy crafting!
Rachelle

Sunday, January 5, 2020

Thank You Card | Altenew - Needlework Motif


Happy New Year!

Thanks so much for stopping by for my first project of 2020! I am starting out with a "Thank You" Card that I created with a "new-to-me" stamp set from Altenew - "Needlework Motif". This set has been on my wish list for a long time and when it was recently on sale, I snatched it up! It reminds me of the Jacobean designs I used to create for wallpaper collections and I always loved drawing these very detailed, historic patterns.

I stenciled the background with Distress Oxide Ink in Antique Linen, spritzed it with shimmer mist and spattered the panel with metallic watercolors. After the panel was dry, it was die cut and set aside. I stamped one of the floral needlework sprays with VersaFine Onyx Black Ink, watercolored it in a warm jewel-tone palette and die cut it with the companion die. I die cut a second spray and glued/stacked it to the colored piece to give it some dimension/stability. Using the same watercolors, I painted a 1/2" navy strip along the outside edge of an A2-sized white card stock panel and then die cut it with a stitched rectangle die; this was adhered to the front of an A2 top-folding card base. I really like the detail that the little stitched edge gives next to the smaller dotted panel. The stenciled panel and needlework spray were also glued into place on the card front.

I die cut the Hello Bluebird word sentiment 5 times from white card stock and glued/stacked them together. Once dry, I painted the die cut with copper metallic paint and glued it into place. I added a touch of the same copper paint to the needlework design because I wanted it to reflect the same color I used for the die cut word sentiment. The card was finished off with a few light blue sequins. 


Thanks a million for joining me and I really appreciate all of your comments! They make my day!

I would like to submit this card for the following challenges:


Rachelle

Tuesday, March 12, 2019

Birthday Card | Altenew - Peony Spray & MFT Stamps' - Geometric Stars Stencil


Hi!

Soon it will be time for the peonies to start blooming here in North Carolina! Yippee! And while I’ve never actually seen a blue peony, I would like to share one with you today.

I smooshed several colors of distressed oxide inks (Broken China, Blueprint Sketch, Twisted Citron) onto my Ranger Inkssentials Craft Sheet and sprayed it heavily with shimmer spray. I randomly tapped a piece of white card stock into the diluted inks several times, dabbed it with a paper towel and repeated the process until I had the color placement I wanted. I always slip the damp card stock pieces in between two clean sheets of paper and place a stack of books on top so that the paper will dry flat. Using the same inks, I blended a background onto a piece of 4.5” x 5.75” of white card stock and flecked it with metallic/pearlized watercolors. When it was dry, I die cut the rectangular frame and the inside sentiment (MFT Stamps' Scripty Birthday Wishes Die) from this blended background. The frame was glued onto a top-folding A-2 card base made from 110# Neenah Solar White Card Stock.


I then blended a distress oxide ink background onto white cardstock using MTF Stamps’ Geometric Stars Stencil. The background was sprayed multiple times with shimmer mist and flecked with the metallic watercolors. I cut a piece of this background 1 1/4” wide, trimmed it to fit into the frame and glued it into place along the left side.

Using the MISTI, I stamped the Altenew Peony Spray onto the inked background with VersaFine Onyx Black Ink and fussy cut the peony image. I stamped an additional spray into heavy card stock and fussy cut it on the inside lines so that it was smaller than the first image; this was glued onto the back of the first to provide stability. I placed the cut flower spray onto the card front just to determine the location for my sentiment and stamped it using the MISTI. I adhered the peony to the card with foam tape and finished the card front with iridescent jewels from Lucy’s Little Things.


I glued the die cut sentiment into place on the inside of the card, fussy cut another partial peony flower head and adhered it to the interior layout as well. 


Thanks for stopping by!
Rachelle