Showing posts with label Valentine's Day. Show all posts

Thursday, April 25, 2024

Valentine's Day Card | MFT - Pure Innocence "Love You Bunches" | Krafty Chicks Challenge #713 - All Occasions


Hello!

Here's a CAS paper piecing project for "All Occasions" week at the Krafty Chicks Challenge! This 'Pure Innocence' cutie is entitled  "Love You Bunches" and while this card could be used for lots of different reasons, I sent out several of these for Valentine's Day!

The image was stamped both on white and polka dot papers with VersaFine Ink. The dotted dress was fussy cut and set aside. I watercolored and die cut the PI image, adding one additional blank die cut to the back. The dotted dress was glued onto the watercolor image and backed with foam dots.

I die cut the pink card stock strip with a border die. trimmed it to fit an A2 card front and adhered it into place. I popped the image on top, stamped the sentiment and added several translucent pink hearts to finish up this card! I hope you'll head over and join us this week with your All Occasion Projects!

The Krafty Chicks'!

Monday, February 8, 2021

Valentine Slimline Tag


Hi!

I used to make a lot more tags and I’m not quite sure why I stopped (?) but I’d like to share a fun slimline tag with you today! This one measures 8.5” x 3.75” and so there’s lots of real estate for some Valentine creativity!


To start, I pulled lots of pattern papers and ephemera together in rose, kraft, black and cream and then I blocked out the proportions for my banding/strips. I stamped multiple vintage images on the two largest bands and assembled all of the pieces together starting at the bottom. Bits of lace, glitter ric rac and German Scrap pieces were added on top. I glued and trimmed everything to a blank tag and finished it with a bow of hand-dyed silk ribbon. 


You can really make these tags quickly once you get the layout figured out and all of the pieces ready to go! Thanks so much for stopping by and thank you for taking the time to comment!

Challenge Submissions:


Take care and stay safe!
Rachelle

Tuesday, February 2, 2021

Valentine's Day Window Card | Pink and Main - "Little Cherubs"


Hi there!

I've got a sweet Valentine to share with you today featuring the new "Little Cherubs" Stamp & Die Sets from Pink and Main! I took a little creative license (with some masking and mirror stamping) in this standing heart-shaped window card and I just love that cute little cherub sending love down from above on a gold thread!

I began by blending Candy Apple Distress Ink onto red cardstock using the Dotty Stencil. This was die cut using the largest of the Double Stitched Hearts Dies and the window was cut using one of the smaller heart dies in the set. I carefully added just a bit of glue to the outer edge and dusted it with some red chunky glitter. I ink blended the sky using the Clouds Stencil, cut it with the largest die and scored it horizontally to create a fold. Scor-Tape was used in the area above the fold line and it was attached to the back of the red panel. I trimmed just 1/8" off the bottom of the back panel and this allows the card to stand up.


I wanted to dangle the ribboned heart by gold thread and so I masked the bottom of the original image and drew in the rest of the cloud. The cherub was colored and die cut. I also stamped the larger single heart from the set and then once more using the mirror stamping technique; both were colored and die cut. 

I poked a small hole at the bottom of the cherub's hand, attached the gold thread behind and adhered it into place at the top edge of the heart. The gold thread was cut to length and sandwiched between the two hearts. I finished the card by stamping the sentiment using the MISTI.

Thanks so much for joining me today and for taking the time to comment!

Challenges:


Have a wonderful week and take care!
Rachelle

Sunday, January 31, 2021

Valentine's Day Box Card | Graciellie Design - "Love Puppies"


Hello!

I'm so excited to share this envelope-shaped box card project with you today featuring digital stamp images from Graciellie Design's latest release, "Love Puppies" and one of the accompanying pattern papers. All of these great Valentine's Day sets are on sale right now! 


I created the envelope box card in the Cricut Design Space and die cut the pieces - layers of the pink plaid digital paper were hand cut to size. The digital puppy image was printed onto 100# white card stock, painted and fussy cut. The person receiving this card has always had Golden Retrievers and so I painted the puppy to match the coloring of their dog! The scripty hearts and the sentiment strip were also printed and trimmed.


I chose card stocks to coordinate with the digital plaid and die cut lots of hearts to create the dimensional background. The box card was assembled and the puppy was adhered to the front as if she's peeking out from the envelope. The die cuts were either attached to the base or to small acetate strips, which created the floating hearts behind the puppy. The die cut sentiment strip was attached to the front with foam tape.


This card folds flat to fit into a 5.5" square envelope and pops back to stand upright. It's only 1/2" wide but the floating heart elements add so much dimension! 

Thanks so much for joining me today and for taking the time to comment!

Challenges:


Take care and stay safe!
Rachelle

Saturday, January 30, 2021

Valentine's Day Shaker Card | Pink and Main - "Rawr"


Hello!

I LOVE shaker cards and I've got a cute Valentine's Day version for you today featuring lots of great products from Pink and Main's latest release! I'm also a huge fan of all things dinosaur so pairing this cutie with the bright magenta pattern paper just makes me happy! : )

I used the largest new Mod Stitched Rectangle Die to create my shaped card base and added a smaller die cut panel (from the new All Occasion Floral Paper Pad) on top. I stamped, watercolored and die cut the images from the "Rawr" Stamp Set and backed each with an additional blank die cut. 


To create the shaker, I die cut oval frames from black and white card stock using the new Layered Oval Dies. The larger black oval was glued to the center of the card front. I stacked/glued three white frames together for dimension/stability and added an acetate panel to the back. Small strips of foam tape were attached just behind the frame and the edges were brushed with my anti-static powder tool. The shaker bits were piled into the center of the black oval and the acetate panel was carefully adhered into place. The stamped images were glued to the shaker and I added baker's twine to the top to finish up the card!

This little guy fits perfectly into the oval frame and I love that adorable banner at the bottom! Thanks so much for joining me today and you can always find amazing inspiration on the Pink and Main Facebook and Instagram Pages!

Challenges:


Have a great weekend and take care!
Rachelle

Tuesday, January 26, 2021

Sushi Party 4-Pack | Pink and Main - "Roll With It"


Hello Everyone!

I’ve got a Sushi Party to share today! I am totally in LOVE with the new “Roll With It” Stamp and Die Set! So much so that I had to stop myself after I made the four cards that I’m going to show you today (and I’ve still got ideas for about half dozen more cards in my sketchbook!) 

I thought I would start by showing you some of my reference photos and the resulting sketches I used to create these designs. This time I Googled "Sushi Menu" graphics and there was enough on-line inspiration for a thousand different cards! These are the four graphics that inspired my projects...and as you can see, they aren't ever copied directly but instead used as a guide for my final design. Sometimes it's the angles of the shapes, the color palette, or even the way the separate pieces fit together. It can also be an overall style or the way a background pattern works with the foreground - I believe you can always find something to inspire! : )


I then transfer these ideas to a notebook by drawing quick sketches which help me scale the ideas down to my card size. Here are the corresponding drawings...sometimes they start as a slimline card and then switch to an A2 or change from a horizontal to vertical layout! When I start with a sketch, the time it takes me to complete a card is usually cut in half and this allows me to make more cards!!!

Now on to my sushi party - I started by stamping all of the images multiple times with VersaFine Onyx Black Ink onto 100# white card stock. The images were then water colored and/or fussy – die cut.

For the first card, I stenciled the Petite Petals Pattern with Black Soot DOI onto red card stock and spattered the panel with gold paint. I used the largest of the Nested Hexagon Dies to cut an omit into the stenciled panel. I lightly ink blended the outer edges of a top-folding A2 card base with Scattered Straw DOI and added strips of black and gold metallic papers at the bottom. The stenciled panel was backed with craft foam and adhered to the card front. I attached the die cut images and the heat embossed sentiment strip into place with glue and/or foam tape. 


I just love this red/black/gold color palette and those cute Kawaii images!!!


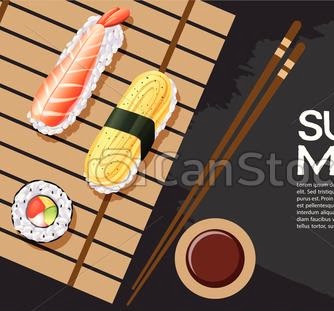
The second card is based on a photo I saw of sushi being served on a woven bamboo mat. I used the Sunburst Slimline Die and die cut kraft card stock multiple times. This gave me lots of 1/8” strips, which I used to create the mat. Once it was assembled, I glued it onto a white card stock panel measuring 4” x 5.25” and trimmed the overhang with scissors. This panel was adhered to a top-folding black A2 card base, the die cuts were attached with foam tape and I carefully stamped the sentiment using the MISTI; a few gems were added for a bit of bling!


Card #3 is a bright all-occasion design and I once again used the Petite Petals Stencil with Twisted Citron DOI to create a vertical band along the right side of the layout. This panel (3.75” x 5”) was heavily sprayed with shimmer mist and spattered with lime green pearlized paint. Some of the die cuts were glued directly onto the panel and the rest were popped up with foam tape. I used a partial sentiment from the Spring Sentiments Stamp Set and stamped it using the MISTI. I added some of the new All Occasion Glitter Enamel Dots and glued the top panel onto a top-folding A2 card base. 


The last card is a small appetizer plate filled with sushi goodness! I spattered a piece of red card stock with gold paint/Candy Apple DOI and fussy cut the triangular shape to use as my plate. A piece of black card stock was glued onto a top-folding horizontal A2 card base and striped paper was added onto both sides. After spattering a white card stock panel (3.75” x 5”) with gold paint, it was glued to the card front. The plate was attached with foam tape first and the sushi die cuts were added on top. The chop sticks were glued directly to the panel and the sentiment was stamped using the MISTI. A few matte gold sequins finished up my final card!


Thanks so much for sticking with me for this longer-than-usual post! This new release has so many wonderful images and I hope you will be inspired by all of the creative Design Team projects found on Pink and Main’s Facebook and Instagram Pages!

Challenges:


Have a great day and stay safe!

Rachelle

Tuesday, January 19, 2021

Valentine's Day Card | Sneak Peek - Pink and Main "Rawr" Stamp & Die Set


Hey There!
I've got a great sneak peek for you today featuring a some awesome new products from the upcoming Pink and Main January Release! First off is an adorable dinosaur stamp and die set, "Rawr", that includes this handsome guy is delivering an oversized Valentine's Day Greeting! This set is a wonderful collection of dinosaur images mixed with tons of hearts & banner decorations!

The images were stamped, watercolored and die cut...don't you just love that cute speech bubble?? I used a couple of the beautiful pattern papers from the new release to set the scene in my card layout and cut the soft aqua paper with one of the dies from the new "Layered Ovals" Set. The size increments in the Pink and Main Layered Shape Die Sets are stepped perfectly and I can always find the exact size I need! 


The floral pattern paper was die cut and glued down first and then the aqua oval die cut (which I backed with backed with thick craft foam) was adhered on top. Dino and his speech bubble were popped into place with a double layer of foam tape and I added a few heart embellishments to up the "cuteness" factor!


It was so much fun basing my coloration on the gorgeous palette in the new "All Occasion Florals" Paper Pad and I can't wait for you to see all of the other patterns!

Thanks so much for joining me today and get ready for tomorrow's amazing release!  There's always new inspiration over on the Pink and Main Blog - Instagram - Facebook Page!

Take care and have a great day! Rachelle

Challenges:


Saturday, January 16, 2021

Valentine's Day Card | Graciellie Design - "Puppy Kisses"


How about some Puppy Kisses?

This little gal is ready to go in the kissing booth just for you! Graciellie just released her latest sets including, "Love Puppies", complete with wonderful dog images, sentiments and pattern papers!


I used the wooden planks from Gracie's "Hang In There" Set for my booth construction (see below) and after printing the images out on light kraft card stock, I colored the planks with Prismacolors and fussy cut the pieces. 

The background panel was ink blended with Salty Ocean and Picked Raspberry DO Inks and adhered to the A2 card front. I watercolored/fussy cut the puppy and die cut the sentiment with a stitched heart.


I assembled the kissing booth onto the cloud panel and popped the heart/puppy into place with layers of foam tape. I finished the card with a heart garland tied to the top and a few sequins.


Thanks so much for joining me today and I hope you will head over to Graciellie Design to check out these great new sets!

Challenges:


Take care - Rachelle

Friday, January 15, 2021

Valentine's Day Card | Pink & Main - Sneak Peek January Release


Hello!

I'm so excited to share a sneak peek with you today featuring wonderful new products from Pink and Main's upcoming January Release! I combined the new "Wide Stripes" Embossing Folder with images from two of the new stamp sets to create this pretty feminine card!  

I began by stamping the large floral-trimmed heart from the new "Always" Stamp Set in Antique Linen DO Ink on two separate panels and created a stencil from one by trimming out the heart outline. The heart was ink-blended through the stencil, spattered with pearlized watercolors and then the floral element was colored with a no-line painting technique. A gorgeous scripty sentiment from the new "Cherry Blossoms" Stamp Set was heat embossed onto the ink-blended heart and the finished piece was die cut. I also stenciled the “Garden Gate” Pattern onto the front of a horizontal A2 card front.


My idea was to create a ‘white-on-white’ wood trim effect in this design - so I combined the striped texture from the new embossing folder as a vertical “wainscoting” panel at the bottom and the scalloped stitched band was cut to size from a section of the “Blessings” Slimline Die Frame. This simple trim piece layer joined the panels together perfectly! The die cut image was popped off the front with foam tape and I added a few of the new “All Occasion” Glitter Enamel Dots for a bit of sparkle!


Thanks so much for joining me today for this quick sneak peek! I can't wait for you to see all of the new products in this month's release - stay tuned for more reveals!

Challenges:


Take care - Rachelle

Monday, January 11, 2021

Valentine Card | Graciellie Design - "Love Kittens" Mini Bundle


Happy Monday!

Here's a cool cat in HOT PINK who just can't wait to wish you a Happy Valentine's Day! There are so many different ways to use Graciellie Design's "Love Kitten" Sets and I decided to go for a fabric-inspired mix of woven textures with a little houndstooth on the side!


The Love Kitten was printed, watercolored and fussy cut from 100# white card stock. I sized the sentiment to fit a stitched heart die and printed/cut it from the hot pink card stock. The houndstooth pattern from Pink and Main's "Pattern Maker" Set was stamped with VersaMark Onyx Black Ink on a slightly darker pink paper, trimmed and glued at the bottom of an A2 top-folding card front.

I inked up a woven embossing folder with some Picked Raspberry DO Ink and ran a white card stock panel through my die cut machine. I shaded the edges with the same ink and spattered pink and black watercolor on top. I added a bit of woven ribbon to the bottom and this panel was adhered to the front with foam tape. The kitten and heart die cut were also attached with foam tape long with a handful of hot pink sequins.

Thanks so much for joining me today!
 
Challenges:


Take care and stay safe!
Rachelle

Saturday, December 19, 2020

Valentine Shaker Card | Graciellie Design - "Love Kittens"


Hello!

I've got a shaped Valentine Shaker to share with you today featuring this great new set from Graciellie Design, "Love Kittens." And I've also got a little secret to tell...since both my husband and I are highly allergic to cats, I'm not really a fan (not that I dislike them) but Gracie's new cute & punny feline sets are really adorable and 100% allergy free! I've already got about a dozen ideas for how to use these images (for all of the cat lovers in my life) and I'm starting with this simple shaker card! 

I sized the cat image to a 3" square and printed it onto 100# card stock; it was then watercolored and fussy cut. I cut and glued two extra images to the back just to give it some strength since it would be attached above the shaker.

I die cut the heart frame using the two largest sizes of  Lawn Fawn's Stitched Heart Stackables from red pattern paper and glued it to several glued/stacked white frames. This frame was backed with a piece of acetate and thin strips of foam tape. I chose a cream and pink pattern paper for the base, die cut that from the large heart and piled the shaker bits in the middle. The acetate panel was then attached to the base to finish the shaker.

The cat was glued onto the heart with strong glue and the fussy cut sentiment strip was adhered to the bottom with foam tape. I glued a blank heart die cut onto the back where I will write my greeting and gave his glasses a bit of shine with a Nuvo Shimmer Pen. The final card will fit into an A7 envelope and I just love how he is peeking over the top!

Here are the sets from Gracie's new release and they are on SALE NOW!

Love Kittens


Bow Tie Kitty (Add On)


Love Kitten Background (Add On)


Thanks so much for joining me...it was kind of nice to be looking forward to Valentine's Day! : )

Challenges:


Rachelle