Showing posts with label Sunny Studio Stamps. Show all posts

Friday, June 25, 2021

Birthday Card | Coffee Loving Cardmakers Blog - Guest Designer Spot

Hello Everyone!

I'm so excited and honored to be the Guest Designer today on the Coffee Loving Cardmakers' Blog! I was chosen as Amanda Wilcox's "Designer Pick" during the recent 2021 Spring Summer Coffee Lovers Blog Hop and I'm so happy to share this card based on my favorite coffee blend, "Pleasant Morning Buzz", from Whole Foods! The old packaging design used to show bees buzzing around a flower garden with their tiny coffee cups filled to the brim and so I decided to try and recreate this scene with one of my favorite stamp sets, "Bee Happy", from Hello Bluebird! Butterfly Reflections, Ink. always carries such a great selection of HB products and is a very generous Super Sponsor of the Coffee Lovers Blog Hops! 


I stamped, water colored and die cut all of my images. I needed a few extra flowers and a glass coffee carafe and so I drew those myself with a black permanent marker and they were colored/fussy cut. I inked a slimline panel with Distress Oxides to create my sunrise background and die cut it with the largest of Pink & Main's "Stitched Slimline Dies" (3.5" x 8.5"). I inked/die cut the grass strip with Sunny Studio Stamps' "Slimline Nature Border Die (rolling grass) and this was glued to the sunrise panel.


I adhered all of the images into place on the top panel and layered this with a black mat before attaching it onto my slimline card base (4' x 9"). I added a computer-generated sentiment strip and sequins to finish up the card front! 


Here's the inside complete with a gift card so that this coffee lover can purchase their own favorite brew!

Challenges:


Thanks so much for stopping by and have a great day!
Rachelle

Friday, December 18, 2020

Christmas Card | Alphabet Challenge - "S" is for "Snow Scene"


Happy Friday before Christmas!

I've got a great mixed product mash-up for you today as we start a new challenge over on the Alphabet Blog! This time "S" is for Snow Scene and this little yeti is chillin' with a warm beverage on a cold winter's day! 

There was quite a bit of prepping all of the pieces to get this card to come together because I pulled so many things from my stash! I stamped, colored and die cut the images from the now-retired "To My Beastie" from MFT Stamps and Ellen Hutson's "Lil' 'Squatch". The slimline panels from Sunny Studios were die cut/inked with Distress Oxides (Spun Sugar, Tumbled Glass & Dusty Concord) and the sentiment was stamped onto the snowbank. I also ink-blended the front of a slimline card base with DO "Evergreen Bough". The scripty word from MFT Stamps' "Believe" Die-Namics and nativity star from MFT Stamps' "Little Town of Bethlehem" Die-Namics were die cut from heavy white card stock.

Then it was time to assemble! I glued all of the slimline panels together first, added a couple of smaller pine tree silhouette die cuts to the left side and then attached the large trees/yeti with foam tape. The scripty word/star die cuts were glued onto the sky panel and I added an iridescent gem to dot the "i". The completed front panel was glued onto the slimline card base to finish things up! 


We can't wait to see your SNOW SCENES over on the Alphabet Challenge Blog! Thanks so much for stopping by and stay safe!

Additional Challenges:

Simon Says Stamp Wednesday Challenge: Christmas Critters

Sisterhood of Crafters - Anything Goes - Christmas/Winter

Watercooler Wednesday #302 - Anything Goes 

A Perfect Time To Craft #12 - 2020 - AG

Crafter's Cafe #257 - Holidays

Sparkles Forum Christmas #119 - Non-Traditional Christmas Colors

Christmas With The Cuties #45 - Have Yourself a Merry Little Christmas

Rachelle

Tuesday, September 3, 2019

All Occasion Card | Simon Says Stamp/Neat & Tangled - Hello Pumpkin


Hello! 

I think I can almost feel a cool down starting in my neck of the woods (or maybe it's just wishful 
thinking considering it was almost 90 degrees this afternoon with a relative humidity of 99% here in North Carolina?) and I believe it may be due to the "Everything Pumpkin" display that I saw today at my local Whole Foods Store! Pumpkin puree - pumpkin flavored tea - pumpkin spice muffin mix - harvest pumpkin craft beer...you get the idea! Well that put me in the mood to get started on some autumn-inspired cards!

This cute bundled bear is a part of Simon Says Stamp's Stamptember 2017 Neat & Tangled Set and is combined with Hello Bluebird and Sunny Studios products. I am basing the card layout on this week's Retro Rubber Stamp Challenge Sketch #118.


I used Distress Oxide Inks and blended them through Hero Arts' Woodgrain Stencil onto a piece of 110# Neenah Solar White card stock, spritzed it with shimmer spray, die cut a panel and adhered it to a top-folding A-2 card base. I ink blended a piece of the same cardstock with Wild Honey and Fossilized Amber and die cut it with Sunny Studios Scalloped Square Dies - a panel was lightly ink blended with a circle/diamond stencil, cut to fit behind the square die cut frame and adhered into place.

I smooshed a mix of autumn-toned Distress Oxide inks onto my craft mat, spritzed them with water and daubed pieces of the Neenah card stock into the inked areas. I tapped the paper numerous times until I got the depth of color and mix that I wanted and I set these pieces aside to dry. Hello Bluebird has so many great stand-alone dies and one of my favorites is the Gallery Frame #3, which has some added leaf and pumpkin die cuts. This is such a wonderful die set and I used it to cut multiple leaves, acorns and pumpkin images from my inked papers. 

I stamped the bear with VersaFine Onyx Black Ink and water colored/die cut the image. I glued it into the scalloped frame and stamped the sentiment using the MISTI. This entire piece was glued onto the wood grain panel (following the sketch) and the autumn die cuts were added to the left-bottom corner. The card was finished with a sprinkling of assorted sequins and a light application of Wink of Stella clear shimmer.


Challenge submissions:


Thanks so much for stopping by!
Rachelle

Monday, July 22, 2019

Birthday Card | Ellen Hutson - Otter Ware & Inner Mermaid | Sliding Window Pop-Up Shaker Card


Hi!

Today I am sharing a design team card over at the Back To Basics and Beyond Challenge for this week's "Off The Edge" theme! Head on over to the BBB Challenge site to see all of the wonderful examples that the designers have created! This card was inspired by a great video I saw on YouTube recently by Carissa Wiley at "Sprinkled With Glitter". If you have never seen Carissa's videos, you are really missing out...she is a great teacher with wonderful ideas and an infectious laugh - she makes me smile during every single episode! My card ended up totally different from hers but I wanted to give her credit for steering me in the right direction.

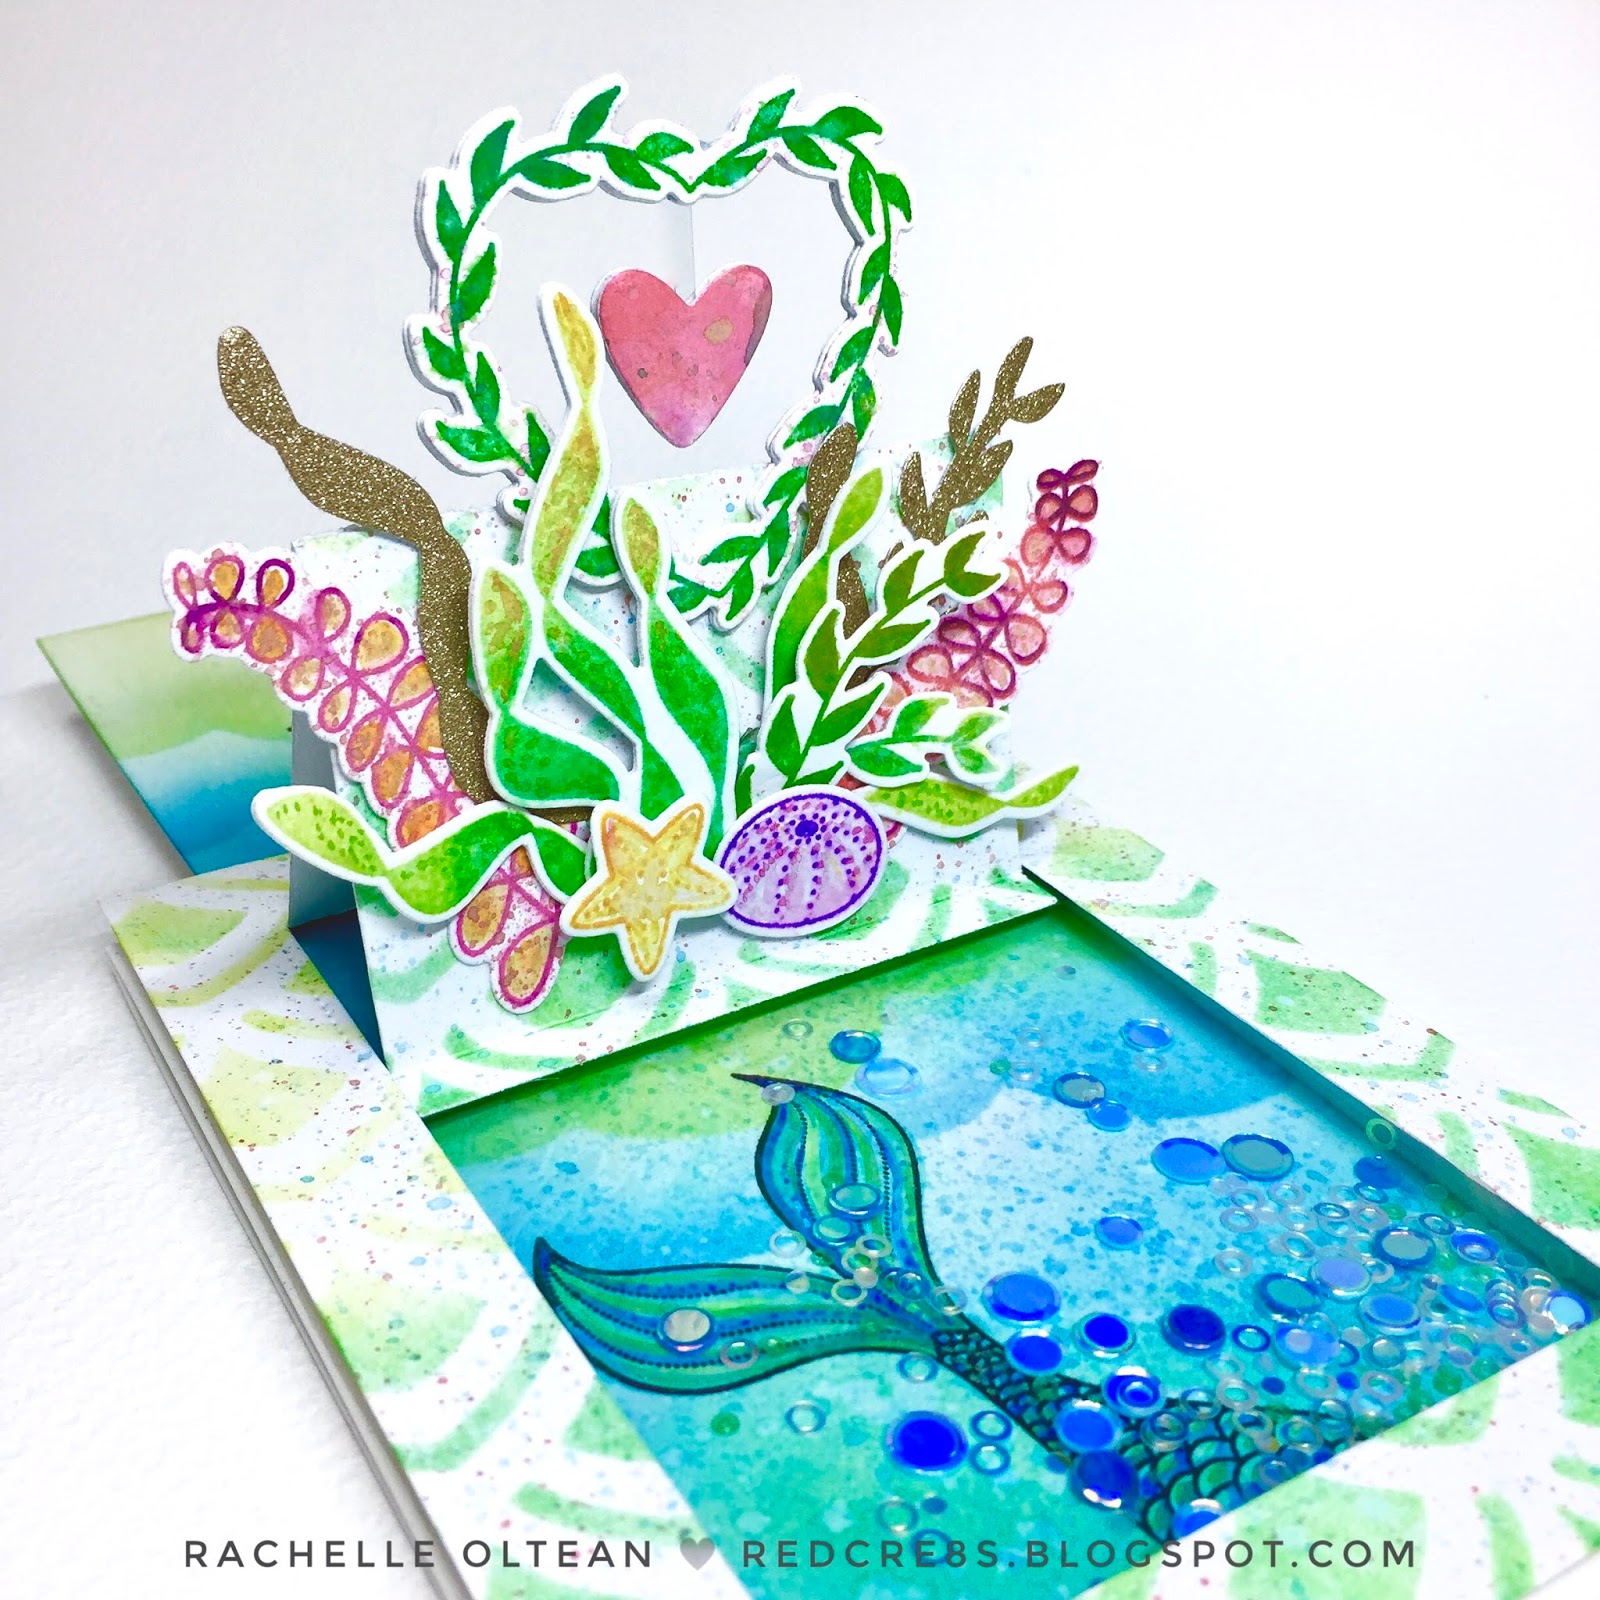
I started by creating my own 'mermaid-tail scallop' pattern in the Cricut Design Space and cut a stencil from an acetate presentation cover page. I find that this weight of acetate really works well while cutting my own stencils (with the fine cutting blade) and yet they are still sturdy enough to hold up over and over again with ink blending. I used Distress Oxide Inks (Twisted Citron, Peeled Paint & Lucky Clover) and blended the mermaid scallop pattern onto a piece of 4.25" x 5.5" 110# Neenah Solar White card stock. I sprayed the card stock with water and shimmer spray and flecked it with an assortment of pearlized watercolors. Once the panel was dry, I used Sunny Studio's "Sliding Window Pop-Up Die" to cut the interactive mechanism. The pull-tab panel was cut to size (4 7/8" x 3 1/4") from the same card stock. Using a stencil, waves/water were ink-blended onto the panel and the front of an A-2 top-folding card base using the same ink colors, adding Salty Ocean; everything was spritzed with shimmer spray and spattered with diluted inks. I lightly traced the pop-up opening onto the card front so that I would know where to stamp the mermaid tail from Julie Ebersole's "Inner Mermaid" Stamp Set. Once stamped with VersaFine Onyx Black Ink, I colored it with the oxide inks. 

To create the shaker base, I used a double thickness of foam tape to make a frame, coated the edges with my anti-static powder tool, filled the middle with sequins/confetti, peeled off the release paper and topped the foam tape with a piece of heavy acetate. I then stamped the sentiment onto the back slider panel and attached some inked die-cut circles to the top, which gives the recipient an easy pull tab and fits flush at the top of card when fully closed. This panel was then adhered to the very bottom of the front panel with heavy-duty two-sided tape. You need to use really strong adhesive here because this is the pressure point for the pull tab slider.


I knew that I wanted the seaweed vine wreath to stick above the pop-up fold with a heart dangling down in the center on a sliver of acetate. Beyond that, I was a little unsure of exactly how the ocean foliage/shells were going to be arranged. I glued the wreath down first (with the heart hanging down after sandwiching it between multiple die cuts) then I simply stamped/die cut a bunch of kelp, seagrass images and started playing with the design. When I got close to what I wanted, I took a picture so that I could recreate it from the bottom up! I added some die cuts of matte gold glitter paper to give it a bit more neutral shimmer and was really pleased with this "bouquet"-look at the bottom of the slider. I used Distress Ink for all of the stamping and softened all of the edges with water and shimmer spatters; this created a slightly blurry, underwater-look.


I have used this slider pop-up die several times on other cards and have learned that I prefer to give the slider a bit of room to operate and so I added another layer of double-sided foam tape behind the front panel (being sure not to get too close to the slider - but adding sufficient tape to give it enough support.) The front was then adhered on top of the shaker element. 


Even with using the 110# Neenah card stock as the card base, I felt like this card was so top/front-heavy that I needed to add another piece of cardstock to the back panel to reinforce it a bit. I created another 4.25" x 5.5" stenciled background, stamped the interior sentiment, die cut it and glued it to the back panel.

I have entered this card into the following challenges:


Thanks so much for joining me today!
Rachelle

Friday, December 14, 2018

Christmas Card | MFT Stamps - Lawn Fawn - Sunny Studio Mash-up


Happy Fri-YAY!

Who doesn't love a good Christmas Card Mash-Up??? And this one features some of my favorite products from MFT, Lawn Fawn and Sunny Studio!

I started off by creating the interactive card panel (4.25" x 5.5") with Distress Oxide Inks and pearlized watercolor, which was lightly sponged through MFT's "Snowfall" Stencil. The slider mechanism was cut using Sunny Studio's Sliding Window die and the score lines reinforced using a bone folder. I adhered a piece of white shimmer card stock onto the front of an A-2 top-folding card base and blended a little oxide ink at the bottom where the sliding window would reveal the sentiment. I placed the panel over the shimmer paper and lightly marked the margins of the opening with a pencil. The sentiment was then stamped using a MISTI.

I die cut all of my snowman pieces (hat, scarf, and head) and then die cut a circle slightly larger for his body. I wanted to keep the background simple so I blended a piece of cardstock with darker oxides and cut it with Lawn Fawn's Forest Border die at the top. I adhered this to only the bottom half of the slider window so that it would pop-up when the panel was pulled.  I cut a snow drift using Lawn Fawn's Hillside Border die, blended it with the same Oxide inks and glued it to the bottom of the background panel. The snowman was assembled/glued down and finished off with black jewels for his eyes and buttons. I cut a piece of black card stock to use as the slider piece and rounded the top corners with a punch.  Two punched circles were glued to the top of the card and a piece of baker's twine finished off the pull tab.


♥ LOVE ♥ this simple interactive card!

Thanks for stopping by!
Rachelle

Friday, August 10, 2018

Birthday Card | Sunny Studio's Happy Camper & Lawn Fawn's Starry Skies


Howdy!

My younger sister’s “Happy Place” is anywhere she can set up her RV and this “Feet with Fire Pit” pose is the standard photo she takes when she get there! There was a general discussion about butter vs. shortening vs. lard pie crusts after I saw what book she was reading in this picture! 😉


For her Birthday, I designed the ♥ PERFECT ♥ card combining the “Happy Camper” stamp/die set from Sunny Studio Stamps and several die sets from Lawn Fawn.

I wanted the night sky to seem like a giant planet rising above the camping scene and so I started with a horizontal A-2 card base and played with circle dies until I found one with the right proportion to extend beyond the edge. I blended several Distress Oxide Inks (Wilted Violet, Salty Ocean & Black Soot) onto a piece of navy cardstock, die cut the circle and randomly cut stars using Lawn Fawn's "Starry Skies" die set. I spritzed the circle with shimmer spray to activate the ink, blotted it with a paper towel and then spattered a little gold paint on it as well. I die cut a second circle out of white card stock, trimmed it down slightly and painted the top ½ with pearlized watercolors. After it was dry, I carefully glued the blue circle on top, which allowed the bright stars to shine through.

The camper was stamped, water colored, die cut and finished off with a little Wink of Stella. I die cut the pine trees from green cardstock and shaded them using Distress Oxide Inks. The background elements were die cut using Lawn Fawn’s “Forest Border” / “Stitched Hillside Borders” and shaded as well. After I determined their placement, I trimmed them down using the rectangle dies. I die cut a 4.25” X 5.5” panel out of kraft cardstock using Lawn Fawn’s "Large Stitched Rectangles" and glued it to the card base. The sky and forest border were adhered to the card front using strong tape. After I determined the design for the trees & camper, the rest of the scene was glued into place.

A piece of black cardstock was prepped with an anti-static powder tool. The sentiment was stamped with VersaMark Ink, white embossed, trimmed to size and adhered to finish off the card.

Thanks for stopping by - time to start the s'mores!
Rachelle