Wednesday, June 27, 2018

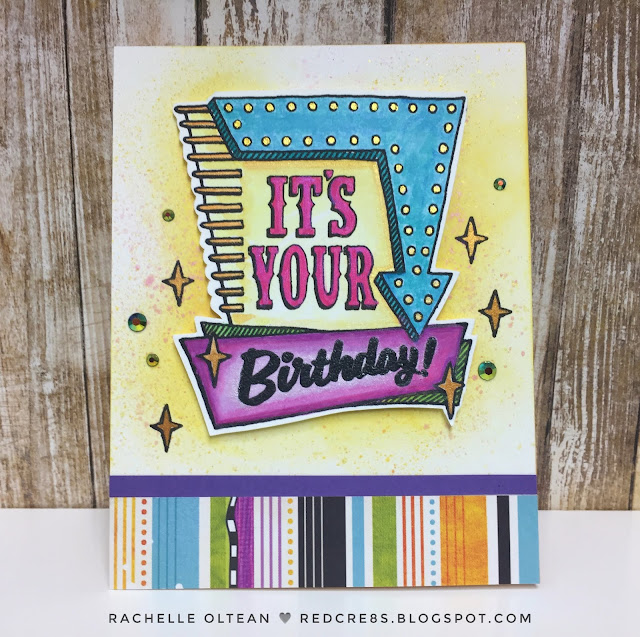
Birthday Card | Stampin' Up - Marquee Messages


Hey everyone!

This card came together quickly because of the wonderful marquee image, which can be customized with an unlimited number of sentiments! I  LOVE  this set because it can be used for both masculine and feminine birthdays. 

I created a background on white card stock by blending and spattering Distress Oxide Inks and randomly stamped small retro stars in VersaFine black ink. The marquee was stamped in VersaFine Onyx Black Ink, embossed with clear powder and painted with pearlized watercolors. I fussy cut the image and popped it off of the prepared background with foam tape. Strips of plain and patterned card stock were glued to the bottom of this A-2 top-folding card and some bling was added with new items from Little Things from Lucy’s Cards – Peacock Feather Mix Jewels♥ 

I needed two birthday cards this week so I created a second coloration!


The inside was stamped with small stars from this same set and a sentiment from MFT’s “Aim For the Clouds” stamp set.


Thanks so much for joining me and have a great day!

Rachelle 

Tuesday, June 26, 2018

Birthday Card | Lawn Fawn - One in a Chameleon


Today I would like to share this cute card with you, which features Lawn Fawn’s “One in a Chameleon" stamp set. The chameleon image was randomly stamped onto the front of an A-2 top-folding card base with Hickory Smoke Distress Ink and then spattered with pearlized paint. Rainbow colors were painted on to white card stock, the chameleon was stamped with black VersaMark ink and die cut. The tree limb was stamped onto wood grain card stock and die cut; multiple leaves were also die cut. 


I die cut MFT’s Die-namics Stitched Rainbow and watercolored it to match my chameleon’s stripes. After a black die cut frame was glued to the card front, the limb/leaves were also glued down. The chameleon and sentiment were popped up with foam taped for added dimension. The rainbow die cut was trimmed and glued into place behind the chameleon and a Wink of Stella was added for a bit of shimmer. I used Waffle Flower’s Rainbow Stamp & Die Set to finish the sentiment on the inside.


This card just makes me smile 😊


Rachelle ❤️

Tuesday, June 19, 2018

All Occasion Card | Church Die Cuts


Hey there!

Today I wanted to share a series of religious-themed cards that can be used for many occasions – thinking of you, sympathy, thankfulness, etc. The background takes center stage on these cards and the technique is easy with Distress Oxide Inks. I knew that I wanted to make a few versions of this same card so I began by cutting sheets of letter-sized Neenah Solar White Card Stock into 4.25 x 5.5” pieces. The background was created by blending Mustard Seed, Abandoned Coral, Picked Raspberry and Wilted Violet together on each of these paper pieces. I spritzed water droplets onto the surface to activate the ink, daubed it with a paper towel and flicked additional drops of gold and white opaque paint onto the surface. After it was dry, the background was trimmed to 3.25 x 5.5” and glued onto a piece of mustard yellow card stock 3.75” wide.

I used the MISTI to stamp the sentiment onto this 2-layer panel in VersaMark Onyx Black Ink, coated it with a clear embossing powder and heat set the powder. I trimmed a piece of craft foam just a little smaller than the entire panel, attached it to the back with strong, double-sided tape and then taped it to the center of the card front. I really like the way this 2-layered panel floats above the card front by using the craft foam. I used the small ink blended pieces that I trimmed from the front panel to finish off the card’s interior.

I die cut the church images from heavy white card stock and attached them to the front with foam tape; a sprinkle of sequins finished off the card.


Thanks for stopping by!

Rachelle

Wednesday, June 13, 2018

Birthday Card | Lawn Fawn - Sweet Smiles - CTS #275


Hi there - thanks for joining me today!

This card is a submission for CAS(E) this Sketch #275.

 CAS(E) this Sketch! #275

This card came together pretty quickly using the "Sweet Smiles" stamp/die set from Lawn Fawn. I stamped/colored/die cut the gumball machine. I then die cut a scalloped circle from the blue Swiss dot paper, backed it with craft foam and attached a small strip of striped paper along the left side. 

I prepped a small piece of black card stock with my anti-static powder tool, stamped the word "sweet" with VersaMark ink, embossed it with Lawn Fawn's white embossing powder and trimmed it down to size. The gumball machine and sentiment were popped off the card front with foam tape to add some dimension and the card was finished off with a Wink of Stella to give the image some sparkly reflection. I really like the bright, graphic look of this card.


Thanks for stopping by today!

Rachelle

Wednesday, June 6, 2018

Pop Up Card | Lawn Fawn - Yay Kites


Hi there!

Today I would like to share my first pop up card! Yippee! It's a whole new world and using Lawn Fawn's "Stitched Hillside Pop-Up" made it easy after my planning was done! I decided that I wanted to create a kite flying scene so of course Lawn Fawn's "Yay Kites" stamp/die set was perfect!

Keeping the card front very simple, I just used a sentiment banner, grassy border die cut and baker's twine. It's all about the big reveal! 


I created the kite flying scene in layers by first adhering the light blue card stock panel, puffy cloud border pieces and single clouds. This side of the card was finished with a dark blue frame. Since the hillside pieces were being cut from green patterned paper, I continued that paper on the other side of the card’s interior. All of the images were stamped, water colored and die cut. I glued 3 of the “hello” die cuts together, attached it securely to the back of the kite and finished it off with twine ribbons. The animals were glued directly onto the pop up layers and the flying kite was attached to the bunny’s paw. I LOVE how the kite flies suspended above the scene! 

I decided to add a sky/cloud panel onto the “grass” in front of the pop up, which gave me a place to write my sentiment. Wink of Stella and clear sequins were added for just a little bling and BAM the card was finished!

I can’t wait to start my next pop up card! 😊


Thanks so much for joining me and have a great day!

Rachelle 

Tuesday, June 5, 2018

Graduation Card | Watts of Occasions - Stampin' Up


Hey there!

I wanted to show you a very simple graduation card featuring one of the creative light bulbs from the Stampin' Up "Watts of Occasions" set. I combined it with sentiments from Lawn Fawn and the great stamp/die set from Pinkfresh Studio's Word Series "Brilliant".

I lightly blended Distress Oxide Ink (Mustard Seed) onto a panel of white pearlized card stock and adhered it to the right side of an A-2 white top-folding card base. The heart bulb was stamped onto the same paper with black VersaFine Ink, colored with distress inks and then fussy cut. To add some color, I added two strips of patterned paper to the left side of the card front.

Using the MISTI, I lined up and stamped the sentiments with the VersaFine Ink and popped the light bulb onto the front of the card with foam tape to give it some dimension. The inside of the card read "Keep Doing That! Happy Graduation!" I LOVE simple, beautiful cards like this one!

Thanks for joining me and have a great day!

Rachelle 

Monday, June 4, 2018

Father’s Day Card | Flying By – Lawn Fawn


Hey there!

My father-in-law was a pilot in WWII and he continued to fly small prop planes well into his 60’s. So this Father's Day Card focuses on Lawn Fawn’s paper airplane from the “Flying By” stamp/die set being piloted by the adorable mouse from the "Elphie Selfie" stamp/die set.

I created my own sun ray stencil from cereal box chipboard and blended Distress Oxide Inks (Wild Honey/Mustard Seed) onto a piece of pearlized white paper. Keeping the stencil in place, I flicked water and small spatters of gold paint from the Kuretake Gansai Tambi Starry Colors Set onto the paper - I really wanted the sun rays to glow. The painted background was trimmed and glued onto a top-folding A-2 white card base. I stamped, colored and die cut the mouse/paper airplane. After cutting a small slit in the paper airplane, I slipped the little mouse down inside and taped him into the cockpit on the backside of the images. I LOVE how cute he looks flying the plane! I blended Salty Ocean Distress Oxide Ink on a small piece of the same pearlized paper, spritzed is with shimmer spray and die cut a circle to create my sky scene. I wanted the mouse to be flying onto the paper so I taped the die cut onto the card front with washi tape. Using my MISTI, it was easy to position the little dotted line stamp exactly where I wanted it across the card base and into the sky.


Small clouds were die cut from Waffle Flower’s "Rainbow Panel" set and the sentiment was stamped into the wide banner from Lawn Fawn’s “Bannertastic” stamp/die set. Instead of ending the sentiment with the word “hi”, I used a post-it note to cover it so that I could add dots leading to the inside of the card instead. The sky was popped up with foam tape and adhered to the card front – aligning the dotted lines. The clouds, sentiment banner and flying mouse were also attached to the scene with either glue or foam dots. There was a lot of dimension to this card and I added tons of additional sparkle with small sequins and Wink of Stella. I used Happy Father’s Day from Lawn Fawn’s “Happy Happy Happy” stamp/die set for the inside of the card and attached another little paper plane next to the sentiment. I think he's gonna love this card!


Thanks so much for stopping by!

Rachelle