Happy Friday!
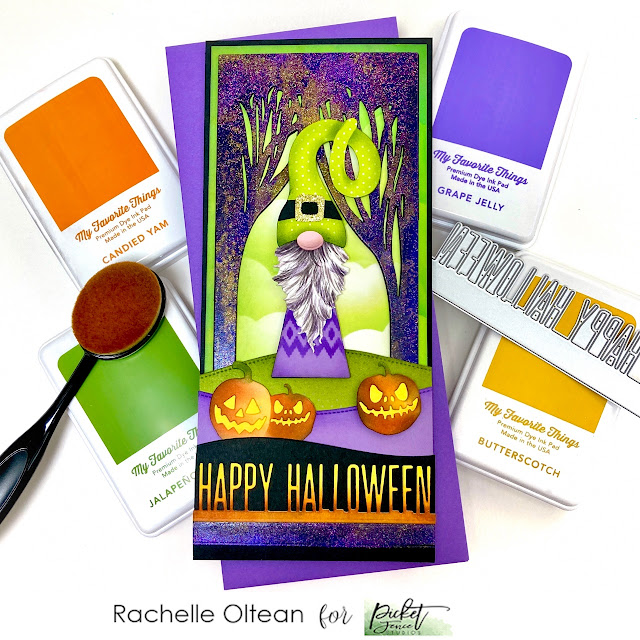
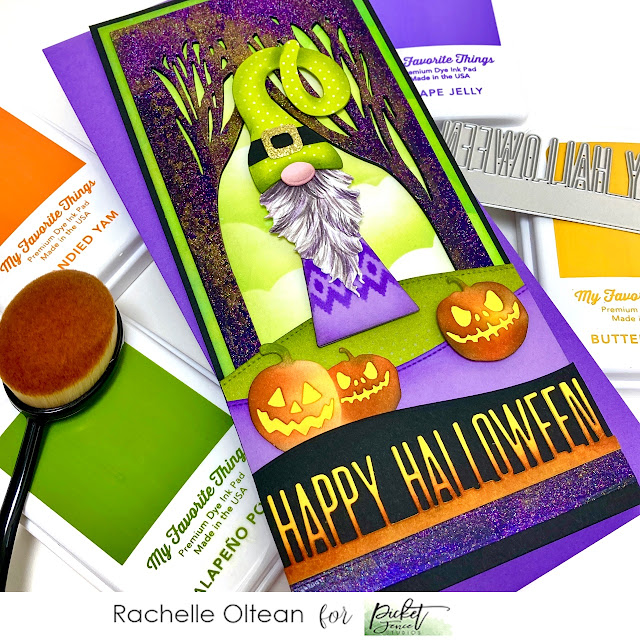
Picket Fence Studios has joined forces with MFT Stamps today for a creative collaboration! The PFS Design Team received ink pads/pattern paper to use and I had so much fun ink blending on both of my projects! I have been an MFT customer for many years and love their stamps/dies/pattern paper but I had never purchased any of their inks - now I can't wait to add more to my collection! The colors are so intense (with really juicy ink pads) and they blend beautifully with Picket Fence's "Life Changing Blender Brushes".
I have had this idea for a spooky forest scene ever since I saw the "Billy The Gnome" Die Set and this was the perfect opportunity to add some great detailing with MFT's "Premium Dye Inks! This ink quartet - "Candied Yam", "Jalapeño Popper", "Butterscotch", and "Grape Jelly" - created the perfect Halloween palette!
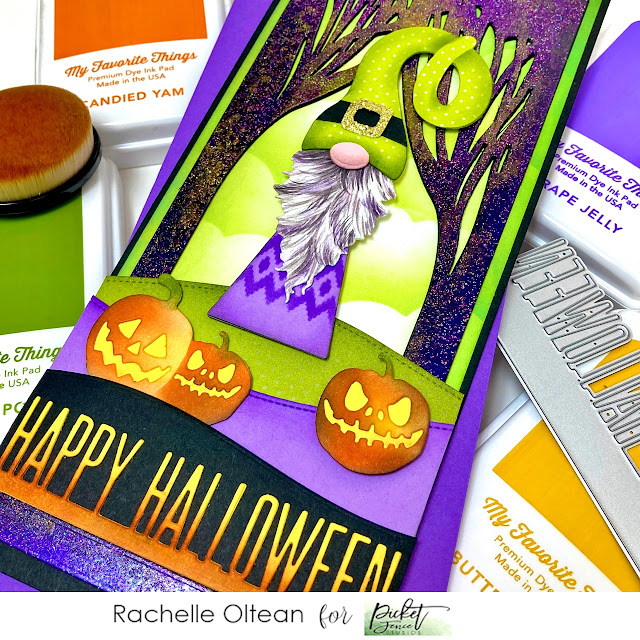
I began by die cutting "Billy" from several different card stocks and his hat from MFT's lime green pattern paper from the
"Poppin' Polka Dots" Paper Pad. I added ink shading/pattern to the various pieces and painted the beard details with watercolors; all the pieces were assembled together with liquid adhesive. Using the
"Scarecrow Cover Plate Die", I die cut just the row of pumpkins from the image and fussy cut them apart. The pumpkins were blended with the MFT Inks and backed with yellow card stock pieces to cover the omits. Sloped pieces of black, purple and green card stock were die cut; ink blended shading was added. I also ink blended the green sky background, trimmed this finished panel down to 3.75" x 8.75" and attached it to a black slim line card base. My final ink blending was on the
"Happy Halloween" Word Topper Die.

Then it was time to assemble all of the remaining die cuts in the scene from the back to the front ending with the "Word Topper" on the black sloped piece at the bottom! I just love Billy as a bewitched Halloween gnome!
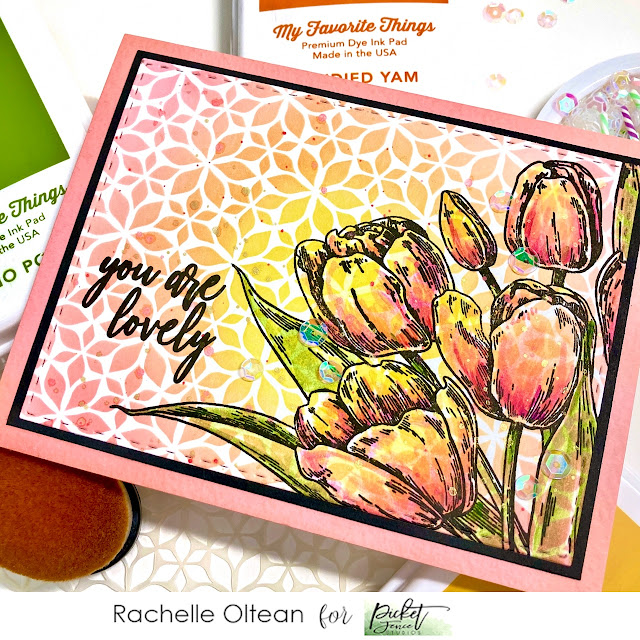
For my second project, I used the MFT Inks to stencil a soft background
("Flowers Stencil") with a warm glow in the center. I then stamped the large floral image from the
"Early Tulip Bouquet" Stamp Set on top of the background and added touches of transparent watercolor so that the pattern would come through. The finished panel was die cut and attached to a skinny black mat, which was glued onto a pale peach card base. The sentiment was stamped using my MISTI and a sprinkling of sequins from the NEW
"Birthday Candles" Sequin Mix Plus finished up this card.
Thanks so much for stopping by today and be sure to check out all of the great projects created by both Design Teams! There's also a great giveaway - each company is giving away a $50 gift certificate to use in their respective stores so be sure to leave a comment or two for a chance to win! Here are the links:
Have a great weekend and happy crafting!
Hugs - Rachelle ♥


Your gnome card is stunning Rachelle so many elements that came together creating a fabulous Halloween card.The tulips are simply beautiful a gorgeous background and colours
ReplyDeleteTwo favorites: Gnomes, and tulips!! You spoiled my today, my friend! Both absolutely fantastic!!
ReplyDelete=]
Oh my goodness this gnome card is to die for! I love the bright lime green and purple colors! So nice!
ReplyDeleteTrying to post a comment
ReplyDeleteI like your step by step instructions. Makes me want to try it! Thanks for the inspiration.
ReplyDeleteGorgeous, love the stencilling paired with the beautifully coloured florals!
ReplyDeleteI love both of your cards! So pretty.
ReplyDelete