Friday, March 27, 2020

Birthday Card | MFT Stamps - The Whole Herd & Green Pastures


Howdy!

Thanks so much for stopping by today! This special card is for my niece who just turned 18 and who is a bovine expert! She loves her cows - specifically "Harmony" and "Hope", who look very much like this red-spotted dairy cow I colored for her!

The card today is all about the watercoloring! I stamped, colored and cut all of the images: the cow and farmer are from MFT Stamps' "The Whole Herd" and "Green Pastures", respectively. The barn/silo image is from an ancient Stampin' Up! set that is over 15 years old! I then created the grass panel by using a very fine brush and gradating greens from the top to the bottom with short strokes. I made a domed card base from MFT Stamps' now-retired Stitched Dome Die-namics by using the largest shape to cut the curvature along the top and added a white frame along that edge; the final card measured 4.5" x 6".


The grass was trimmed with a stitched border die and all of the images (including the heat embossed sentiment strip) were glued and/or popped into place with foam tape. Red and white twine was tied along the card fold to finish the project! This little red-headed gal looks just like my sweet niece and I hope she had a great birthday despite the COVID-19 quarantine! 

Challenges:


Thanks so much for stopping by and for commenting!
Rachelle

Tuesday, March 24, 2020

Easter Card | Guest Designer on the Retro Rubber Challenge Blog - #131 Tic Tac Toe!


Hello!

I'm so excited to be joining the amazing team over on the Retro Rubber Blog today as the Guest Designer for challenge #131 - Tic Tac Toe! As you can see from the options below - there are so many great choices from which to create your own perfect 3-in-a-row! I decided to make an "X" and went with five prompts! I hope you will join us and don't forget to use a stamp that is at least one year old!


I decided to use Lawn Fawn's "Easter Party", which was released in combination with the "Easter Egg Frames" in the Spring of 2018. I started by cutting small strips of pattern paper and gluing them down onto white card stock measuring 3.5" x 4.5".


Using the egg frame, I traced around the shape to give me a cutting edge and hand cut the eggs to fit behind the frame.


I die cut the frames from contrasting card stock, glued/stacked 2 frames together and adhered them onto the egg base. I placed the egg into the MISTI and stamped the sentiment. The Lawn Fawn images were stamped, colored and die cut and I glued one blank die cut behind each one to give it stability before popping them into place with foam tape. I added a few pastel pearls to finish off the card front. 

I made the card base by creating a positive template from the die cut and adding numerous marks to make sure that the image remained square. So when I placed the folded card base onto my grid, the template was also aligned on top (using the same grid) over the fold and then I cut the shape to create the card base. 


I ended up with a card base rainbow!


Thanks so much for joining me today and please head over to the Retro Rubber Blog to see the other great projects for this challenge!

Additional Challenge Submissions:

Die Cut Diva's - March 2020

Let's Craft and Create #157 - AG + Opt Easter

Sparkles Monthly Challenge  - #126 Easter

Sweet Stampers - #42 - Easter or Spring

Use Your Stuff - Spring #394

Crafty Cardmakers #253 - Spring

Rachelle

Friday, March 20, 2020

Birthday Card | Cut It Up! Challenge #196 - "Spring Fever: Use at Least 3 Butterflies"


Here Comes Spring!

Hey Everyone! Today we are starting a new challenge over on the Cut It Up! Blog: "Spring Fever - Use at Least 3 Butterflies." I decided to go with a mix-n-match combination of several die cuts as my focus for this challenge! Our prize sponsor, Wendy from Digital Delights by Louby Loo, is offering a $5 gift code to the on-line store. The design team has designed some stunners for this challenge so head over to the Cut It Up! Blog to see their creations. We hope that you will join us and don't forget the die cut! 

Truth be told, I was a bit stumped with this challenge but once I got rolling, everthing just came together and I ended up making THREE Butterfly Cards! ; )

Card#1: 
I ink blended an A-2 sized background panel with Distress Oxides, stamped the sentiment with VersaMark Ink and heat-embossed it with white powder; this was adhered to the front of the card front. I smooshed several Distress Oxides Inks onto my craft mat, sprayed it with water and then tapped my white cardstock into the inks. Once I was happy with the coverage, I flecked it with metallic watercolors and set it aside to dry. 

I die cut the largest butterfly from white card stock several times and glued/stacked the images together. The same butterfly was cut from vellum and using my Scor-Pal, I gently scored along each side of the body - the middle-sized butterfly was cut from Louby-Lou's Digital Checked Paper and scored the same way. The vellum and pattern paper die-cuts were then glued down to the center of the base butterfly.

Using Avery Elle's Wonky Circle Frames Die, I cut/glued/stacked four die-cuts together to create some dimension. I also cut a frame from the ink-smooshed background panel and used the interior circle for the center. The frame pieces were glued into place on the card front and the triple butterfly was popped up with foam tape. A few sequins finished up the card. The mix of vellum and card stock is really effective together and the smooshed background looks like an abstract floral background!


Card #2:
I used the outside ink-smooshed frame die-cut from Card #1 as the base for this next card! I added another detailed circle frame and lightly colored the vellum with Work Lipstick DO Ink. The angled white card stock panel was die-cut with Pinkfresh Studio's "Classic Edger Die". I used the leftover smooshed background for the bottom piece and using my Scor-Pal Board, scored vertical lines on the reverse side every 1/4" to give it some textural interest. This card was assembled much in the same way as the first one and I added a small word die-cut as my sentiment.


CARD #3:
I wanted to enter the "Twofer Card Challenge #25: Spring Animals" and so I designed a totally different butterfly layout for this card! First, I ink-blended a spring-y background panel and spritzed it with shimmer spray. Then I die-cut multiples of all three butterfly dies and glued/stacked two of each size together. After the die-cuts were arranged as you see below, I took a quick picture and then used that as my guide to start adhering them down. After they were all glued into place, I simply cut the overhanging pieces off from the backside, leaving a flush edge. This panel was adhered to the front of an A-2 top-folding card base.


Using Honey Bee Stamps' "Smile" Die Set, the shadow was cut from light blue vellum and the top from a textured gold metallic card stock; the pieces were glued together and into place on the card front. Using the MISTI, the coordinating sentiment was stamped onto the butterfly die-cut and a few matte gold sequins finished up the card.


Thanks so much for sticking with me for this longer-than-usual post! 
Please stop by the Cut It Up! Challenge to check out all of the great projects and we can't wait to see all of your butterflies fluttering into our gallery!

Additional Challenges:


Thanks so much for joining me and for taking the time to comment! 
Rachelle

Thursday, March 19, 2020

All Occasion Card | MFT Stamps - I Vike You


Hi!

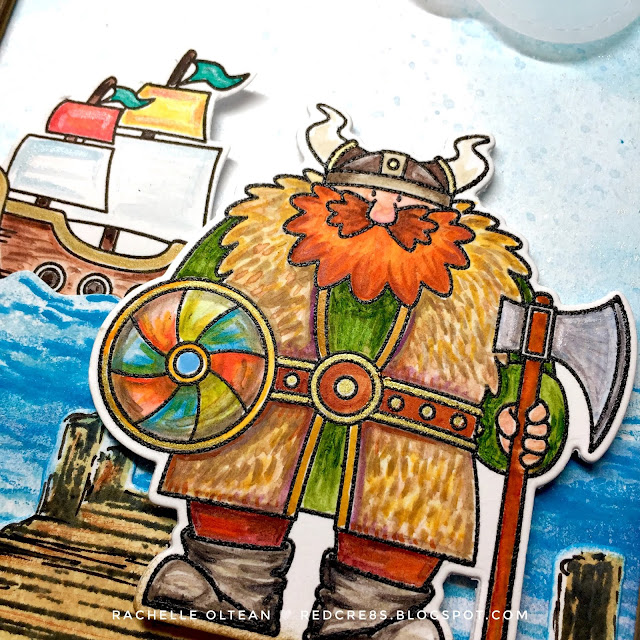
You'd never know it now...but my hair used to be almost the same color as "Erik The Red's" beard!! This guy has been in my stash for a while now just waiting for the perfect time to make an appearance! My father-in-law is in an assisted-living facility, which has now stopped allowing visitors (due to COVID-19), and so I thought that a card featuring this wild man would brighten his day!

This scene was created with a combo of MFT and Hero Arts products and I started by using stamps from the MMH Kits, the layered ocean background and wooden dock. The ocean waves were stamped onto the bottom half of an A-2 panel of 130# white card stock; the sky was lightly blended using the same Distress Oxide Inks and the entire panel was spritzed with shimmer spray. The dock was stamped/die cut and I lightly blended the edges with blue ink to soften the white edges.


I stamped Erik (MFT Stamps now-retired "I Vike You") and heat embossed him with clear powder; he was painted with water colors and backed with a plain die cut blank. I stamped/colored/fussy cut the ship from MFT's now-retired BB "Party Like a Pirate"Set

Using an A-2 rectangular frame die, I die cut four pieces from brown card stock and glued them together for stability and dimension. I then dry-brushed the frame to give it some wood grain texture and spattered it with gold watercolor. I die cut stitched cloud banks from vellum and white card stock, determined the placement under the frame, trimmed them to fit and adhered them to the backside of the frame. The sentiment was stamped using the MISTI.


I glued the dock into place at the bottom of the front panel and made a small slit along the top edge of the waves. The ship was slipped into the water, taped into place on the back and a small piece of foam tape was added underneath so it would "float" a bit! The frame was glued on top and Erik was popped into place with foam tape; the entire panel was attached to an A-2 top-folding card base. I've printed a bunch of "Viking" cartoons that will go inside to help brighten my FIL's day! : )


Thanks so much for joining me and for your encouraging comments!

Challenge Submission:

Watercooler Wednesday - WWC263 - AG/Masculine Twist

Paper Funday Challenges - AG / March 2020

Cardz 4 Guyz - Challenge #240 - Something Beginning with "F" - Fur Coat

Dream Valley #221 - One For The Boys

Crafts Galore Encore - March AG #73

Die Cut Divas - March AG

Daisy Chain Challenges - March 2020 #39 Use Dies

Through The Craft Room Door - AG

Artsystamper - #12 Lots of Layers

Creatalicious Challenge - #13 Anything Goes - Opt. Layer It Up!

Rachelle

Friday, March 6, 2020

St. Patrick's Day Card | Cut It Up! Challenge #195 - "Green With Envy" Use Green on your Project


Top O' The Morning!

We've got a great new theme over on the Cut It Up! Challenge Blog..."Green With Envy" all you need to do is use some green on your project (and include a die cut!) We are so very lucky to have TWO AMAZING sponsors for this challenge: Avery Elle ($20 e-Gift Code) and Your Next Stamp ($15 e-Gift Code)! We want to send out a HUGE THANK YOU to these great companies for their ongoing generosity and support of our challenge! Please stop by the CIU Blog to see what fantastic projects my fellow designers have created!

I wanted to create a graphic St. Patty's Day Card and decided to go with a mix-n-match of dies cuts and a simple stamped sentiment. This is a 5" x 7" card and I began by layering the black and green dotted card stock pieces onto the card front. The sentiment was stamped using the MISTI and all of the die cuts were adhered onto this panel. The mustache was popped off with a bit of foam tape in the middle and I curled up the edges to give it a more dimension. This entire panel was glued onto the card front to finish! I will have to hand-deliver this card because it probably won't fare well going through the mail...I don't want to squish that perfect bow tie! : ) We can't wait to see your "greens" for this challenge!

Additional Challenge Submissions:


Thanks so much for stopping by!
Rachelle