Thursday, August 29, 2019

All Occasion Card | Freshly Made Sketches #400 Milestone Celebration | Lawn Fawn - You Are Sublime


Hello!

Thanks so much for joining me today as I celebrate with the wonderful team over on the Freshly Made Sketches Blog! They are celebrating a HUGE Milestone - their #400th Sketch - and to commemorate this accomplishment, a long list of great manufacturers have been very generous and donated lots of prizes for this challenge. Please head over and check out the wonderful ideas that the design team created for this very special sketch!

I have wanted to do a pastel color way for Lawn Fawn's "You Are Sublime" for a long time and this was the perfect opportunity to combine the Lawn Fawnatics current challenge (Something See-Through) with #FMS400! I began by lightly ink blending a background using Distress Oxide Inks (Wilted Violet, Salty Ocean and Cracked Pistachio) and a bubble/wave template. I sprayed the panel with shimmer mist, spattered it with diluted inks and set it aside to dry. I also blended these same three colors on a thin strip of scrap paper and cut it in half (this gave me 2 smaller strips measuring 1/2" x 5.5"). I trimmed the stenciled panel down to 3.25" x 5.5" and die cut the frame in the middle with Lawn Fawn's Shadow Box Theater Add-On. I added more ink blending to the small positive die cut since I was going to pop it back in the middle of my underwater scene. I determined the stencil panel's placement on the front of an A-2 horizontal top-folding card base and glued the small center die cut in the correct spot. I adhered my two ink blended strips on the outside edge of the stencil panel (in reverse color order) in order to frame it with a border and backed the entire panel with craft foam.


I stamped, colored and die cut all of my Lawn Fawn images. I decided that I didn't like the white die cut edge popping off of the darker ocean background so I colored the edges to match the background tones and the images were glued into place. I really like the way this turned out - it looks more like you are peering into an aquarium with the softened image edges. I lightly ink blended Wilted Violet onto the back of heavy vellum, prepped the opposite side with my anti-static powder tool, stamped the sentiment with VersaMark Ink and heat embossed it with white powder. I die cut the sentiment and adhered it into place with a very small piece of vellum adhesive at either end. I wanted a semi-transparent effect for this sentiment strip and this technique worked very well.


I glued my little lobster into place holding onto my sentiment strip and adhered the entire front panel into place with the submarine scene lining up in the middle. The card was finished off with an assortment of iridescent bubbles from Lucy's Little Things - I love how they play off the other colors used in the card!

Thanks a million for stopping by and make sure you enter in the #FMS400 celebration!

Challenges:


Rachelle

Friday, August 23, 2019

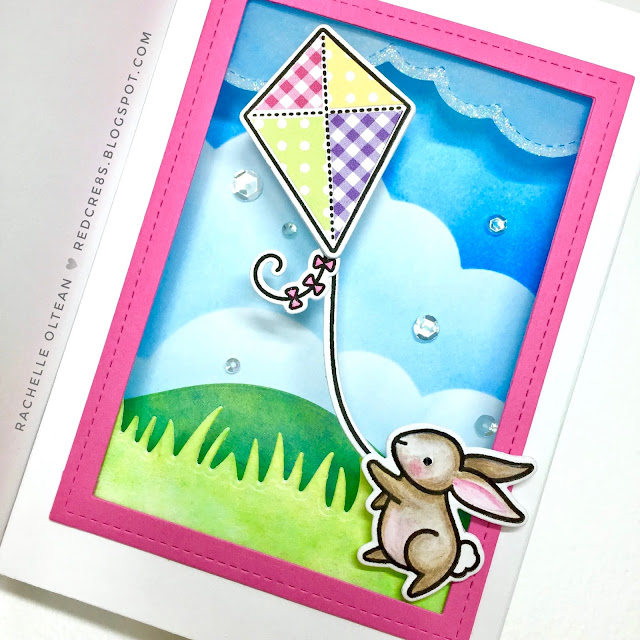
All Occasion | Lawn Fawn - Yay Kites | Inside Shadow Box Card | Guest Designer on the Cut It Up Challenge Blog


Hello!

I am SO excited to share this card with you today as the guest designer over at the Cut It Up Challenge Blog! This challenge is entitled "Outdoor Fun" and the main rules are to use dies & follow the challenge theme. Head on over to the blog to see all of the other great ideas created by the fabulous design team!
"Yay Kites" is one of my favorite older Lawn Fawn Sets (an "oldie but a goodie" - released in Summer 2016) and I used it to create this inside shadow box card based on Jennifer McGuire's popular blog post. Thanks to Jennifer for being such a generous teacher and for sharing the tips & tricks on how to make this awesome card!

I die cut cloud stencil edgings using Lawn Fawn's "Puffy Cloud Borders" Die Set and ink blended cloud banks using Salty Ocean Distress Oxide Ink onto a panel of 100# white card stock; the panel was cut with the largest (4.25" x 5.5") Lawn Fawn "Stitched Rectangle Die." Two additional cloud banks were die cut using the largest puffy cloud border and then again with the same stitched rectangle die in order to form a seamless layered panel when adhered together! Before I glued the cloud banks to the sky panel, I added a bit of fine glitter to the outer edges of the clouds. I wanted to keep the card front simple since the scene on the inside is more detailed and I needed a kite that was a bit larger than either of the kites in the stamp set in order to get the proportions correct. So I created my own kites (see below) in PowerPoint which were similar to the stamps, printed them on cardstock, paper pieced the main kite with assorted papers and hand cut the image. 


All of the "Yay Kites" images were stamped with VersaFine Onyx Black Ink using  the MISTI, colored and die cut. I finished the front sky panel by gluing all of the images into place and set it aside to dry in a heavy book.

Next, I cut/scored both pieces of card stock needed to construct the shadow box; here are a couple of quick sketches that show the measurements/scoring instructions: (please note: card front score is a valley fold and all the score lines on the card interior are mountain folds)


I die cut my interior shape and used a 1/4" pink stitched rectangle frame as an outline. Then I put the shadow box together per Jennifer's instructions. Using the same puffy cloud stencil edging, I ink blended another sky panel (3.5" x 5.5") on white card stock with the same distress oxide ink and glued it into place on the background panel. A piece of heavy-weight vellum was die cut with the puffy cloud border and fine glitter was added to the edging; when it was dry, this die cut was adhered behind the pink frame. The rolling hillside and grassy foreground border were ink blended with Distress Oxide Inks, die cut using Lawn Fawn's Stitched Hillside Borders and Grassy Border, and adhered into the scene. 


I die cut 3 additional kite strings/rabbits from white card stock and glued/stacked them behind the stamped images; this gave me the stability I needed to assemble the rabbit holding the kite in the sky. I used strong liquid glue to adhere all of the pieces together and stuck the bunny in place with foam tape. The top of the kite was attached to the vellum cloud with a couple of small glue dots. 

The bird/kite/sky panel was attached to the card front and crystal sequins were added to the inside scene to finish up the card. I folded/refolded the card's score lines several times to make sure that the shadow box would work correctly and it held together perfectly. 


Thanks so much for joining me today - I really appreciate all of your comments!

I would also like to enter this card into the following challenges:


Rachelle

Thursday, August 15, 2019

Birthday Card | Die Cut Shaker


GAME - SET - MATCH!

Thanks so much for joining me today This special card is for my husband who plays tennis at least 3 days a week since he retired and absolutely loves it! He's like the Energizer Bunny on the court and can easily keep up with his competitors who are less than half his age...not sure how he does it?

I created the striped panel in the Cricut Design Space, die cut it using 130# Neenah Classic Crest to form the front panel and backed it with a piece of acetate. I then ink blended a separate panel using Distress Oxide Inks (Blueprint Sketch, Salty Ocean & Lucky Clover) on a 4.25" X 5.5" piece of 110# white card stock and glued it to a top-folding A-2 card base. I die cut the tennis player/ball 3 times from black card stock and glued/stacked the images together. 

The sentiment was stamped using VersaFine Onyx Black Ink onto the front panel and then small strips of foam tape were cut/adhered into place on the back. I added foam tape strips on specific horizontal lines, which allowed me to separate the sequin colors into three distinct bands on the finished card. The front panel was positioned into place on top of the sequins/ink panel and the silhouettes were adhered with small pieces of foam tape to finish off the card. 

This is a simple design that packs a lot of graphic punch and the inside sentiment reads "Hope Your Birthday is a SMASH!"


Thank you so much for joining me and I really appreciate your comments!

I have entered this card in the following challenges:

The Male Room - #117 - Birthday

Simon Says Stamp Wednesday Challenge - Midsummer Blues

Sisterhood of Crafters - Die-Namic

Krafty Chicks - Masculine #468

AAA - For The Boys - #4

Use Your Stuff #370 - Summer Activity

Have a great day!
Rachelle

Sunday, August 4, 2019

All Occasion Card | MFT Stamps - Pure Innocence Love You A Bunch | A Place To Start Challenge


Hey There!

I would like to share my design team project for A Place To Start's current challenge - "A Crafty Piece of Mine: Paper Piecing." This sweet little gal is Pure Innocence "Love You A Bunch" from MFT Stamps. 

I stamped her with VersaFine Onyx Black ink two times - once on 110# white card stock and again on a small piece of lavender polka dot pattern paper. I colored and die cut the image on the white stock and fussy cut just her dress from the pattern paper. After I went round the edge of her dress with a black marker, it was glued into place on the colored image; another plain die cut was glued behind it to add some stability.

I prepped a piece of black card stock with my anti-static powder tool, stamped the sentiment using VersaMark Ink and heat embossed it with white powder. The sentiment was die cut and I added two additional cuts (glued/stacked together) to give it dimension.

A strip of MFT's "Party Patterns" stripe paper was adhered to the bottom of a top-folding A-2 card base, the sentiment strip was glued on top and the cutie patootie was popped off the card using foam tape. A sprinkling of assorted lavender sequins finished up this simple card. I really like this sentiment/image combination because it can be used for a birthday, as a thank you or just to brighten someone's day.


I have entered this cutie patootie in the following challenges:


Thanks so much for stopping by and thanks so much for your comments! They make my day!
Rachelle