Friday, January 25, 2019

All Occasion Card | Hello Bluebird - Rainy Day


Happy Fri-YAY!

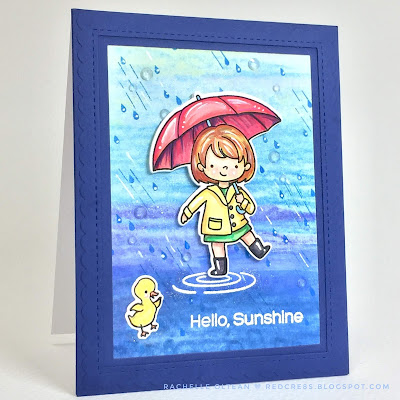
Today I would like to share a card that uses Hello Bluebird’s wonderful “Rainy Day” stamp set.

The rainy watercolor background was created with Caran d-Ache Neocolor II Artist's Crayons. I taped down a piece of 130# Neenah Solar White card stock onto an Epicurean cutting board and lightly sketched bands of overlapping color onto paper. I sprayed it with plain water, recolored certain areas and sprayed again with shimmer spray. I dried the paper with my heat gun and went back in to add some additional colors. Because I had taped the paper down it remained fairly flat, even with all of the water that I sprayed onto the surface! The raindrops were randomly stamped onto the background and highlights were added with my Uni-Ball Signo White Pen. I stamped the little girl/duckling onto the same 130# Neenah cardstock with VersaFine Onyx Black Ink, water colored and die cut the images. I glued and stacked three of the little girl die cuts together to provide some dimension to the image.


I die cut multiples of Hello Bluebird’s Gallery Frame #1 & 2 on navy cardstock and glued/stacked different pieces together to create a simple frame. The rainy background was adhered onto the front panel of an A-2 top-folding card base and prepped with an anti-static powder tool. The sentiment/puddle were stamped with clear embossing ink using the MISTI and heat embossed with detail white powder. The navy frame was glued down onto the background and the puddles were highlighted with a heavy coat of Wink of Stella Shimmer Pen. The duckling was glued directly onto the background and the girl was popped off using some foam tape. The card was finished with little raindrops using Lucy’s Clear Ice Cube Jewel Mix.

Thanks for joining me!
Rachelle

Thursday, January 24, 2019


Hey there! 
I’m sharing a wedding shaker card with you today!  

The background was blended with distress oxide inks and adhered to a top-folding A-2 card base. I die cut Hello Bluebird’s Gallery Frame #3 several times from 100# white card stock and glued/stacked the interior frame together to create some depth; a piece of acetate was taped to the back of the frame stack. The scalloped part of the frame was glued directly to the inked base. I also die cut the frame from craft foam and adhered the center foam frame to the acetate backing. Three “Mr. & Mrs.” die cuts were glued/stacked together and adhered onto the acetate in the center of the top frame panel. I piled up an assortment of shaker fillers at the bottom of the card, adhered ScorTape to the craft foam and placed the frame in the card center. The front was finished with a pink heart rhinestone to compliment the shaker fill.

Thanks for joining me!
Rachelle

Monday, January 14, 2019

Birthday Card | Avery Elle - Shut the Front Door


Hey There!
Sharing one of my favorite foods with you today…GUACAMOLE! And I love it even more when it’s featured in a birthday card using Avery Elle’s punny “Shut The Front Door” stamp set!
This CAS card starts with a top-folding A-2 white card base with a simple embossed stripe on the front. The avocado was stamped, water colored, die cut and given a bit of shimmer with a Wink of Stella. The sentiment was stamped onto green card stock and die cut. Both of these small die cut panels were then mounted onto contrasting papers. Once I had determined their placement on the card front, the sentiment was stamped using the MISTI.  The green panel was glued directly to the card front and the avocado panel was popped up with foam tape. The card was finished off with a sprinkling of assorted sequins and baker’s twine.


This card was entered into the Seize the Birthday #156 Challenge “Confetti” Topping.

Thanks for stopping by!
Rachelle

Wednesday, January 9, 2019

Thank You Card | MFT's - Captivating Mandala


Hello!

I was lucky enough to have a bit of extra time during the Christmas holiday and was able to get out all of my thank you notes pretty quickly. This pretty snow-inspired card features the MFT’s Captivating Mandala Die. This wonderful die can be used in so many different ways but its "snowflake-look" was perfect for these thank you cards.


I started by randomly blending a background using distress oxide inks (Salty Ocean, Cracked Pistachio, Peacock Feathers, & Wilted Violet). The background was spritzed with shimmer spray, flecked with metallic watercolors and blotted with a paper towel. I created the shaped card base by partially die cutting a horizontal A-2 top-folding card base with MFT’s Elegant Rectangle Stax Die-namics. The inked background was die cut with the same shape and adhered to the card base. The mandala image was die cut once from white glitter paper and twice from heavy white card stock; these die cuts were glued/stacked together to create dimension. I wanted a simple sentiment to stretch along the bottom of the card front and chose one from Lawn Fawn’s “Simply Sentiments”. The mandala “snowflake” was glued onto the card front and it fit perfectly into the heat-embossed sentiment! The card was finished with a bit of ‘bling’ with Lucy’s Little Things’ Clear Iridescent Jewels.

Thanks for stopping by!
Rachelle