Showing posts with label CAS. Show all posts

Thursday, August 15, 2024

Birthday Card | Krafty Chicks Challenge #729 - CAS


Hello!

Thanks for stopping by this week for another CAS Challenge over at the Krafty Chicks! This quick birthday card uses one of my favorite Ellen Hutson Sets - "Voices in My Head" with that giant speech bubble die and cute line drawing! All that I needed to add was a large word die cut and a teeny stamped sentiment to finish up the design! YAY!

Please stop over to see us at the Krafty Chicks Challenge this week for some clean & simple fun!

Be sure to head over to the Krafty Chicks' Blogs and leave them some love!

Thursday, April 18, 2024

Birthday Card | Graciellie Designs - "Cupcake Wishes" | Krafty Chicks Challenge #712 Week 3 CAS


Hey there!


It's week #3 over at Krafty Chicks Challenge and that means CAS! I decided to go with one of my favorite birthday images from Graciellie Designs' "Cupcake Wishes" digital stamp set and I absolutely LOVE this cupcake image!

I printed the image on 80# white card stock, watercolored and trimmed it to fit an A2-sized card base. The wide sentiment is from one of my most-used stamp sets, Simon Says Stamps' "Birthday Greetings." This great set has nothing but birthday sentiments in all sizes/fonts and has a matching die set as well! The heat-embossed sentiment was cut to size and glued onto the card front.

I also made a second color way for a very special little girl who loves PINK and here is that version -


I hope you will join us over at the Krafty Chicks Challenge for some 'Clean & Simple" FUN!

The Chicks!


Thanks for stopping by and happy crafting!
Rachelle ♥

Wednesday, November 24, 2021

Christmas Card | Pink & Main - "Homespun" Christmas Card Kit


Hello everyone! 

I know we’re all geared up for Thanksgiving here in the US but I’ve got a CAS Christmas card to share with you today that focuses on the beautiful poinsettia image from the “Homespun Christmas Card Kit”. If you haven’t picked this up yet, there’s still time to grab this awesome kit, which is a fantastic value for all of the goodies included! I stamped and watercolored the floral image and then die cut the panel using a NEW “Notched Corner Die.”


I attached a red stitched rectangle (Stitched Rectangles Set 1) onto an A2 card base and glued the floral panel on top. The “J” and “Y” (from the “Thin Alpha Die Set”) were die cut from the Red “Winter Glitter Paper Pack” and glued next to poinsettia to spell out the word “Joy”. I added a few sequins to finish up this clean design!


You could also spell out the word “Noel” with this same poinsettia image and “Snow” using one of the snow people from this month’s “Snow Sweet” Set as the “O”! There are lots of possibilities you could come up with using this same concept! Thanks so much for joining me today and happy crafting!

CHALLENGES:


Have a wonderful Thanksgiving!
Hugs - Rachelle ♥

Wednesday, September 22, 2021

CAS Christmas Card | Picket Fence Studios - "Paper Glaze Lux Ombre - Nutcracker Ballet"


Hello!

I've got a special card to share with you today - an easy CAS design featuring a background created with a brand new product from Picket Fence Studios...the Paper Glaze Lux Ombre "Nutcracker Ballet"! Paper Glaze Lux is a new mixed media glitter-based art medium. Paper Glaze Lux is a heavy body mica and glitter infusion which provides a MAXIMUM level of shine and thickness in a spreadable glitter glaze. This unique formulation showcases the many hues of glitter used to create ultimate depth and dimension and it's so easy to apply Paper Glaze Lux through a stencil or direct application. Your application thickness allows you to decide the level of opacity and so I experimented with painting a small, diluted amount directly onto black card stock and achieved a Northern Lights Effect! You can see the base color of the pearly mica pigment and the highlighted areas of glittery shine where the Lux was a bit thicker with color "C" from this Ombre collection! I was so excited with the result and this literally took me less than 5 minutes to create!


After the Paper Glaze Lux panel was dry, I trimmed it down to 3.75" x 5" and attached it to a top-folding A2 black card base. Using the "Santa's Snowy Hills" Die , I cut a panel from aqua card stock and trimmed off some of the silhouette leaving a scattering of pine trees and the single house in the distance. This panel was cut to fit the width of the card front and adhered on top. 

A sloped panel was cut to size from white card stock and the sentiment (from the "Winter Has Come To Town" Stamp Set) was stamped using my MISTI. I glued the small stamped/colored/die cut figure of the man carrying home his prize Christmas tree (from the "Winter Scene Building People") onto the sentiment panel, which was attached to the card front. A few "Spring Fling" Sequins finished up this clean-and simple card!


This card will be so easy to mass-produce and the effect of that painted Paper Glaze Lux is stunning in real life! I encourage you to stretch your Paper Glaze products by using them as painting mediums!

Thanks so much for joining me today and for taking the time to comment - take care!

Happy crafting and have a great day!
Rachelle ♥

Wednesday, July 28, 2021

Christmas Card | Picket Fence Studios - "Arctic Winter" & "Winter Forest Scenery"


Hey there!

I just love the "Christmas in July" theme because it helps me stock up on my card stash and here's a stenciled design featuring two of Picket Fence Studios' newest releases - the "Arctic Winter" and "Slim Line Winter Forest Scenery" Stencils! This would be an easy card to mass produce since it's all inked on the front panel of a kraft card base!

I masked off rows of the "Arctic Winter" Stencil with painter's tape and using one of the smallest "Life Changing Blender Brushes", I inked my knitted sweater pattern with Hero Arts' "Unicorn" ink and "Candied Apple" DOI. The pine trees from the "Winter Forest Scenery" Stencil were heavily inked with several green DOI's and while they were still slightly wet, I spattered the top of the card with diluted white paint, which softened into the green trees and looking like falling snow! 

I heat embossed the greeting from the "Joyeux Noel" Stamp Set and added the twine accent to separate the trees from the sweater pattern. A few white snowflakes from the "Icicles" Sequins Mix were added to finish the card! I just love this rustic look for a CAS Christmas card design!

Thanks so much for stopping by and for taking the time to leave comments! Take Care!

Challenges:


Happy crafting and have a great day!
Rachelle ♥

Wednesday, July 21, 2021

Christmas Card | Picket Fence Studios - "Nativity" Slimline Cutting System Insert


Hello!

I’ve got a CAS Christmas card to share with you today featuring Paper Glitz blending and the NEW Nativity Slim Line Die Cutting System Insert! This card would be so easy to mass produce and the two-toned Paper Glitz background is perfect against this peaceful die cut nativity scene.

I began by spreading quarter-sized dollops of “Snow Drifts” and “Fall Golds” Paper Glitz onto a piece of 100# white card stock. I ran my offset palette knife across it several times to soften the edge where the two colors met. There was a bit of color blending in that area and that’s the effect I was going for in this scene.


Here’s a shot of the Paper Glitz panel once it was dry – that shine is amazing!


I cut a 4” x 5.25” panel of white card stock and centered the Nativity Insert Die into the top portion using my clear ruler to finalize the position. Once the interior pieces were removed from the die cut, I heat embossed the large sentiment from the “Joyeux Noel” Stamp Set underneath with gold powder. I love all the different font styles in this large sentiment set – there’s something for every winter occasion!


I backed the Nativity scene with a small piece of the Paper Glitz panel, allowing the gold area to highlight the figures inside of the stable and then blend up to the turquoise night sky. This panel was backed with a piece of craft foam for dimension and attached to the center of a top-folding A2 card base. 


Using one of the smaller dies that comes with the Nativity Insert Die Set, I cut a Christmas star from the “Fall Golds” Paper Glitz panel and attached it to the card front above the scene to finish up the card.  


Head over to the Picket Fence Studios' Shop to see all of the other amazing products from the latest release!

Challenges:


Happy crafting and have a wonderful day!

Rachelle ♥

Tuesday, January 19, 2021

Valentine's Day Card | Sneak Peek - Pink and Main "Rawr" Stamp & Die Set


Hey There!
I've got a great sneak peek for you today featuring a some awesome new products from the upcoming Pink and Main January Release! First off is an adorable dinosaur stamp and die set, "Rawr", that includes this handsome guy is delivering an oversized Valentine's Day Greeting! This set is a wonderful collection of dinosaur images mixed with tons of hearts & banner decorations!

The images were stamped, watercolored and die cut...don't you just love that cute speech bubble?? I used a couple of the beautiful pattern papers from the new release to set the scene in my card layout and cut the soft aqua paper with one of the dies from the new "Layered Ovals" Set. The size increments in the Pink and Main Layered Shape Die Sets are stepped perfectly and I can always find the exact size I need! 


The floral pattern paper was die cut and glued down first and then the aqua oval die cut (which I backed with backed with thick craft foam) was adhered on top. Dino and his speech bubble were popped into place with a double layer of foam tape and I added a few heart embellishments to up the "cuteness" factor!


It was so much fun basing my coloration on the gorgeous palette in the new "All Occasion Florals" Paper Pad and I can't wait for you to see all of the other patterns!

Thanks so much for joining me today and get ready for tomorrow's amazing release!  There's always new inspiration over on the Pink and Main Blog - Instagram - Facebook Page!

Take care and have a great day! Rachelle ♥

Challenges:


Friday, January 15, 2021

All Occasion Card | Alphabet Challenge - "U" is for Umbrella


Hi!

I don't know about all of you but I'm looking for any excuse to find some sunshine and rainbows right now! It's been hard to stay positive this past week but this card has reminded me to "Choose Joy!" The new theme at the Alphabet Challenge Blog is "U is for Umbrella" and I put together products from Hello Bluebird, Ellen Hutson and Pink Fresh Studio to come up with this CAS card!

I stamped, colored and cut all of the images. The window omit was die cut from a 130# white card stock panel and backed with craft foam. I die cut a slightly larger circle from the front of a top-folding A2 card base, added the accent paper strips at the bottom and the window panel was glued into place.


I attached the rainbow through the scallop window and popped up the clouds with foam tape. The pig was glued directly to the card front and I love how he's tucked under the overhanging rain clouds! I stamped the sentiment using the MISTI and added a few aqua hearts on the inside, which would show through my window. 

Thanks so much for joining me today and I look forward to seeing your "Umbrella" Projects in our Alphabet Challenge Gallery!

Challenge Submissions:

Try It On Tuesdays - Uplifting or Positive Quote

Unicorn Challenge #61 - CAS

Die Cut Divas - Frame It January 2021

A Bit More Time To Craft - #132 - Anything Goes

Pearly Sparkles Challenge Blog #58 - Beginning With "P" - Pig

Creative Moments - #206 - Anything Goes

Take care! Rachelle ♥

Sunday, November 15, 2020

Christmas Card | Sparkles Challenge #134 - "Use A Stencil"


Hi!

Our November theme over at the Sparkles Monthly Challenge is one of my favorites - "Use a Stencil"  and  I decided to use one of my tried-n-true patterns...a random dotted snowfall in this pink and green winter scene! 

The pink background was blended with Spun Sugar Distress Oxide Ink, the dots with Picked Raspberry and the entire piece was spritzed with shimmer mist. Once dry, I attached the circle die cut panel on top and glued everything to the front of a top-folding A2 card base. 

The mouse and tree were stamped, colored and die cut. I added a paper-pieced present to the mouse instead of the basket that is attached to the original image to fit into my Christmas scene! The die cut sentiment strip was glued to the front and the tree/mouse were adhered into place on top. I glued an iridescent star to the tree top and die cut snowflakes/assorted gems were added last.  

We can't wait to see your stencil projects in our Sparkles Challenge Gallery!

Additional Challenges:

A Gem of A Challenge #23 - Anything Goes

Aud Sentiments #264 Christmas/Winter Animals + A Sentiment

Craft Rocket #76 - Christmas/Winter


Tuesday, November 3, 2020

Christmas Card | Graciellie Design - "Live For Today"


Yippee!

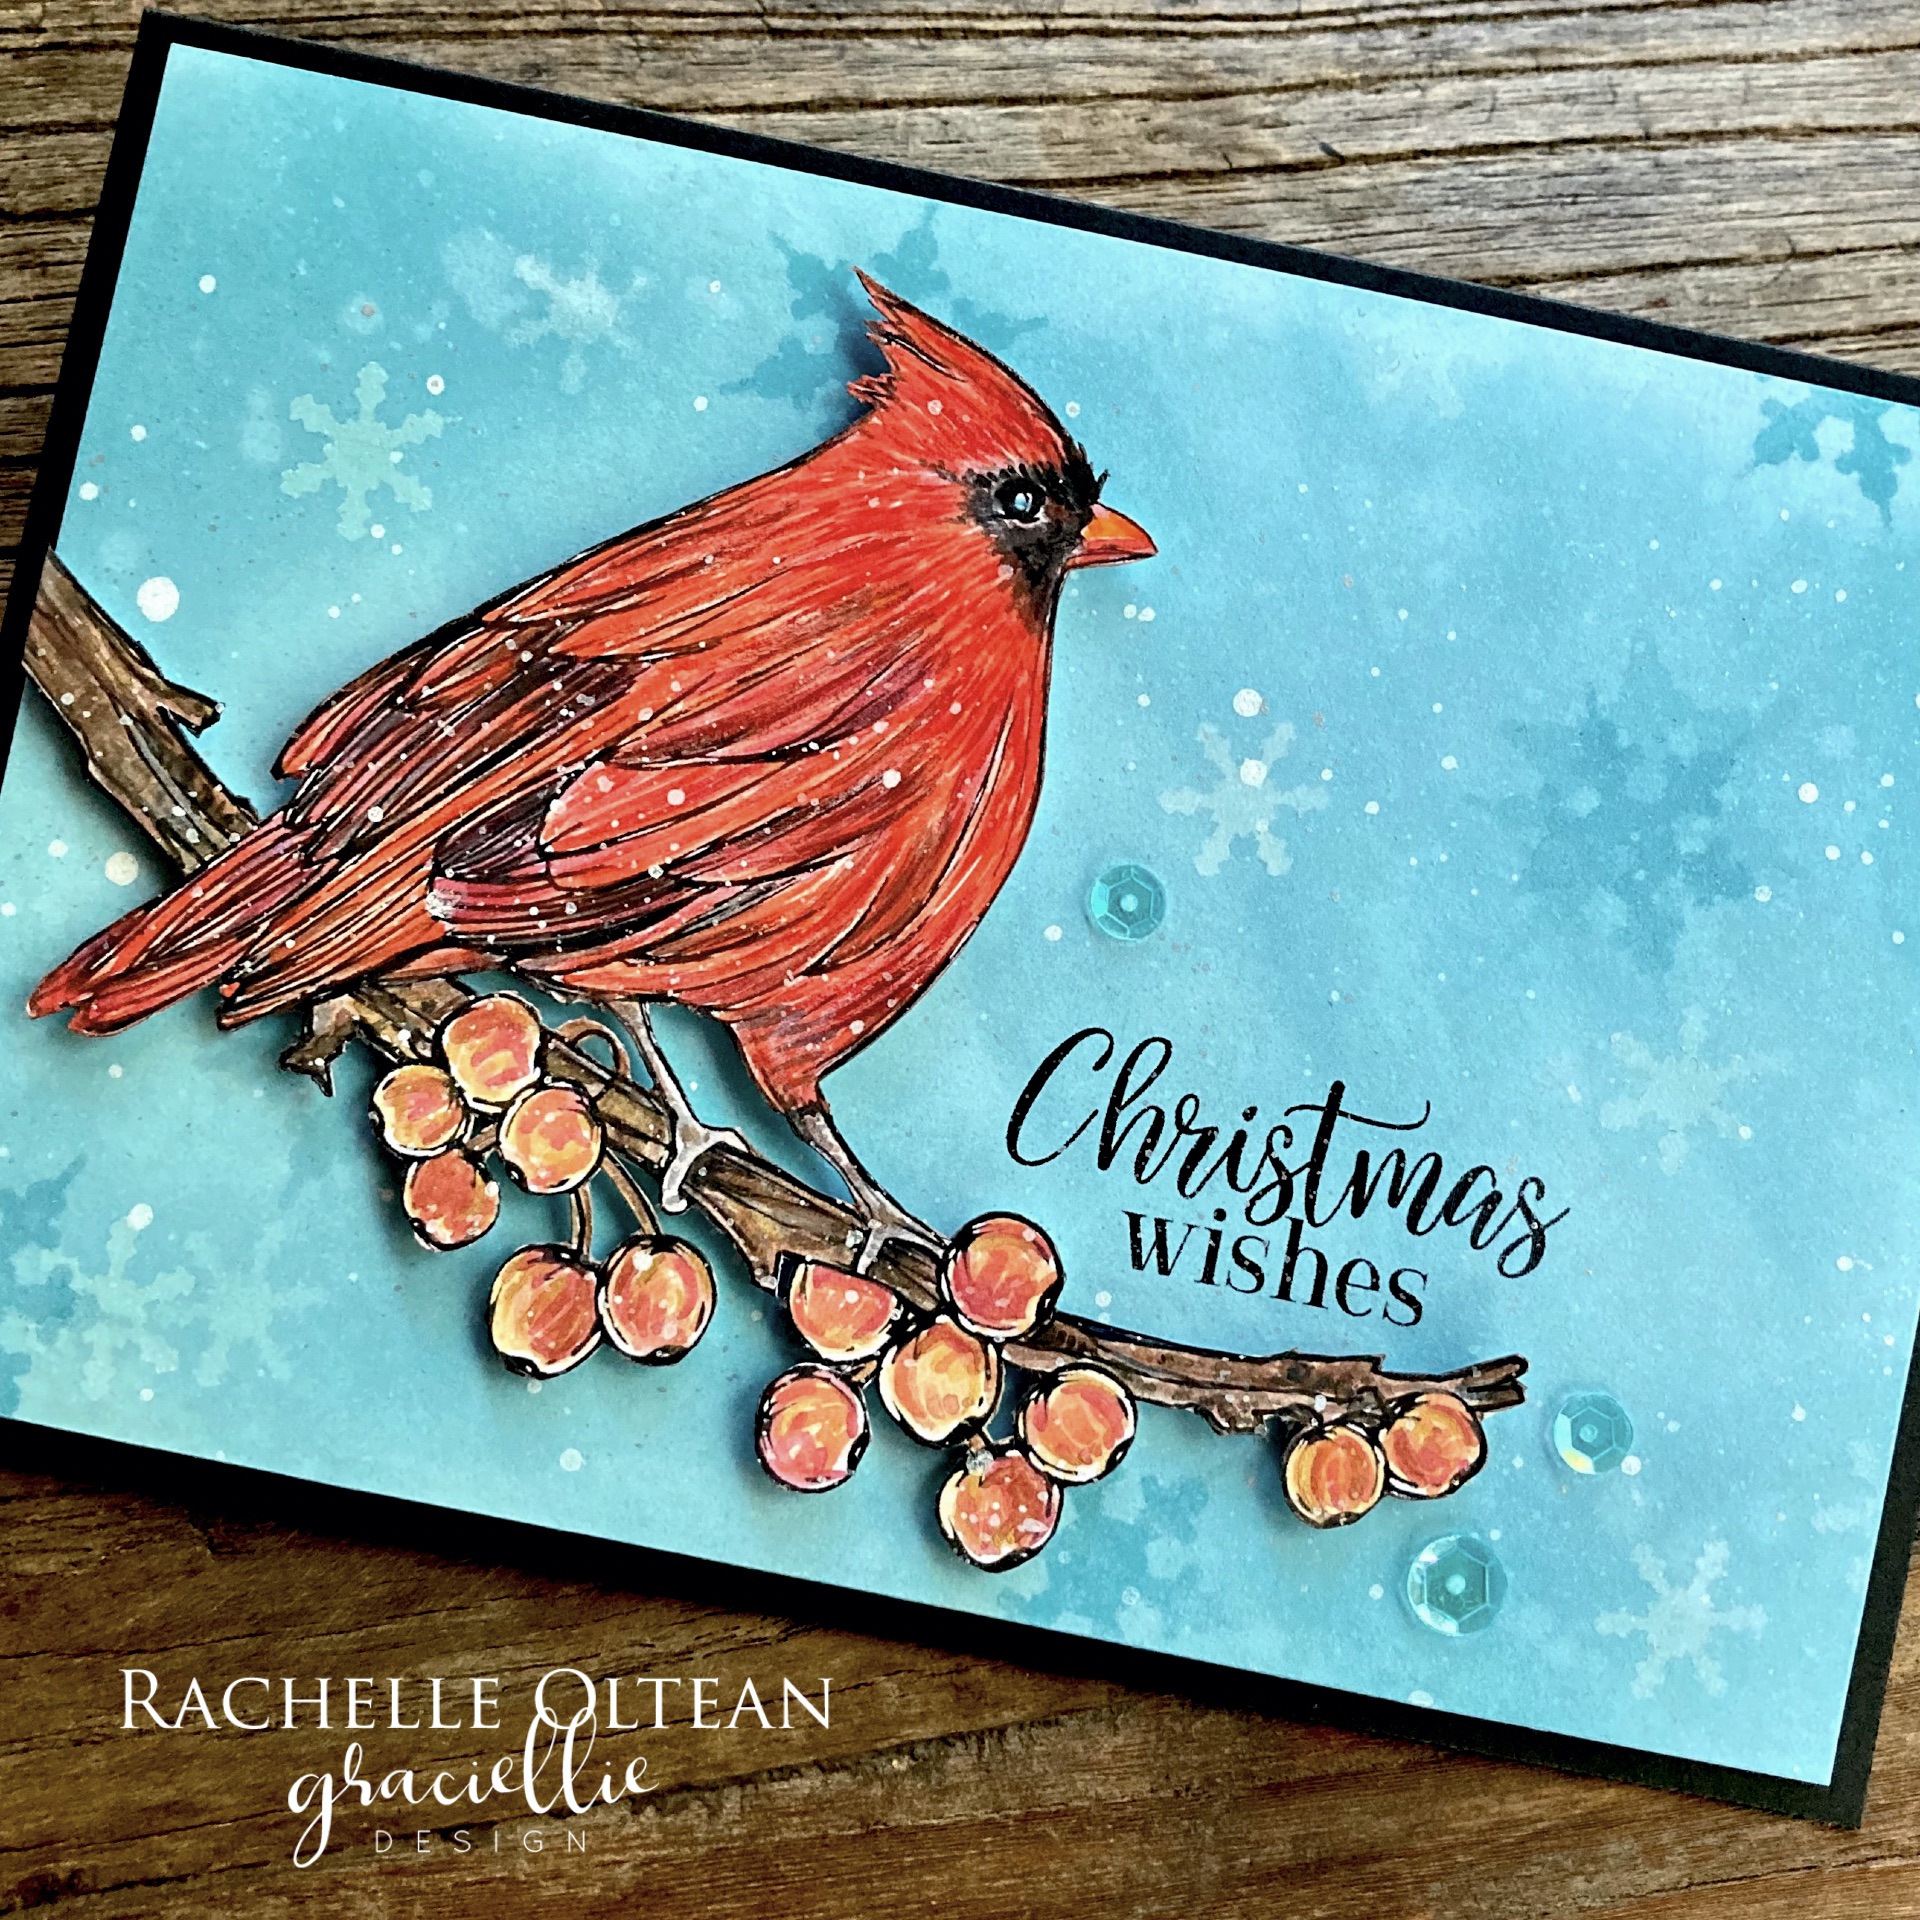
I've got some exciting news to share...I've been invited to join the Graciellie Design Team! I'm so honored to be creating projects for Gracie and to be included with her remarkable group of designers! So I'm thrilled to be sharing this inaugural DT post featuring her latest 2020 Holiday release, "Live For Today."


I sized/reversed the bird image in PowerPoint and printed it on 100# cardstock. I needed a slightly longer tree branch for my layout and so I just drew that in with a permanent marker after printing. The final image was then watercolored and fussy cut. When I fussy cut directly on the printed line, I always go back in and add either black marker or watercolor along the edge to finish it off - it makes all the different in the world to the image!


When I was thinking about this design, I wanted to create a snowflake ''bokeh" effect with Distress Oxides and so I used Speckled Egg, Tumbled Glass and Salty Ocean as my base palette. Once the background was blended with a mix of all these colors, I sprayed it heavily with shimmer mist. Using several snowflake punch images as simple stencils, I blended these shapes into the base with varying degrees of transparency to create the snow field. This panel was spattered with white opaque paint and pearlized watercolor. Here's a photo of just the finished background - I couldn't quite capture the overall shimmer but take my word for it, it's really sparkly! 

I figured out the sentiment location on the background panel, designed it on PowerPoint and ran the blended cardstock piece through the printer (with my fingers crossed!) and VOILA it printed exactly were it needed to be! All that was left was to cut it to size, add the bird image to the front panel with foam tape and finish the card with some turquoise sequins! Popping up the bird image with the foam tape really adds so much dimension to this card!


Thanks so much for joining me today and for leaving your comments! They brighten my day and I love reading each and every one!

Challenge Submissions:


Rachelle ♥

Wednesday, October 28, 2020

Christmas Card | Graciellie Design - "Live For Today" Stamp Set


 Hello!

I am in love with this new stamp set from Graciellie Design, "Live for Today", featuring this adorable Tufted Titmouse! I have dozens of these beauties in my backyard every day and they love chit-chatting with me as I fill up the feeders! The great thing about Gracie's illustration is that it can also be colored as a Cardinal, Blue Jay or even a Cedar Waxwing! Here's a look at the entire set...aren't the sentiments great? 


This CAS design came together quickly and only took about 30 minutes to watercolor. I trimmed an A2 card base with a strip of pattern paper and spattered watercolors onto a smaller panel of white card stock. This panel was spritzed with shimmer mist and set aside to dry while I fussy cut the image.


I glued two of the matte silver snowflake die cuts together and printed/die cut the sentiment strip. The spattered panel was glued to the card base and the rest of the pieces were adhered on top. I was really happy with the way this design turned out and I think I will make about a dozen more of these for this year's Christmas card stash!

Thanks so much for joining me today and for taking the time to comment!

Challenge Submissions:


The Holly and Ivy Challenge #82

Rachelle ♥

Friday, October 23, 2020

Birthday Card | Alphabet Challenge - "O" is for "Old People"


Happy FRI-YAY!!!!

I'm back to introduce another great theme over on the Alphabet Challenge..."O" is for "Old People"! I had to go the sassy route with this sentiment-focused card since I don't have a single stamp of an old person! However, the design team has some great examples for you over on the blog!! 

I chose a primary palette and stamped the Concord & 9th birthday cake image. The MFT Stamps' sentiments were added on top and this panel was die cut. I glued a red scalloped die cut to a black card base, adhered the cake panel on top, added sparkling star designs to the candles and the card was finished! This will be a great card to mass produce since it came together pretty quickly and can be sent to either guys or gals! 

We can't wait to see your take on our theme over in our Alphabet Challenge Gallery!

Additional Challenges:

Little Red Wagon #572 - Things Starting with "B" - Birthday

Tuesday Throwdown #468 - Use a Funny Sentiment

The Paper Players PP513 - CAS - Cookies, Cupcakes and Cakes (My favorite trio!)

Allsorts Challenge #594 - Birthday Cake or Cupcakes

Thanks for stopping by and have a great weekend!

Rachelle ♥

Tuesday, October 20, 2020

Christmas Cards | Graciellie Design - "Start Anew" Magnolias


Hello!

I've got a "Dynamic Duo" to share with you today featuring a cropped version of the new Graciellie Design's "Start Anew" Magnolias! When I designed wallpaper and fabric, I would have to create dozens of different color ways of the exact same pattern, which would then be weeded down to just few selections for any new release. We would call these color options "croquis" and this is what I'm showing you today - the contrast between a light, wintry blue-based palette and a warm, ink-blended woodgrain. I would love to know which one you like the best? 

I started with the blue version first and based it on the pretty blue pansies that overwinter here in North Carolina every year. It's so nice to look out my window and see pansies thriving in January! I cropped the "Magnolia Bouquet" image, printed and watercolored the panel. I lightly outlined the images with a pale blue gray wash to make it look like a snow shadow and spattered it with white paint. The panel was trimmed to size, adhered to a black card base and a few sequins were added to finish up the card.


For my second "croquis", I chose a one-layer coloration focusing on the rich, warm woodgrain and a more natural palette. In order to keep the floral colors clean, I had to create a mask (by fussing cutting another image to go on top) for each section and ink blending around them. I used Distress Inks and sprayed the panel with shimmer mist to activate! Here are some photos to show the coloring progression...adding a couple of woodgrain stencils to the base really made the background pop!


Once again, I trimmed the panel and attached it to a black card base. The sentiment from the "Christmas Wishes" Set was printed and cut with a fishtail banner die. I added an additional gold die cut underneath and glued this to the card front.


Here's a final shot of the two color ways side-by-side - let me know your top pick! : ) 

Head over to Graciellie Designs to check out all of her great new 2020 Holiday Sets! or -> @gracielliedesign - Instagram!

Thanks for stopping by today! I really appreciate you taking the time to comment! : )

Challenges:


Rachelle ♥

Thursday, October 15, 2020

Thank You Card | Sparkles Monthly Challenge #133 - "Hello Autumn!"


Hello Autumn!

Our new challenge over at the monthly Sparkles Challenge is in keeping with the season and we would love to see your "fall-inspired" projects in our gallery this month! 

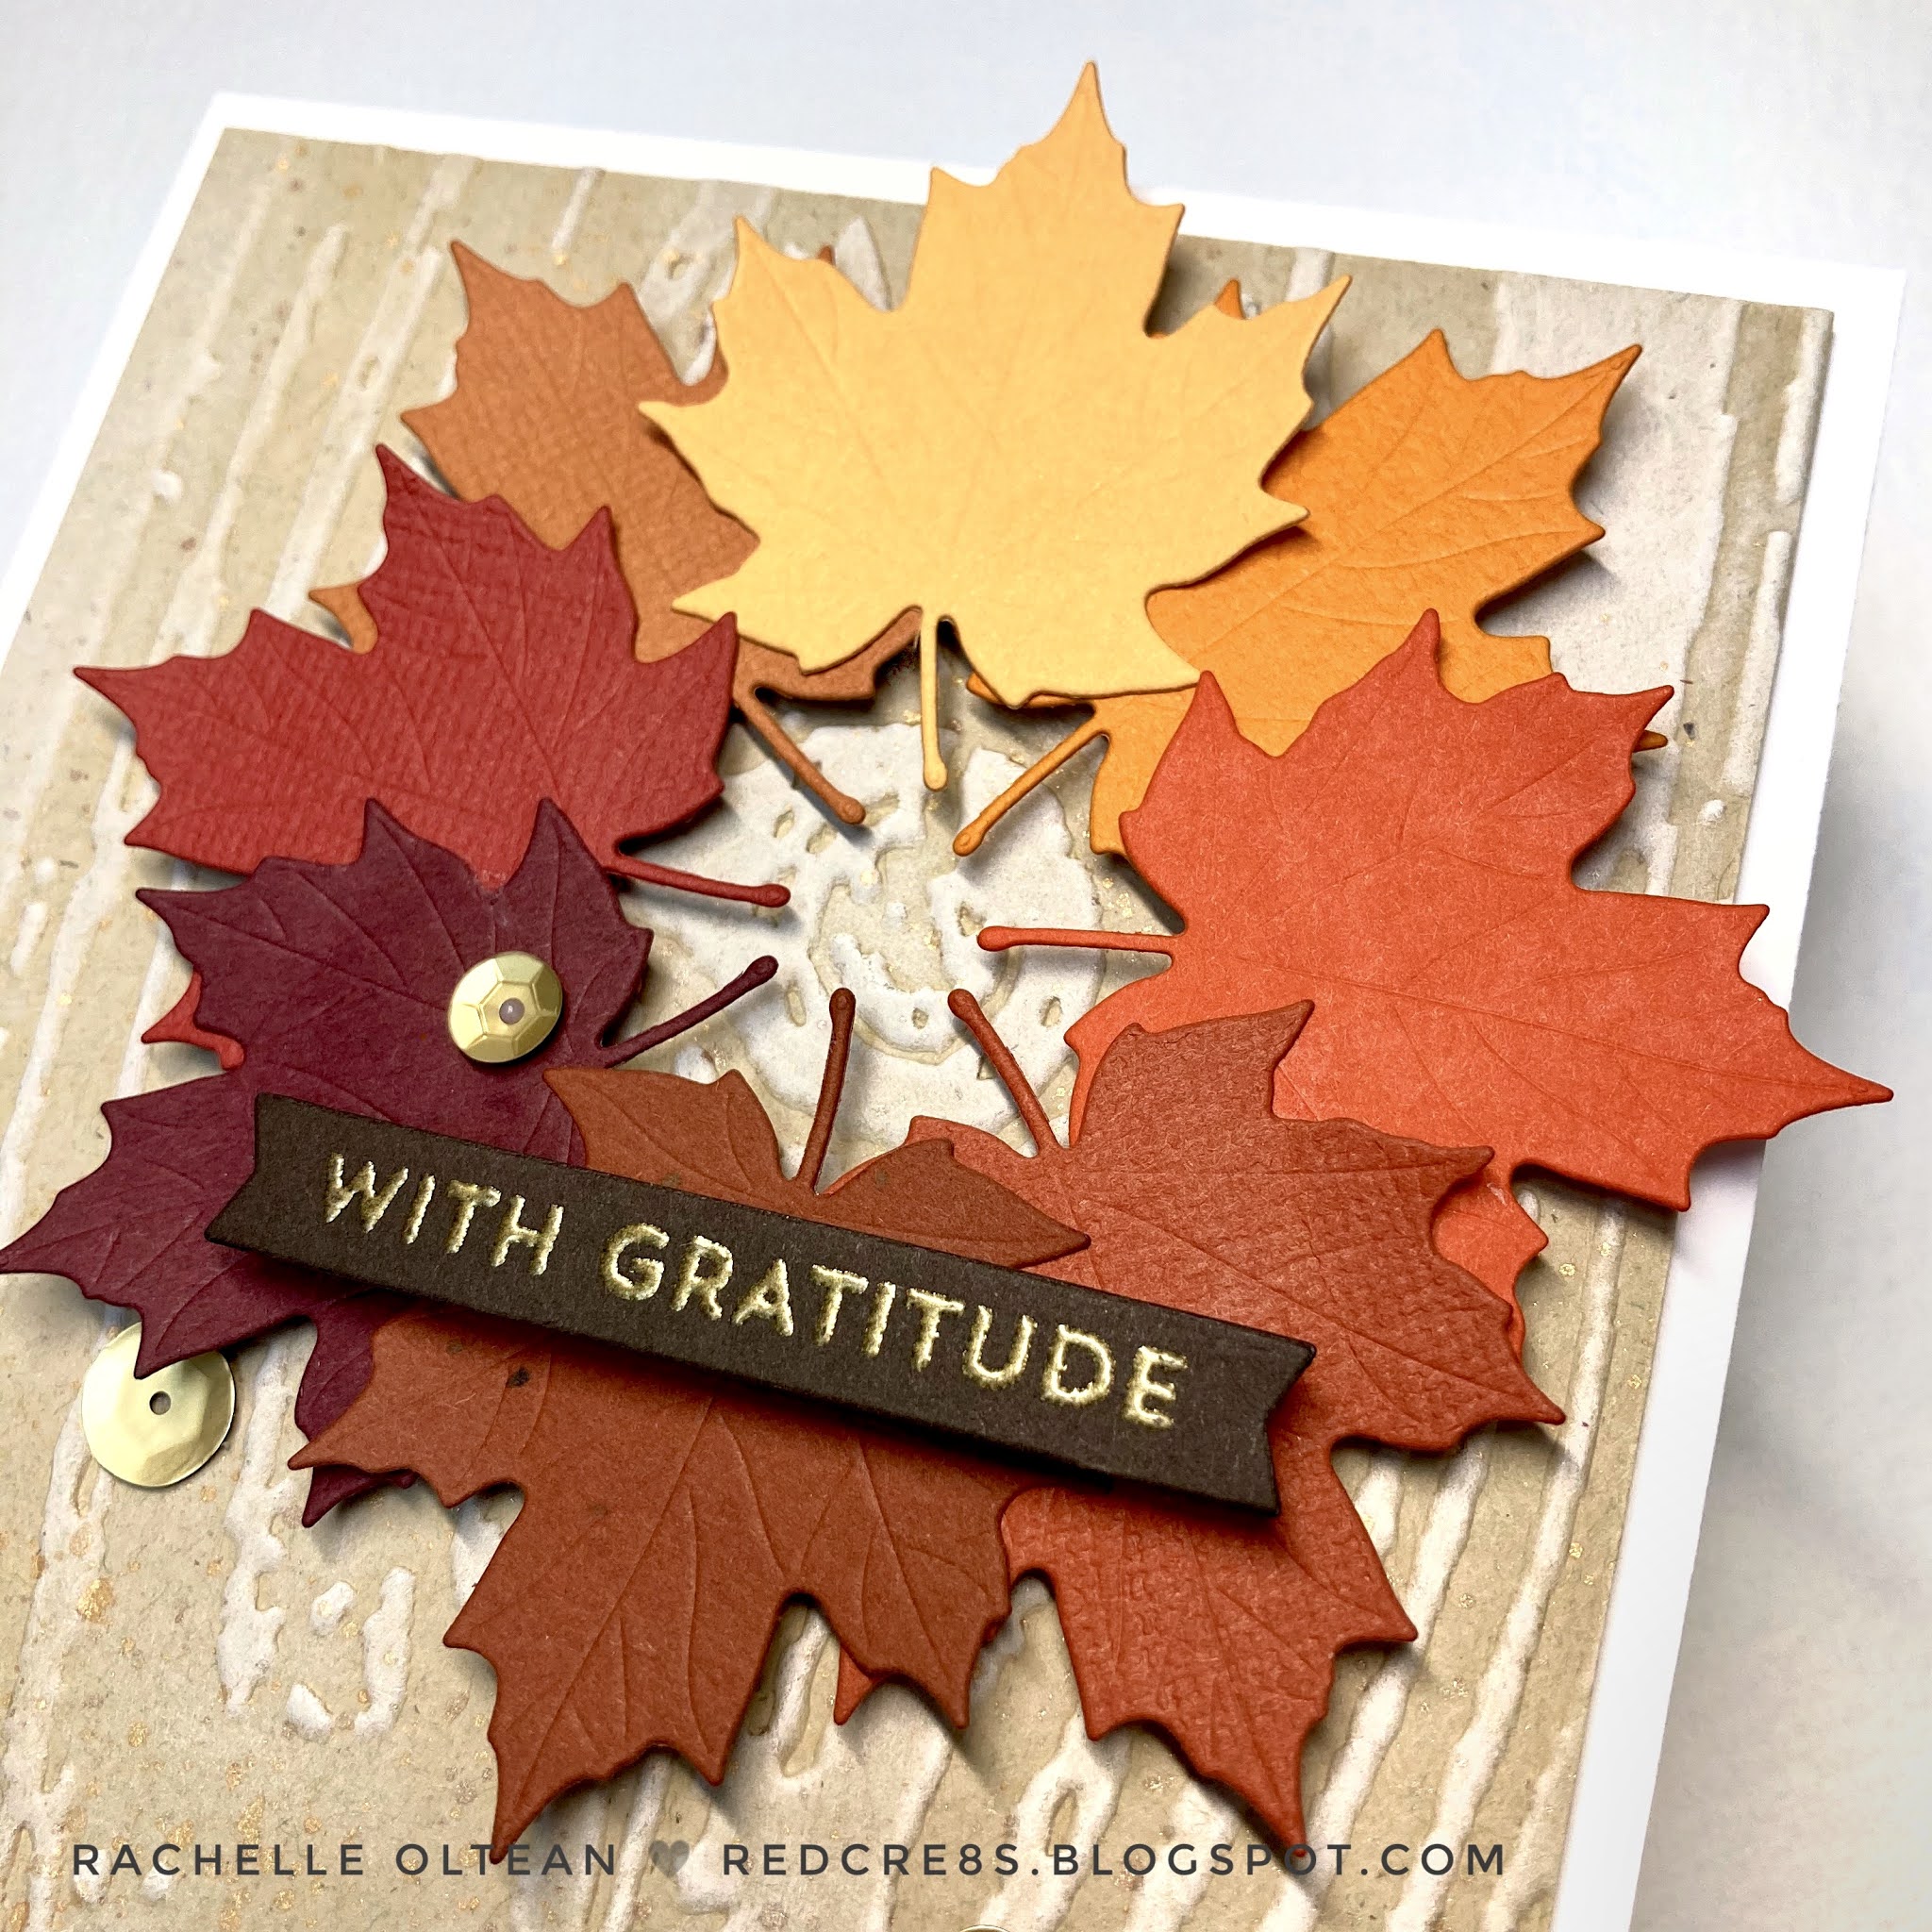
This CAS leaf wreath was created by die cutting a warm rainbow of maple leaves from assorted card stock and gluing them to a circular die cut. I created the woodgrain background by running a piece of Desert Storm card stock through an embossing folder and highlighting the top with white ink. The panel was spattered with copper paint and attached to the front of a top-folding A2 card base.


The wreath was popped onto the card front with foam squares and the heat-embossed sentiment strip/sequins were added on top to finish the card! We can't wait to see your "Autumn" projects over on the Sparkles Monthly Challenge!

Additional Challenges:


Thanks so much for joining me and for taking the time to comment!
Rachelle ♥

Saturday, October 10, 2020

Halloween Card

Bewitched!

Halloween is gonna look a little different this year but this CAS card will still cast a spell on you! : ) The design took a lot of ink blending and since a made a dozen of these cards, I actually burned through a couple of Ranger blending sponges! I took my Covid-19 frustrations out on them and they just couldn't handle the pressure! BWAH-HA-HA-HA! 

I made a template from a large circle die cut, ink blended the sky/moon with Distress Oxide Inks and spattered it heavily with water and shimmer spray. Another card stock panel was blended with these same colors to create an even gradation and using the MISTI, I stamped the haunted house on it with Onyx Black VersaFine Ink, fussy the image and backed it with craft foam.


The moon panel was glued onto a black card base and the house was adhered in the corner. I put the card back into the MISTI and stamped the witch silhouette with the same ink. I added a few sequins to the front and created/attached the inside sentiment panel to finish up the card. I was really happy with the way the  moonlight glows onto the house! : )

Thanks so much for stopping by! ♥

Challenges:

Craft Rocket #75 - Add Sparkle

Creative Knockouts #371 - Clean and Simple

Crafty Creations #414 - Anything Goes

Simon Says Stamp - Wednesday Challenge - Make It Sparkle

The Paper Funday Challenge #22 - AG/Opt. Twist Halloween

Country View Challenges - Halloween Make a Scene

Creative Craft Cottage #134 - Spooky and/or Cute

Pearly Sparkles Challenge #56 - Use Black and/or Purple

Unicorn Challenge #59 - Spooky and/or Cute

Dragonfly Dreams Challenges - October Spooky and/or Cute

Crafty Calendar Challenge - Halloween

Have a great weekend!

Rachelle ♥