Friday, January 24, 2020

Get Well Card | Avery Elle - More Furry Friends & MFT Stamps - Rainy Circle Die-Namics | Cut It Up! Challenge Blog #192 "Get Well Soon!"


Hey There!

Just in time for cold and flu season, we have a very appropriate theme over on the Cut It Up! Challenge Blog:"Get Well Soon!" Our generous sponsor, Digital Delights by Louby Lou, will be offering a digital prize to the winner of this challenge and provided a great set of sentiments for the design team to use. Head on over to the CIU Blog to see the other wonderful projects that my team members have created! We hope you will join us for this challenge and don't forget the die cut! : )

I chose the "Under The Weather" sentiment for this challenge and knew that I wanted to use the MFT Die-Namics set, "Rainy Circle", to create my scene! I printed the sentiment onto 100# white card stock and die cut it with an A-2 rectangle die. The Rainy Circle was die cut above the sentiment and I ink blended this piece with Distress Oxides (Stormy Sky, Faded Jeans & Black Soot.) Using these same inks, I blended another piece of card stock to create my storm cloud and die cut it with MFT's "Cute Cloud Outlines Die-Namics". The little schnauzer from Avery Elle's (now-retired) great pet set, "More Furry Friends", was stamped, colored and die cut. The final piece of the scene was an ink blended grassy border die cut.

I lightly inked the center of an A-2 Top-Folding card base with Salty Ocean and Tumbled Glass Oxides, attached the grassy border behind the circle opening and backed the sentiment panel with craft foam. The raindrop circle, sentiment panel and storm cloud were all glued into place; the puppy was threaded through the grass and popped up with foam tape. I really like how the raindrop omits work to create a very dimensional background with this die set!

I would like to enter this card in some additional challenges:


Thanks so much for stopping by and I hope you will join us for this challenge over on the Cut It Up! Blog!

Rachelle

Wednesday, January 15, 2020

Birthday Card | MFT Stamps - Beary Best Friends


Happy B-r-r-r-thday! 

Well, that's actually wishful thinking because it's been in the low 70's all week here in central NC but the cooler weather is supposed to make a return next week! Yippee!

I would like to share a card that I created for the AAA Cards CAS Game #156 | Sketch + Optional twist of Winter Birthday! I used MFT's now-retired stamp set "Beary Best Friends", which you can still find at numerous on-line retailers. This is such a well-drawn set (released in November of 2018) and the sentiments are so cute! Here is the sketch:


I decided that I wanted to use a warm, citrusy color palette for this card and here is the list of Distress Oxide Inks I used for ink blending and to water color the images: Squeezed Lemonade, Fossilized Amber, Wild Honey, Carved Pumpkin, Twisted Citron, Tumbled Glass and Broken China. 

I ink blended the background strip with Tumble Glass and Broken China, spritzed it with shimmer mist and adhered it into place on the front of an A2 top-folding horizontal cards base. I partially stamped and die cut the fishing bear (leaving the fish off of the end). This allowed me to extend the line and add my own hook; I fussy cut the remaining area. The ice float was stamped and the images were colored using the inks. Using the Carved Pumpkin, I applied the ink directly to paper, allowed it to dry, prepped it with my anti-static powder tool, stamped the word "HAPPY" with VersaMark Ink and heat embossed it with white powder. I die cut the embossed pieces and glued 2 more blanks behind to give it some dimension.


I glued the bear, ice float and word die cut into place and stamped the lower sentiment in Broken China using the MISTI. The card was finished with several moonshine snowflakes and pearlescent gems. This is a great sketch and I've already got a few more cards cards ready to go using this design!

I'd like to enter this card into there challenges as well:


Thanks so much for stopping by!
Rachelle

Monday, January 13, 2020

Birthday Card | MFT Stamps - Magical Dragons

Hey There!

Thanks so much for stopping by today! I would like to share this delightful dragon makin' an impromptu birthday appearance! This MFT stamp set, Birdie Brown's Magical Dragons, has been on my wish list for about 3 years and I finally added it to my stash! 

I like to start with a quick sketch (see below) and then put all of the pieces together to see how they actually work in space! The dragon/cake were stamped, colored and die cut. A 4.25" x 4.75" of white card stock was ink blended with Shaded Lilac and Tumbled Glass Distress Oxide inks, spritzed with shimmer spray and spattered with white pearlized watercolor.


I lightly blended these same same inks onto a couple of puffy cloud border die cuts and set them on top of the sky panel to determine where they should be trimmed with a stitched rectangle die. Once the cloud borders were die cut, the sentiment was stamped and they were glued into place on the sky panel; this section was backed with a piece of craft foam. 


I adhered a 1.5" strip of pattern paper to the bottom of a top-folding A2 white card base and glued the cloud/sky panel to the top, overlapping the pattern paper. The dragon, cake and smoke puff were all popped into place with foam tape and the card was finished off with pearlescent gems.


I would like to enter this card into the following challenges:


Thanks so much for joining me and taking the time to comment!

Rachelle

Friday, January 10, 2020

All Occasion Card | Ellen Hutson - A Breve Note | MFT Stamps


Wake up and smell the coffee!

I was gifted a new coffee maker for Christmas and while this card doesn't explicitly say "Thank You", the inside sentiment does read: "Thanks For Keeping Us Out Of the Darkness!" I love the simple graphic design of Julie Ebersole's stamp sets and I used her "A Breve Note" set to create this card.

I stenciled the sun ray pattern onto a piece of A2-sized white card stock with Distress Oxide Inks (Squeezed Lemonade & Fossilized Amber), cut it with a stitched rectangle die and adhered it to an A2 top-folding card base. The sentiment was stamped with VersaFine Onyx Black Ink, heat embossed with clear powder and die cut with MFT's "Elegant Rectangle STAX Die-Namics".  Using the next larger die, several black rectangles were cut and glued/stacked together; the sentiment panel was glued onto the black panel.


Using VersaFine Ink, I stamped MFT's versatile plaid, "All Lined Up Background", onto red card stock, trimmed it with the same stitched rectangle die and glued it onto the bottom of the card front. I stamped the floral coffee cup, heat embossed it with clear powder, colored and die cut the image. The sentiment panel and coffee cup were both adhered into place with foam tape to give the design some dimension and the card was finished with some twine and yellow sequins. I really like the Asian feel on this card with the simple patterns and limited color palette! Sometimes you just don't know until you get it all together! : )

I would like to enter this into the following challenges:


Thanks so much for joining me today!

Rachelle

Thursday, January 9, 2020

All Occasion Card | My Favorite Things/The Cutting Cafe | Cut It Up! Challenge #191 - "Snow Much Fun"


Sending sunny smiles from North Carolina!

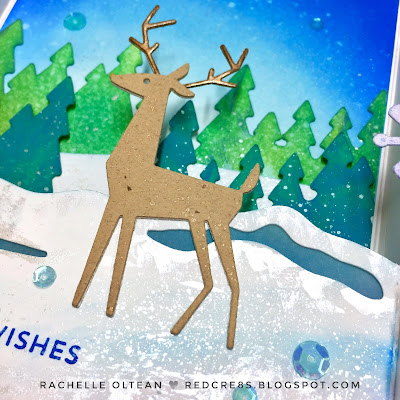
It's been unusually warm here to start January and to tell the truth...I wish we would get just a bit of the white stuff to prove it's really winter! So it was fun to work on this frosty scene for our "Snow Much Fun" Challenge over on the Cut It Up! Blog! A BIG Thank You to Regina at The Cutting Cafe for providing the design team with the snowy cutting files for our projects. I combined these files with products from My Favorite Things Stamps and Dreaming Tree (who is another great sponsor) to create this bridge fold card. Head on over to the CIU Blog to see the other great projects that the design team has created for this challenge! We hope to see your creations focusing on snow, a snowman or snow angels...and don't forget to include a die cut! : )

I started by importing the files in the Cricut Design Space, determining the size of my finished card and then welding Regina's snowflake trio onto the outer edges of the card front to create a frame border. Based on the dimensions of the background panel, I was able to determine the size of the four scene layers. These are the die cuts that I created with the Cricut; a plain background panel was also cut to size.


I ink blended all of the pieces with Distress Oxide Inks, spattered them with diluted inks/pearlized watercolors and set them aside to dry under a heavy book. The card base was scored to create the bridge fold and the scene layers were glued into place on top of the background sky panel. I popped up the darker layer of trees with foam tape and added light blue vellum behind the negative cuts in the foreground layer to create the snow drift shadows. I stamped the sentiment from MFT's great new set, "Bitty Wishes" and this foreground layer was scored/glued into place along the sides of the bridge fold; the snowflakes were then adhered into place on the front.


I die cut the buck 3 times using MFT's "Delightful Deer" set and glued/stacked them together for stability and dimension; the antlers were painted with bronze watercolor and the deer was glued into place on the card front.


I added gems and sequins from Lucy's Little Things to finish the card, which folded flat for mailing but did need to go into a 6 x 9" envelope due to its size and protective padding! : )


Thanks so much for spending some time with me today and taking the time to comment! 

I would like to enter this card into the following challenges:


http://justusgirlschallenge.blogspot.com/2020/01/just-us-girls-word-week-517.html

Rachelle

Sunday, January 5, 2020

Thank You Card | Altenew - Needlework Motif


Happy New Year!

Thanks so much for stopping by for my first project of 2020! I am starting out with a "Thank You" Card that I created with a "new-to-me" stamp set from Altenew - "Needlework Motif". This set has been on my wish list for a long time and when it was recently on sale, I snatched it up! It reminds me of the Jacobean designs I used to create for wallpaper collections and I always loved drawing these very detailed, historic patterns.

I stenciled the background with Distress Oxide Ink in Antique Linen, spritzed it with shimmer mist and spattered the panel with metallic watercolors. After the panel was dry, it was die cut and set aside. I stamped one of the floral needlework sprays with VersaFine Onyx Black Ink, watercolored it in a warm jewel-tone palette and die cut it with the companion die. I die cut a second spray and glued/stacked it to the colored piece to give it some dimension/stability. Using the same watercolors, I painted a 1/2" navy strip along the outside edge of an A2-sized white card stock panel and then die cut it with a stitched rectangle die; this was adhered to the front of an A2 top-folding card base. I really like the detail that the little stitched edge gives next to the smaller dotted panel. The stenciled panel and needlework spray were also glued into place on the card front.

I die cut the Hello Bluebird word sentiment 5 times from white card stock and glued/stacked them together. Once dry, I painted the die cut with copper metallic paint and glued it into place. I added a touch of the same copper paint to the needlework design because I wanted it to reflect the same color I used for the die cut word sentiment. The card was finished off with a few light blue sequins. 


Thanks a million for joining me and I really appreciate all of your comments! They make my day!

I would like to submit this card for the following challenges:


Rachelle