Sunday, July 28, 2019

Wedding Card | MFT Stamps - Birds of a Feather DieNamics


Hi!

My niece is getting married next weekend and this card is for her! I can't wait to see my side of the family and celebrate this very happy occasion! 

This is a 6" square card and I started with black cardstock cut to that size; a piece of light turquoise card stock was die cut using the Cricut and adhered to the center to create my base. I then die cut the largest size of  MFT's Stitched Heart DieNamics onto 3 pieces of 110# white card stock measuring 5.25" square. I wanted this white panel to be very sturdy so I glued them all together with strong liquid adhesive and set it aside to dry inside a heavy book. I then chose my colored cardstock and die cut multiples of all of the Birds of a Feather DieNamics images. I knew that I wanted a simple, symmetrical "folk art" feel to this design so I started to layout the pieces around one of the die cut hearts. Once I had a layout I liked, I took a photo, and recreated it on the actual die cut panel. I like to use Multi Matte Medium when gluing down all of these small bits because it dries clear and you don't need to add a lot for it to stay in place. I also added an assortment of small rainbow jewels in coordinating colors from Lucy's Little Things to give it a bit of sparkle.


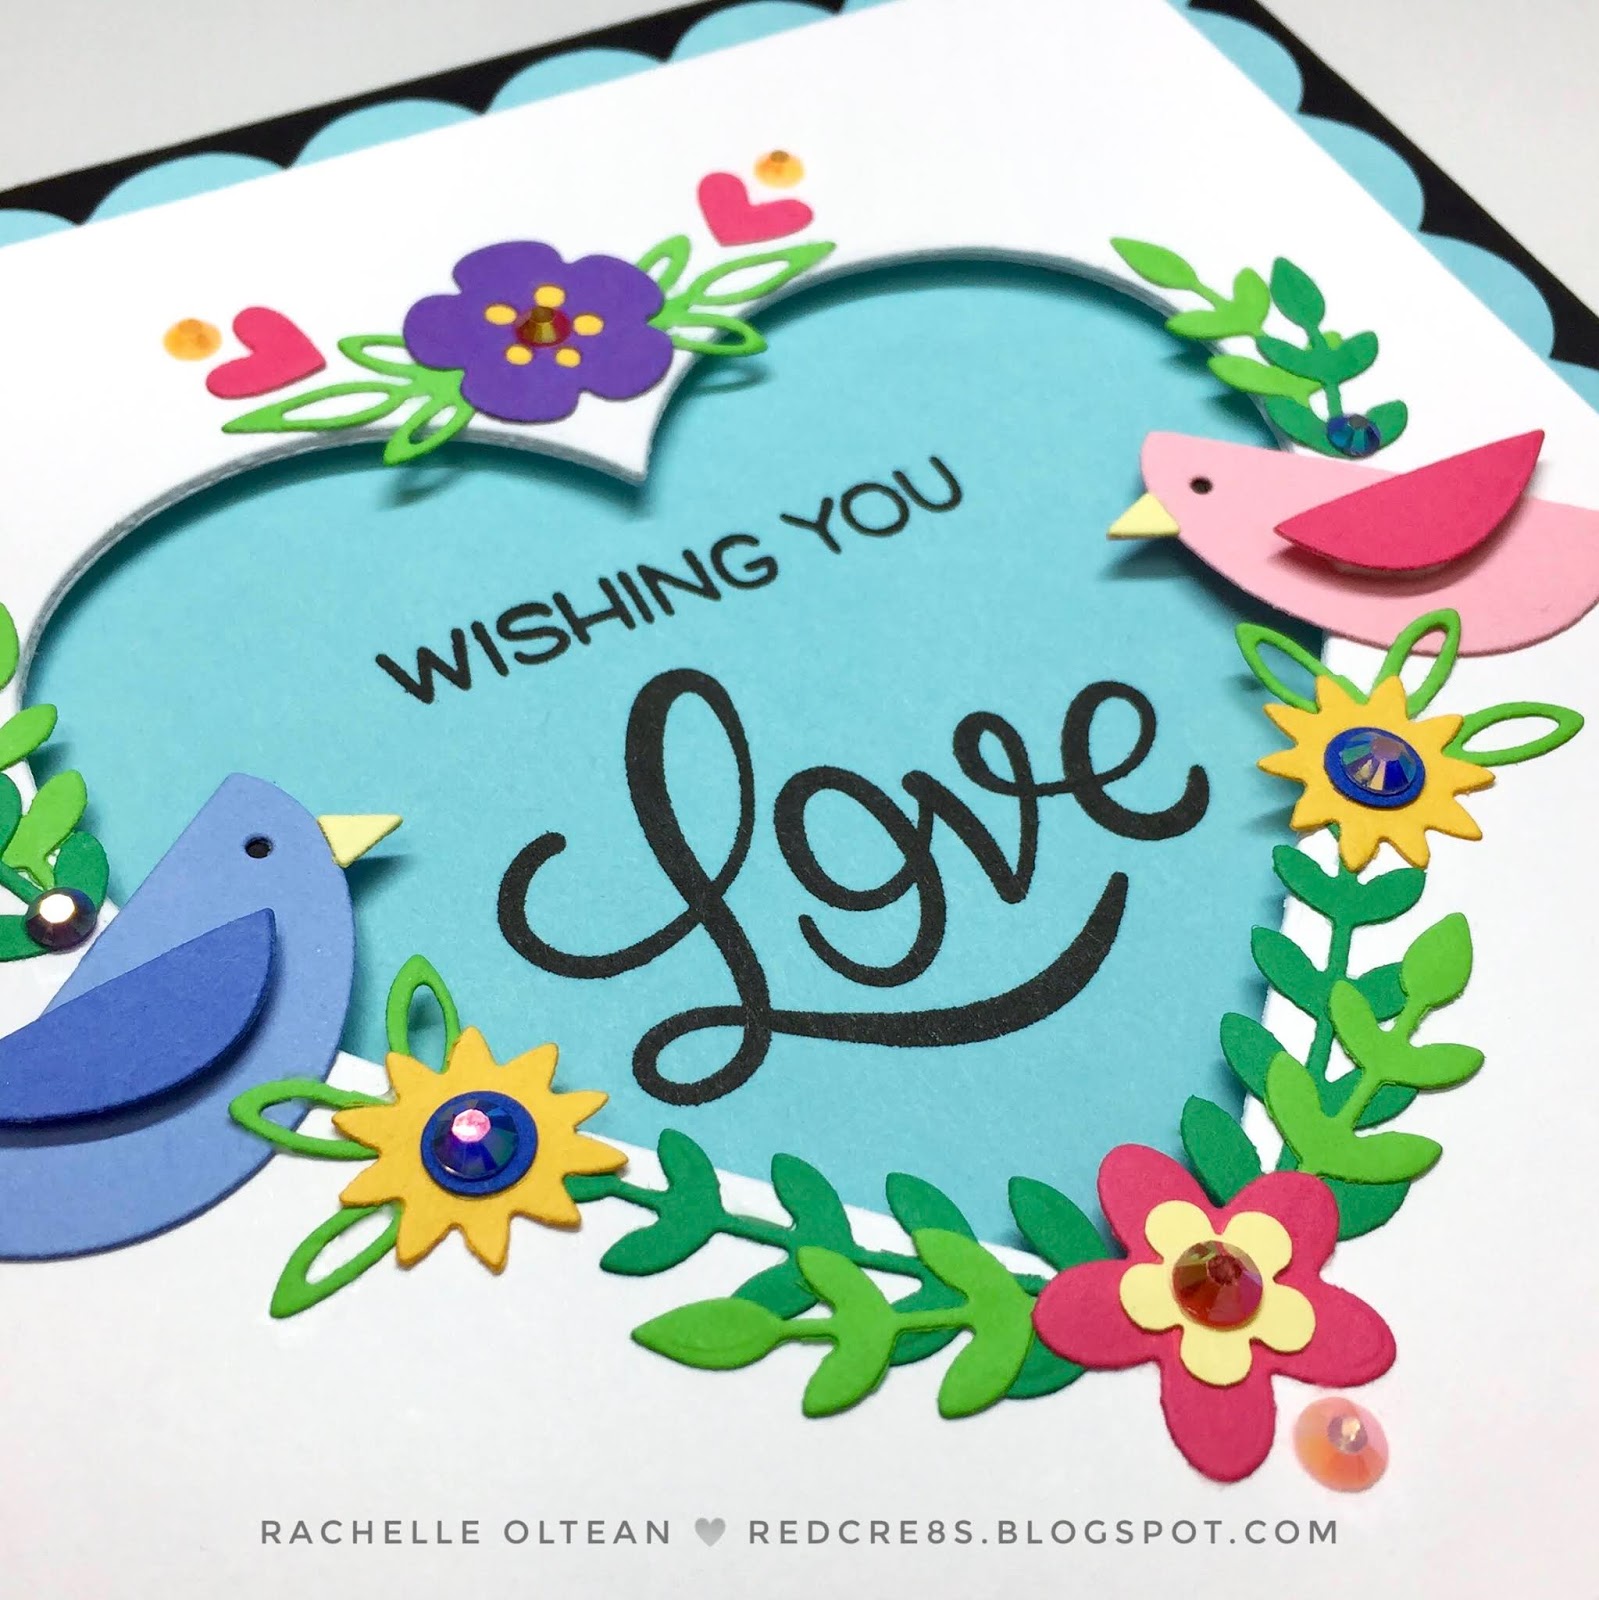
I backed the white panel with craft foam and centered it onto the black/turquoise base. I then placed the clear sentiment stamps in the correct place, gently removed the white panel and used the MISTI to complete the stamping with VersaFine Ink; the white base was then adhered on top. I cut a 6" x 12" piece of heavy-weight white card stock, scored it in the middle and glued the entire card front onto the card base.

I really like the clean symmetry of this card!


Thanks so much for stopping by - I really appreciate each and every one of your comments!

Rachelle

I have entered this card into the following challenges:

A Bit More Time To Craft - #95

Classic Design Team Challenge

Happy Little Stampers - AG/Dies

Happy Craft Challenge - July 2019 - AG

Sparkles Forum - #118 Wedding

World Wide Design Team Challenge - July #07

Love To Craft Challenge Blog - July AG

Crafty Creations - AG #395

WaterCooler Wednesday Challenges - #231 All Occasion

Addicted to Stamps And More #351 - AG

Cut It Up Challenge Blog - Critters #179

613 Avenue Create - #223 July 2019 AG

Monday, July 22, 2019

Birthday Card | Ellen Hutson - Otter Ware & Inner Mermaid | Sliding Window Pop-Up Shaker Card


Hi!

Today I am sharing a design team card over at the Back To Basics and Beyond Challenge for this week's "Off The Edge" theme! Head on over to the BBB Challenge site to see all of the wonderful examples that the designers have created! This card was inspired by a great video I saw on YouTube recently by Carissa Wiley at "Sprinkled With Glitter". If you have never seen Carissa's videos, you are really missing out...she is a great teacher with wonderful ideas and an infectious laugh - she makes me smile during every single episode! My card ended up totally different from hers but I wanted to give her credit for steering me in the right direction.

I started by creating my own 'mermaid-tail scallop' pattern in the Cricut Design Space and cut a stencil from an acetate presentation cover page. I find that this weight of acetate really works well while cutting my own stencils (with the fine cutting blade) and yet they are still sturdy enough to hold up over and over again with ink blending. I used Distress Oxide Inks (Twisted Citron, Peeled Paint & Lucky Clover) and blended the mermaid scallop pattern onto a piece of 4.25" x 5.5" 110# Neenah Solar White card stock. I sprayed the card stock with water and shimmer spray and flecked it with an assortment of pearlized watercolors. Once the panel was dry, I used Sunny Studio's "Sliding Window Pop-Up Die" to cut the interactive mechanism. The pull-tab panel was cut to size (4 7/8" x 3 1/4") from the same card stock. Using a stencil, waves/water were ink-blended onto the panel and the front of an A-2 top-folding card base using the same ink colors, adding Salty Ocean; everything was spritzed with shimmer spray and spattered with diluted inks. I lightly traced the pop-up opening onto the card front so that I would know where to stamp the mermaid tail from Julie Ebersole's "Inner Mermaid" Stamp Set. Once stamped with VersaFine Onyx Black Ink, I colored it with the oxide inks. 

To create the shaker base, I used a double thickness of foam tape to make a frame, coated the edges with my anti-static powder tool, filled the middle with sequins/confetti, peeled off the release paper and topped the foam tape with a piece of heavy acetate. I then stamped the sentiment onto the back slider panel and attached some inked die-cut circles to the top, which gives the recipient an easy pull tab and fits flush at the top of card when fully closed. This panel was then adhered to the very bottom of the front panel with heavy-duty two-sided tape. You need to use really strong adhesive here because this is the pressure point for the pull tab slider.


I knew that I wanted the seaweed vine wreath to stick above the pop-up fold with a heart dangling down in the center on a sliver of acetate. Beyond that, I was a little unsure of exactly how the ocean foliage/shells were going to be arranged. I glued the wreath down first (with the heart hanging down after sandwiching it between multiple die cuts) then I simply stamped/die cut a bunch of kelp, seagrass images and started playing with the design. When I got close to what I wanted, I took a picture so that I could recreate it from the bottom up! I added some die cuts of matte gold glitter paper to give it a bit more neutral shimmer and was really pleased with this "bouquet"-look at the bottom of the slider. I used Distress Ink for all of the stamping and softened all of the edges with water and shimmer spatters; this created a slightly blurry, underwater-look.


I have used this slider pop-up die several times on other cards and have learned that I prefer to give the slider a bit of room to operate and so I added another layer of double-sided foam tape behind the front panel (being sure not to get too close to the slider - but adding sufficient tape to give it enough support.) The front was then adhered on top of the shaker element. 


Even with using the 110# Neenah card stock as the card base, I felt like this card was so top/front-heavy that I needed to add another piece of cardstock to the back panel to reinforce it a bit. I created another 4.25" x 5.5" stenciled background, stamped the interior sentiment, die cut it and glued it to the back panel.

I have entered this card into the following challenges:


Thanks so much for joining me today!
Rachelle

Tuesday, July 9, 2019

All Occasion Card | Papertrey Ink - On My Couch


Hi!

Here is my next DT submission for the Back To Basics and Beyond Challenge Blog - this time it's a photo inspiration challenge that features a room set with some comfy furniture! Go check out the photo on the blog for more details!

I used one of my favorite "retro" sets from over 10 years ago, "On My Couch". This simple graphic stamp set captured the feel of the challenge perfectly! I went with a CAS layout and kept the color palette to a minimum. I used the MISTI to stamp a band of small dots with MFT's "Itsy Bitsy Polka Dots Background" in a light turquoise ink. The couch was stamped with Onyx Black Versafine Ink and then the polka dot upholstery/furniture feet were over stamped with with dye inks. The pillows and lamp were also stamped with die inks and everything was fussy cut.

After I determined the placement for the couch, I marked the dotted background to indicate where the rug and side table should be stamped. Using the MISTI, I stamped these images directly onto the panel. The lamp was glued on top of the table and the pillows onto the couch, which was then adhered into place with foam tape to add some dimension.


I glued the scene panel into place on an A-2 top-folding white card base and cut additional strips of the white card stock (backed with craft foam) and glued them down on top of the scene. This framed the image in a very clean way and I stamped the word "Hello" to finish off the card the card front. I used the same couch image for the inside but added a little curled-up kitty & sentiment because the recipient is a cat person!


That will do it for today - head on over to see the other great creations that the BBB Challenge Designers have posted!

Rachelle