Sunday, June 30, 2019

Birthday Card | Avery Elle - Photo Mat Die Set & Peek-a-Boo Pals


Hey!

Head on over to A Place To Start Challenge Blog to see all of the great Design Team examples for this month's "Anything Goes" Challenge!

I would like to share this cute lil' critter from Avery Elle's Peek-A-Boo Pals today! I combined it with the Photo Mat Die Set for a special Birthday Greeting. A piece of white card stock was trimmed for 5.5" x 3.5", lightly blended with Salty Ocean Distress Oxide Ink toward the upper middle area and backed with a piece of craft foam. I used both Salty Ocean and Twisted Citron Inks and blended two additional 4" x 4" panels - everything was spattered with diluted inks and spritzed with shimmer spray. 

The little monkey & party hat were stamped, colored and fussy cut. The photo mat was die cut from white card stock twice and the mat/clouds were stacked and glued together. The mat was die cut again from dark orange card stock, which was used as a layering shadow. I also used the photo mat die to cut the ink-blended panels in order to create the sky/grass background pieces. The monkey was glued into place behind the stack photo mat and the the background/clouds were adhered beyond him. This entire panel was backed with a piece of craft foam and set aside. The sentiment was stamped with VersaMark Ink, heat embossed with white powder and cut with a banner die; it was adhered onto the photo mat with foam tape.


A 1" strip of pattern paper was glued onto the left side of a top-folding A-2 card base and the large panel was glued on top. All of the remaining components were glued into place on an angle and the card was finished with an assortment of sequins.

I have also entered this card into the following challenges:


Thanks so much for stopping by today!
Rachelle

Saturday, June 29, 2019

Birthday Card | Hello Bluebird Stamps - Farmyard Little Bits

Howdy!

Can these cows from Hello Bluebird be any cuter??? I just love the expressions on their faces! This birthday card features images from the Farmyard Little Bits Set. 

I ink blended the clouds and rolling hills with an assortment of Distress Oxide Inks, spattered everything with diluted inks and spritzed with water; once dry, everything was die cut. I cut the outer frame from 110# white card stock 5 times - glued/stacked them together. This dimensional frame was glued to the front of an A-2 horizontal top-folding card front. The rolling hills were glued down to the background cloud panel and adhered into place inside the frame.

The images were stamped, colored and die cut. I cut extras from plain white card stock and glued them behind the colored images to give the items some additional weight. Everything was either glued or popped up with foam tape to give the scene added dimension. I heat embossed the sentiment with white powder, die cut it with a narrow banner and glued it into place. I added a few light blue sequins to the sunny sky to finish up the card. This card just makes me smile! 🙂


I have entered this card into the following challenges:


Thanks so much for spending some time with me today!
Rachelle

Tuesday, June 25, 2019

Birthday Card | Lawn Fawn - Out of This World / Explosion Pop-Up


Hello!

Thanks for stopping today...this is my first attempt at a pop-up explosion card and it's my Design Team example over at the Back To Basics and Beyond Challenge Blog. Be sure to check out the other wonderful versions of this really dynamic pop-up design this week! I used one of my favorite 
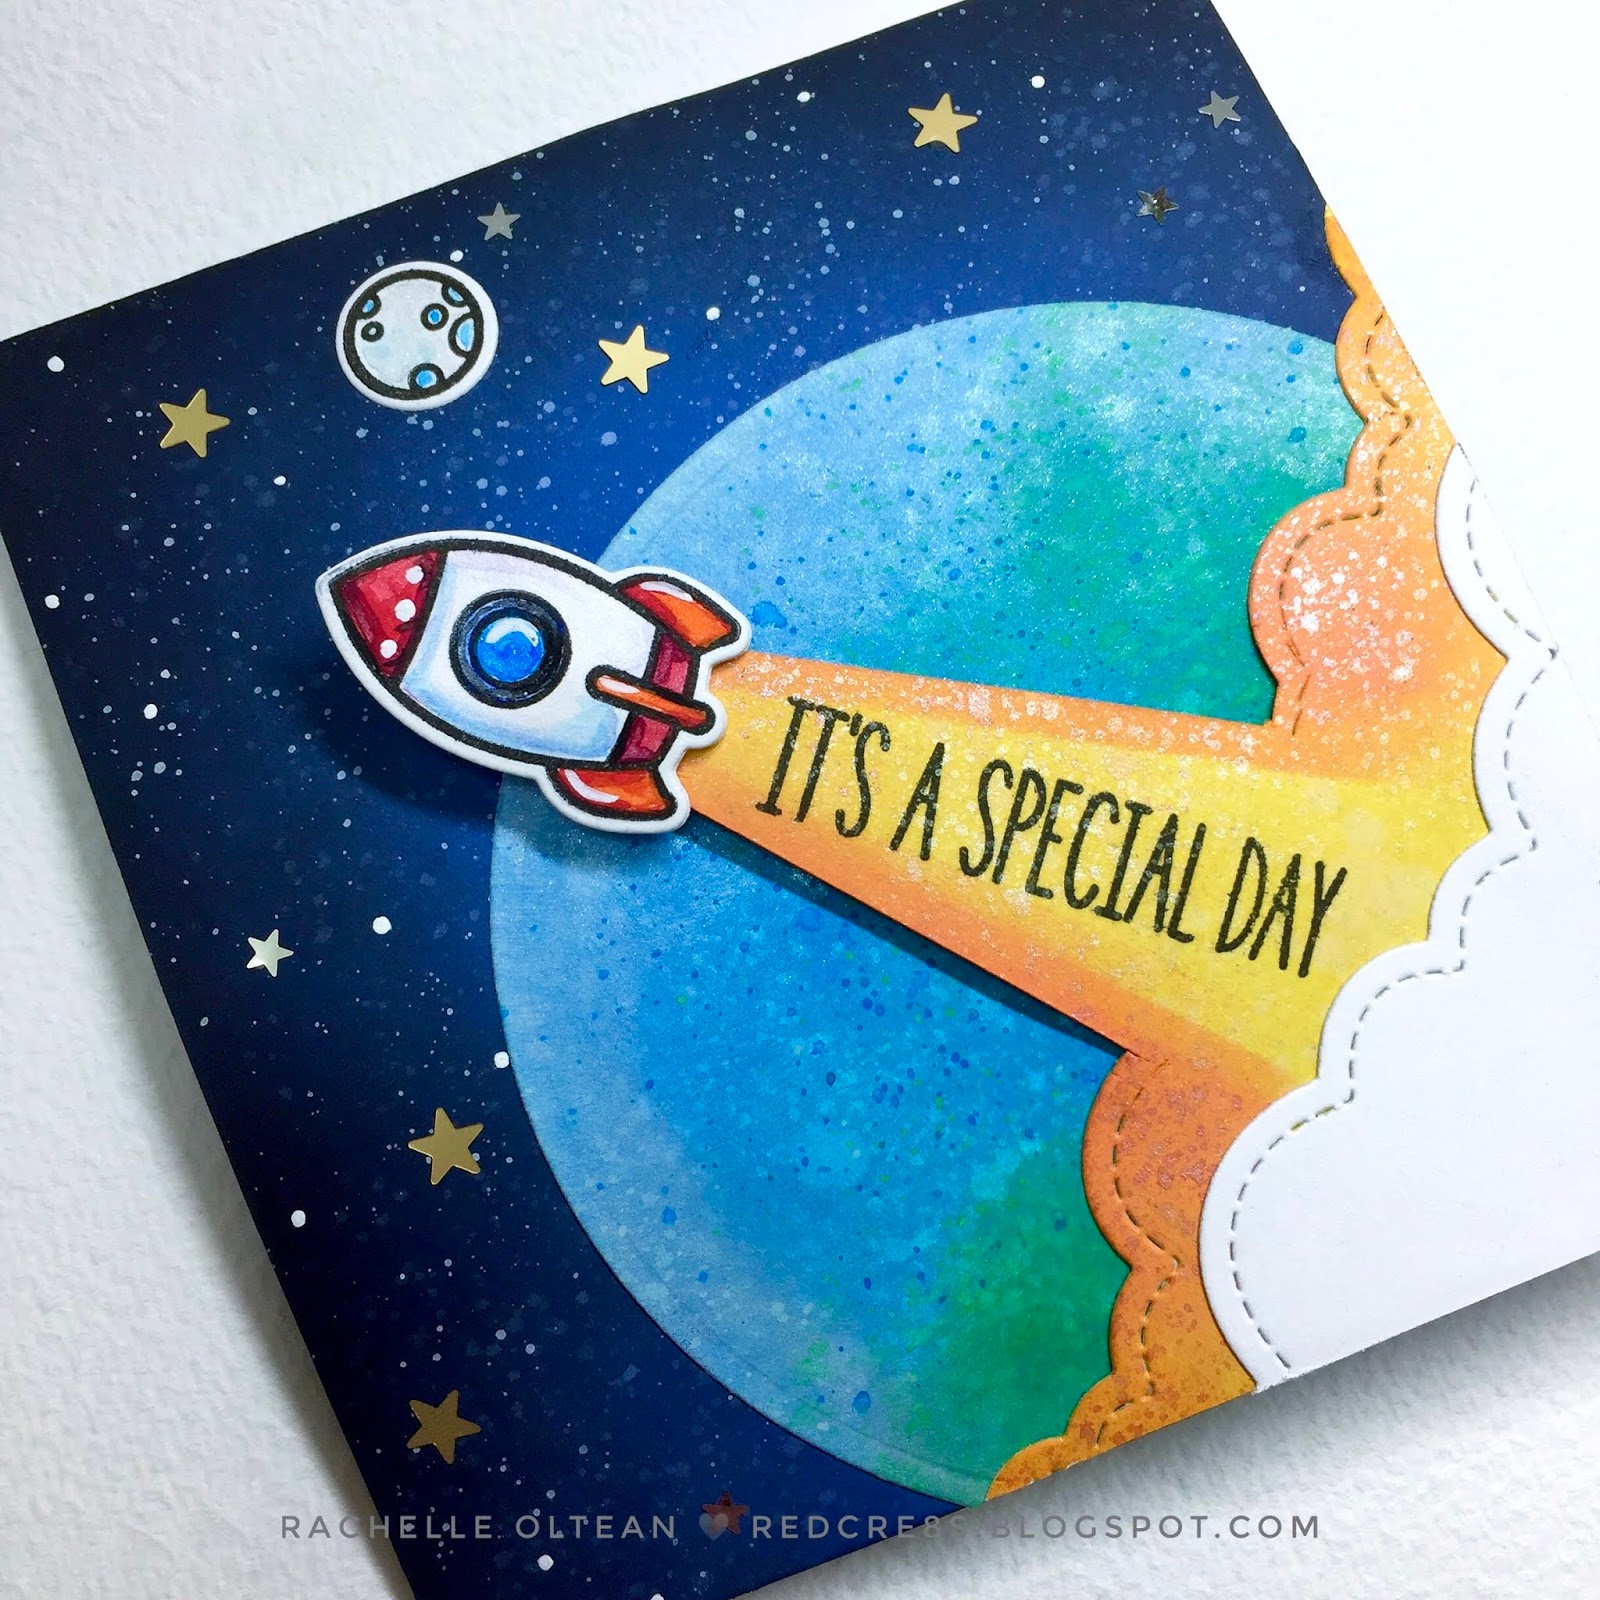
Lawn Fawn Stamp Sets - Out of This World, which is still as wonderful as when it was released in Spring 2017. I have always wanted to travel into space but this is probably as close as I will ever get!


This card started out as a 4.25" x 9" piece of white card stock, which was scored at 4.5", leaving the finished top-folding card sized at 4.25" x 4.5". Two letter-sized pieces of black card stock were randomly blended with Distress Oxide Inks (Salty Ocean, Blueprint Sketch, Shaded Lilac & Black Soot) to create a deep space background. Diluted inks and white watercolor were spattered to create stars and everything was spritzed with shimmer spray. I cut one piece to size and glued it to the card front. A 3.5" circle was die cut from white card stock, ink blended to look like the earth, glued to the bottom right front corner and trimmed along the edge. The space ship was stamped, colored and die cut so that I could figure out how large the rocket flame and smoke clouds should be. 

The rocket flame was ink blended using Distress Oxide Inks (Fossilized Amber & Carved Pumpkin) and partially die cut with Lawn Fawn's Puffy Cloud Borders Die. This is a great utility die set and I have used it for clouds, waves, rocket blasts, landscape shapes, tree canopies, etc. I finished cutting the flame with a craft knife and glued it into place over the earth. A piece of white card stock was die cut with the same cloud die, sprayed with shimmer mist, adhered on top and everything was trimmed from the back with a craft knife. The sentiment was stamped onto the flame and the space ship was popped into position with foam tape for added dimension. I finished the front with a sprinkling of matte gold and shiny silver stars from Lucy's Little Things and a mini moon from the Lawn Fawn set.


I cut 2 more pieces of the space background to 4.25" x 4.5" and glued them to the interior of the card. To create the pop-up explosion folding piece, I cut the other blended panel to a 6" x 6" square. This piece was folded in half one way and then the other (with the ink blending facing up) and each time the folded score line was reinforced with a teflon bone folder. This piece was folded one more time on the diagonal - see the diagram below. This diagonal score was gently coaxed into a mountain fold, which caused this entire mechanism to collapse into itself and ended up as a 3" x 3" square. The mechanism was then glued into the center of the interior on the top and bottom, making sure to leave enough room in the middle for the card to close. 
This is a good side-view photo that shows the folding pop-up.


I stamped/colored all of the planets in the stamp set and fussy cut them right next to the black outline. Using a black marker, I inked the edges of each so that when they were glued onto the space background, they would essentially disappear into sky. I did leave the outside "white" edge of the die cuts showing on the astronaut/flag/cake because I wanted that area on top of the moon landing to stand out a bit more. I die cut another 3.5" circle from white card stock and cut it in half; using a stencil with many small circles, I ink blended craters onto the surface of the moon, spritzed it with shimmer mist, stamped the sentiment and glued it into place. The spaceman and his birthday accessories were adhered onto the moon and additional gold stars were glued into the scene. There is so much visual depth inside because of the pop-up/ink blending combination!


I LOVE  how this card turned out!


I have entered this card into the following challenges:


Thanks so much for stopping by!
Rachelle 

Monday, June 24, 2019

Birthday Card | Avery Elle - Splash

Happy Summer!


This is the first time I have used this great stamp/die set from Avery Elle, "Splash", which was introduced last summer. It had been on my wish list for months and when they had a recent sale, I snatched it up! I also used a great generic linear stamp from MFT, Whimsical Waves Background

I heat embossed the wave background stamp with white powder onto a piece of 110# Neenah Solar White Card Stock and trimmed the image in half horizontally. I ink blended over the embossing with Distress Oxide Inks (Salty Ocean, Peacock Feathers and Blueprint Sketch) keeping the ink value very light; the panel was spritzed with shimmer spray and set aside. I stamped the Avery Elle images with VersaFine Onyx Black Ink and heat embossed them with clear powder; the images were then watercolored and die cut. I glued one additional die cut to each of the bathing beauties to give them a bit more dimension and added a bit of gloss to their shades with some black gel pen.

I cut two more small panels of white card stock and ink blended along the edges with the same distress oxide inks - one had a bit more Peacock Feathers and the other more Blueprint Sketch. I then dripped small droplets of water and spattered diluted inks onto the surfaces to give it a splashy watered effect; both panels were spritzed with shimmer mist. I cut a thin strip of the darker blue color and glued it directly to the bottom of a 4.25" x 5.5" piece of card stock. I trimmed the wave panel down to 2.5" in height and glued that 1/8" above the blue strip. The aqua panel was then glued into place at the top of the card and all of the excess was trimmed from behind using a craft knife. 


I heat embossed the sentiment with white powder to a piece of light aqua vellum and trimmed it down to size. The sentiment strip and die cut images were all glued into place and the card was finished with a sprinkling of assorted sequins from Lucy's Little Things. She always has the best selection of bling and if you order directly from her website, it's almost 40% lower in price when compared to several US-based retailers. She's in England so it takes just a bit longer to arrive (and there is a monetary currency conversion to consider) so I usually wait until the dollar goes up against the British Pound and then place my order - she always throws in a free item as well!

I have submitted this card in the following challenges:

Stamping Sensations - June 2018 - Show Us Your True Colors

Dies R Us Challenge #123 - Summertime

Tinker Dream - #78 Summer

Sweet Stampin' - Summer - June 2019

C.R.A.F.T. Challenges - #518 - Summer

Daring Cardmakers - Midsummer's Day

Ellibelle's Crafty Wednesday Challenge - June /July 2019

Little Red Wagon - 6/2019 - Summer Fun

Thanks so much for joining me today!
Rachelle

Monday, June 17, 2019

Birthday Card | MFT Stamps - BB Penguins in Paradise | Color Throwdown CTD547 | Freshly Made Sketches FMS392


Happy Monday!

I was able to finish up this card, which combined the Color Throwdown Palette ctd547 (yellow, orange, hot pink, and green) and the Freshly Made Sketch FMS392 for this week! Yippee!

I stamped, colored and die cut the images from 110 lb. Neenah Solar White. I water colored and stippled the sand texture on the same card stock and set it aside to dry. I stenciled the sun rays with Distress Inks (Mustard Seed & Carved Pumpkin), spritzed the paper with water and flecked it with gold metallic watercolors. I cut both the stenciled background and sandy beach with the same stitched rectangle die and then die cut the beach again with a hillside die. 

I determined the placement of my palm tree, glued it to the sun ray panel and adhered the beach on top. I popped the beach ball into place with foam tape and glued the penguin to the panel. I watercolored several large swatches of the hot pink color onto white card stock and after it was dry, I stamped the sentiment components on each one using the MISTI and VersaFine Onyx Black Ink. After the ink dried for a couple of minutes, I die cut each one individually with the same sentiment strip die. I glued the beach scene onto the front of an A-2 top-folding card front and attached the three sentiments strips into place to finish the card.


I just love this little chubby penguin enjoying the summer sun with his inflatable!

I have also entered this little guy into the following challenges:


Thanks for stopping by!
Rachelle

Birthday Card | Avery Elle - Phonomenal / Wiper Card - A Place To Start Stencil Challenge


Hello!

I'm so excited to share my first interactive wiper card today, featuring Avery Elle's 'Phonomenal" stamp/die set! This card uses two stencil patterns and is my DT submission for the mid-month challenge over at A Place To Start Challenge Blog - head on over to see what the rest of the designers have created.

Using Ground Espresso Distress Oxide Ink, I stenciled the wood grain pattern onto a piece (4" x 8") of medium brown card stock with  Hero Arts' "Woodgrain Stencil". I spritzed the card stock with water, set it aside to dry and then glued it to a piece of 80 lb. white card stock for stability. I hand-cut my own large sun ray stencil out of 130 lb. card stock (8.5" x 11") using an Xacto knife and protractor. I blended Squeezed Lemonade Distress Oxide Ink onto a piece of 5" x 7.5" white card stock, spritzed it with water/shimmer spray and spattered it with pearlized watercolors. Here are the final cut measurements for the stenciled components:

Woodgrain - 2" x 7" - Scored at 1.5" & 2.25" | Sun Ray - 4.25" x 7" - Scored at 4.75" & 5.5"

I glued the left side of the woodgrain to the bottom of the sun ray piece and set aside to dry. I stamped/die cut all of the phonomenal images and then made a small slit in the soup bowl, which allowed me to slip a few of the toppings down into the noodles! HOW CUTE is this set??? After I determined location, I glued/popped the pieces into place with foam tape. Then I went to work on the wiper mechanism, which would hold the steam rising above the soup bowl. I experimented with a right-angled wiper arm until I came up with the correct length/height for this piece and it looked something like this: (mountain score line - the "X" is where the glue goes and it's positioned heading toward the bottom of the card base)

I did a few dry placement runs fitting the steam/wiper mechanism & finished bowl onto the card with Removable Tombow Adhesive until everything worked correctly and then all off the pieces were glued into place. The right side of the card panels were glued together and some sequins were added to the background. I heat-embossed the sentiment onto black card stock, die cut the strip and it was glued into place. "Have a Souper Birthday" was stamped onto the back of the card!

Here is short clip that shows the wiper in action! 

This card has also been entered in the following challenges:


Thanks so much for stopping by today!
Rachelle

Sunday, June 16, 2019

All Occasion Card | CAS(E) this Sketch #326


Hi!

Sharing my take on this week's CAS(E) this Sketch - CTS326:


I added several extra layers of difficulty to this challenge by using a very limited color palette, stamps sets that were over 10-years-old and kept it to a single layer design...WHEW! This one was a work out! 

Using the MISTI, I daubed both Picked Raspberry and Blueprint Sketch Distress Oxide inks onto the bird silhouette image and stamped it onto white card stock. The sentiment was curved and stamped  several times to reflect motion on the underside of the bird using VersaFine Onyx Black Ink. I then stamped several scrollwork figures with Shaded Lilac Distress Oxide Ink to capture the essence of the  sketch this week. This panel was die cut and glued onto the front of a top-folding A-2 card base. I really like the way the scrolls looks like air currents supporting the bird in flight.

Thanks for stopping by!
Rachelle

Saturday, June 15, 2019

Father's Day Card | Stampin' Up - Message in A Bottle


Ahoy!

I'm sharing a Father's Day Card today that features a nautical-themed stamp set from Stampin' Up, "Message In A Bottle." I used Hero Arts' Woodgrain Stencil and blended Espresso Distress Oxide Ink onto a piece of mid-tone brown card stock. Using the largest frame from Avery Elle's Wonky Scallop Frames Die Set, I cut the frame from the stenciled paper; 4 more frames were cut/stacked/glued together to give it a substantial "wood" feel. I used the same Espresso Ink and darkened up the edges to give it even more dimension.  

The sailing ship was stamped onto white card stock with Faded Jeans Distress Ink and a piece of light aqua card stock was adhered into place to create the horizon line. The "love notes" were stamped onto white card stock, fussy cut and lightly colored to match the aqua tones. The glass bottle was stamped onto a heavy vellum with VersaFine Onyx Black Ink and quickly heat embossed with clear powder. I fussy cut the bottle right up next to the embossed lines and adhered the love notes in behind the vellum. I  LOVE  how this turned out - the transparency looked really cool on the final card! I cut a small cork from kraft card stock and glued it behind the vellum. I die cut additional pieces of aqua-tone papers to create some foreground waves and glued them together. After I determined the bottle's location, it was adhered into place with the waves on top. I put this scene panel into the MISTI and stamped the sea gulls/sentiment using VersaFine Ink. This panel was trimmed down to the correct size, adhered to the back of the wooden frame and then glued onto the front of an A-2 top-folding white card base. 

I used the scrap die cut pieces to create a secondary frame for the sentiment on the inside of the card:


I have entered this card in the following challenges:


Thanks so much for stopping by!
Rachelle

Wednesday, June 12, 2019

Thank You Card | MFT - Moroccan Mosaic Background / Nail Polish Technique


Hello!

Today's post showcases a special technique for the challenge over at Back to Basics and Beyond: Nail Polish Backgrounds. To create this background all you need is finger nail polish, heavy weight card stock and a large flat dish covered in aluminum foil. After filling the protected dish with water, you literally swirl the polish directly onto the surface of the water (mixing colors together as you wish) and dip the paper surface directly on top. The resist between the water and polish is broken on the paper, leaving behind a really great marbling texture. I used three different colors to creat this background. After you set the paper aside to dry on a protected area, you are ready to create cards. The design team over at the BBB Challenge have some great examples of this technique so go check them out!

I decided to add spatters of silver paint to this surface and a white heat-embossed pattern on top using MFT's Moroccan Mosaic Background Stamp. I adhered this panel to another piece of white card stock to give it some additional stability (since it had warped a bit during the marbling process) and then trimmed it down to 3.5" X 5.5". I backed it with a piece of craft foam and glued it down to a piece of black card stock measuring 4" x 5.5". This entire panel was then glued onto the front of a top-folding A-2 card base and set aside. 

I die cut the word "Thanks" using Honey Bee Stamps Large Thanks Die. I really like this die set because it gives you a shadow print and main script die, which can be used either separately or together. The shadow was cut from MFT's Silver Sparkle Card Stock and the script from black card stock; they were then glued together. You do have to either use a paper shim or steel cutting plate with this die set in order to get a clean cut - especially with the heavier glitter paper. 

The card was finished with a few silver gems from Lucy's Little Things.

Thanks for joining me today!
Rachelle

Sunday, June 2, 2019

Birthday Card | Concord & 9th - Stuck On You | A Place to Start Challenge "Stencil Me In"


Hi!

Today's post features great products from Concord & 9th, Stuck On You Stamp/Die Set. I combined my design team entry for A Place to Start's June "Stencil Me In" Challenge with the gorgeous color palette from this week's Color Throwdown #545 - Raspberry, Lavender, Green & Kraft - #CTD545. 


Using my stencil, I blended Distress Oxide Inks - Picked Raspberry, Peacock Feathers & Cracked Pistachio - onto a piece of 110# Neenah Solar White. This panel was spritzed generously with water and spattered with pearlized watercolors in similar colors. Once the panel was dry, it was die cut with a stitched rectangle die. I stamped, watercolored and die cut the main images and finished them off with a generous application of my Tonic Nuvo Aqua Shimmer Pen. The images were then assembled and glued together to the front of the stenciled die cut.

Three rectangular frames were die cut from heavy-weight black card stock and stacked/glued together. This frame was adhered to the front of an A-2 top-folding card base. The stenciled panel was backed with craft foam and glued to the center of the card front. I really liked the simple graphic feel on this card and the bold sketchy image. 

This card is entered into the following challenges:


Thanks for stopping by!
Rachelle

Anniversary Card | My Favorite Things - In Paris | CTS#324


Bonjour!

Sharing an anniversary card today that was created for CAS(E) this Sketch #324 and used a mix of MFT and Lawn Fawn Products. Here is the sketch:


So excited to announce that this card won for the CTS #324! Yippee!


I started by blending Salty Ocean Distress Oxide Ink onto white cardstock and die cut it with MFT's Stitched Dome STAX Die-namics. Two clouds (from the "Love Bugs" Set) were stamped with the same ink and die cut. The balloon and Eiffel Tower (from the "In Paris" Set) were stamped, watercolored and die cut. The word "happy" from Lawn Fawn's "happy happy happy" set was stamped/die cut; all die cuts were cut/glued/stacked together multiple times to create dimension. 

All of the pieces were placed onto the front of an A-2 top-folding card card base to determine their final layout. The dome was glued into place followed by the Eiffel Tower. The sentiment was stamped onto the card base using the MISTI and the remaining pieces were either glued or adhered onto the card with foam tape.

This card was also entered into the following challenges:


Thanks for stopping by!
Rachelle