Tuesday, April 16, 2019

Birthday Card | Back to Basics and Beyond Challenges #26 "Use a Spray" - Ellen Hutson "Inner Mermaid"


Hey!

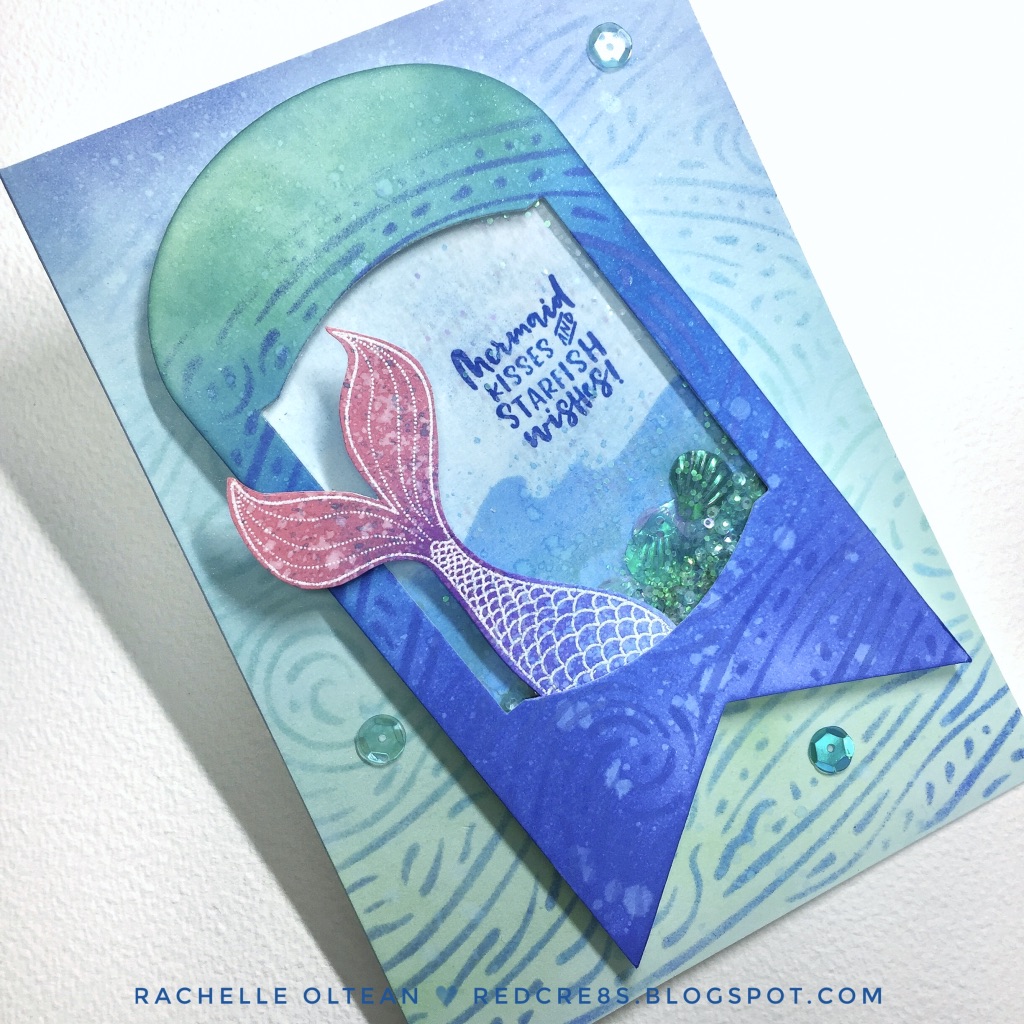
I would like to share a shaker tag card with you today featuring a great textured background using Hero Arts’ Starry Night Stencil. This card is posted, along with the other beautiful Design Team submissions, over on the Back To Basics and Beyond Challenge Blog - #26 “Use a Spray”.

I blended a Distress Oxide ink background (Salty Ocean & Cracked Pistachio) onto a 5” x 7” white card stock panel, sprayed it with a white pearl shimmer spray, blotted it with a paper towel and flecked it with pearlized water colors. Then I stenciled the wave background texture onto the panel using those same ink colors and a little Blueprint Sketch. I spritzed blue pearl spray through the stencil to highlight the waves. I LOVE this stencil because it looks like ocean waves, swirling wind or snow, and the stars at night – it can be used for so many backgrounds! This panel was glued onto a card front.


I designed a tag die cut in the Cricut Design Space and cut it 3 times from 110# Neenah Solar White card stock. I blended the tag front using the same inks/stencil and die cut the opening using My Favorite Things Stamps’ Elegant Rectangle STAX Die-Namics. This was also sprayed with shimmer mist. I adhered a piece of acetate to the back of the tag and set it aside. I stamped the mermaid tail from Julie Ebersole’s “Inner Mermaid” Stamp/Die Set with VersaMark Ink onto white card stock and heat embossed it with white powder. It’s so easy to blend distress oxides on top of embossed images and I love relief effect. I blended the interior of the tag with some of the same inks and stamped the sentiment using my MISTI; one more plain die cut was glued to the back of the sentiment background to give it some stability.


I added foam tape to the back of the tag front, heaped a pile of assorted sequins into the middle of the stamped piece and adhered the tags together, creating the shaker. The die cut mermaid tail was attached into place with a glue dot and the entire tag was glued to the front panel. All that was left was to adhere a few sequins into place. I really like the way the stencil pattern plays on the background panel and onto the tag and although the photos can’t quite capture the reflection, the shimmer spray really makes this card sparkle!

I have entered this card in the following challenges:

Simply Create Too - Anything Goes/No Twist #148

Daring Cardmakers "Bingo" Challenge - Stamping/Paper/Die Cuts

613 Avenue Create - April/Anything Goes #220

Love to Craft Challenge Blog - #33 April Anything Goes

Thanks so much for joining me today!
Rachelle

Sunday, April 14, 2019

Mother's Day | MFT Stamps - A Place to Start Challenge Blog (3 of 5 Challenge)


Hey There!

I'm so excited to join the wonderful design team over at A Place To Start Challenge Blog, which is a great resource for newbies and seasoned crafters alike who may be looking for tips/tricks/tutorials on  all kinds of styles, techniques and design theory. My first DT submission is a "3 of 5" card featuring flowers, die cut, water color & vellum...and yes, I was an overachiever using 4 of the challenge parameters! The only item I did not use was a tag.

Using MFT Stamps' "Geometric Star Stencil", I blended a background using Distress Oxide Inks onto a piece of white card stock. This was spritzed with shimmer spray and die cut with a stitched rectangle die. I stamped MFT's "BG Fresh-Cut Flowers" onto 110# white card stock using VersaFine Onyx Black Ink in my MISTI, then water colored and fussy cut the image. I stamped Lawn Fawn's "Happy" sentiment onto the same card stock and die cut the word three times; these cuts were glued/stacked and finished with an application of Wink of Stella. I blended the same ink onto the back of a piece of vellum, flipped it over and prepped it with my anti-static tool. The sentiment was stamped onto the vellum with VersaMark ink, heat embossed with Lawn Fawn's white powder and die cut with a fishtail banner die. 


I glued the stenciled background onto the front of a side-folding A-2 card front. Using my fingers, I carefully curled the edges of the leaves and flower edges up before gluing the spray onto the background. This really helps add dimension without popping the entire image up with foam tape. Even after it goes through the mail, these areas will still be lifted from the surface. Both parts of the sentiment were adhered into place and the card was finished with iridescent jewels from Lucy's Little Things.

This floral spray is beautifully drawn and I know that I will reach for it again and again because it can be colored in so many different ways.


Thanks so much for joining me today! Head over to the blog and check out the great mid-month designs by the other design team members :)

I have entered this card into the following challenges:


Rachelle

Tuesday, April 9, 2019

Happy Unicorn Day | Essentials By Ellen - Julie Ebersole's "Unicorns 'N Rainbows" & “Pure Magic”


Happy Unicorn Day!

Yes – there really is a National Unicorn Day! And to celebrate, I would like to share a card created with Julie Ebersole’s stamp/die sets “Unicorns 'N Rainbows” & “Pure Magic”.

All of the images were stamped, colored, die cut and given a generous application of Wink of Stella. I blended a background panel with distress oxide inks (Blueprint Sketch, Shaded Lilac, Wilted Violet), spritzed it with shimmer spray, blotted it with a paper towel and trimmed it down to 2” x 5”. This panel was backed with a piece of craft foam and glued to the front of an A-2 top-folding card base. Using the MISTI, the sentiment was stamped below the inked panel. I ♥ LOVE  this sentiment!

All of the images were glued and/or popped off of the card front with foam tape. Several iridescent stars were glued to the panel to complete the card.

This card is entered into the following challenges:

Creative With Stamps - CWS#37: Birthday

Happy Little Stampers - April/Anything Goes with Dies


Celebrate your inner unicorn today! ðŸ¦„
Rachelle

Wednesday, April 3, 2019

Birthday Card | Hello Bluebird Stamps - Bee Happy


Hey There!

Yippee! I was so excited to win the Color Throwdown 535 and be named as "Guest Star Stamper" for this week's CTD537 Challenge! The color palette this week is beautiful (purple, yellow, green & gray) and as soon as I saw it, I had Hello Bluebird's "Bee Happy" images buzzing around my drawing table! 

 ctd537

I knew that I wanted to combine some pattern play with simple images and a die-cut window so I started with MFT's Elegant Rectangle STAX Die-namics as the shape for my scene. The bee and berry images were stamped using VersaFine Onyx Black Ink, colored, die cut and given a light application of Wink of Stella. The bee's flight trail was stamped onto heavy vellum with VersaMark Ink, heat embossed with white powder and die cut. The sentiment strip was stamped and die cut from the same vellum.  


Since the margins were fairly narrow, I die cut the window opening frame from white card stock twice and glued/stacked them together to provide some stability. I blended yellow/gold distress oxide inks onto a separate piece of white card stock and die cut it with the next smaller sized die - thus giving me a yellow framed window. I glued the white and yellow panels together and backed this frame with craft foam. I inked up one side of a Tim Holtz honey comb stencil with the same oxide inks and ran it through my die cut machine, impressing the color and pattern onto one of the negative white die cuts. I sprayed it with shimmer spray and set it aside to dry. I love this technique - you get the color and texture combination at the same time!


A 3/4" strip of gray pattern paper was adhered to the bottom of a 4.25" x 5.5" panel of 110# white card stock; the honey comb piece and foam-backed frame were glued into place as well. I popped up the berry and bee images with foam tape, placed them into the frame and adhered this entire panel onto the front of a top-folding horizontal A-2 card base. I finished it off with a few sequins from Lucy's Little Things "Honey" Sequins Mix. This mix is a gorgeous color blend of warm yellows and was a perfect match with my coloration.

"BEE" sure to head over to the Color Throwdown Blog to see the other great submissions for this week's challenge! 😉

Thanks so much for stopping by! 
Rachelle

All Occasion | Back to Basics and Beyond Challenge #25 - 1.2.3. Card


Hey There!

I have just joined the wonderful Design Team over on the Back to Basics and Beyond Challenge Blog (http://bbbchallenges.blogspot.com/) which will showcase technique challenges for beginners and seasoned crafters alike...so it will be about the technique not the content. There will be two challenges each month and it will be great to have total freedom to design around the technique.


The challenge today is a 1.2.3. Card = 1 x Topper,  2 x Colors and 3 x Gems, Pearls or Jewels.


My 1.2.3. combination is:
1 Topper = Mega "Hello" Die Cut
2 Colors = Wilted Violet & Peacock Feathers Distress Oxide Inks
3 Jewels = Iridescent Jewels from Lucy's Little Things

I chose to focus on a large die cut as my topper since I wanted to use a distress oxide ink technique for the coloration on this card. I die cut, glued and stacked three words together from 100# white card stock and a heavy #110 black stock, too. I blended Wilted Violet onto the white die cut, sprayed it with shimmer spray, blotted it with a paper towel and flecked it with metallic watercolors and a little diluted Peacock Feather Ink. When it was dry, I glued it (slightly offset) to the black die cut for a shadow effect. 

I designed my own geometric pattern in PowerPoint and created a 6" x 6" stencil layout, which I die cut (from a heavy-weight acetate) using my Cricut. The options for making your own stencils are endless! I taped the stencil over a piece of 110# white card stock and blended my two inks together in a random pattern. I wanted some of the single color to shine through and also the blended color combo - these two inks work really well together!  A second panel was also blended with just Peacock Feather Ink. Once again, I sprayed both panels with the shimmer mist and used the same flecking technique to give them a speckled texture. After the panels were dry, they were die cut to size. 

The frame die cut was glued directly to the front of an A-2, top-folding white card base and the stenciled panel was popped up with craft foam and adhered in the center. The topper was glued into place and the card was finished with the three jewels - per the challenge. Head over to the BBB Challenge Blog to see the great work submitted by the rest of the design team!

I have also entered this card in these challenges:


Thanks for stopping by today!
Rachelle