Thursday, May 31, 2018

Birthday Card | Shaker Snow Globe - Ellen Hutson


Ahoy there!

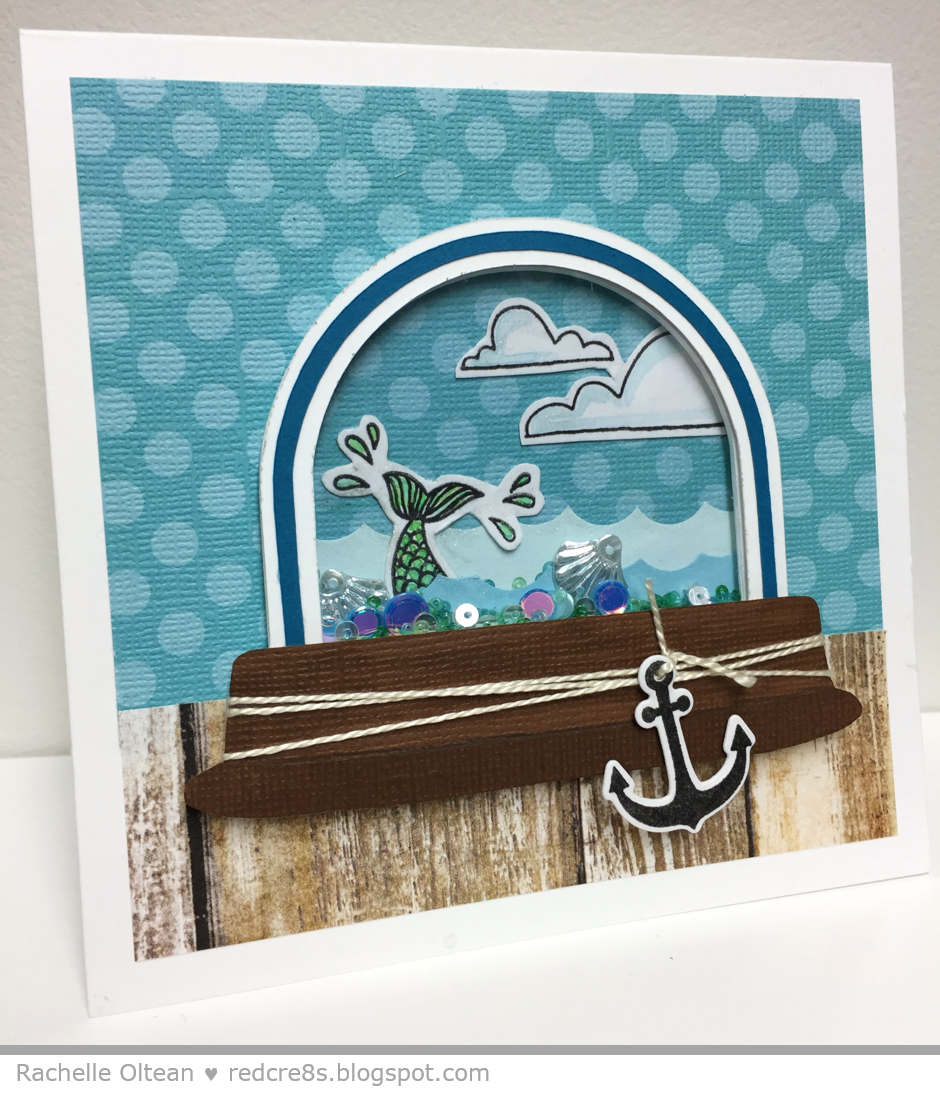
Today's card features stamp/die cut images from Essentials by Ellen, Stay Salty & Mermaid's Tail by Julie Ebersole with a cute mini mermaid tail flipping out of the water inside an ocean scene shaker. 

I designed my own "souvenir snow globe" in Cricut Design Space and then die cut all of the shapes. The clouds, mermaid tail and anchor were stamped, colored and die cut as well; a little shimmer was added to everything with a Wink of Stella. After I glued the card stock pieces onto the front of a 5.5-inch top-folding card base, I assembled the shaker window. The waves were created with a 1/4" paper punch, the tail was glued behind the first wave and the clouds were trimmed/glued to fit inside the shaker.  

I wrapped heavy string around the globe's base several times and tied up the anchor! Lots of tiny pieces of foam tape were added to the back of the window to create the shaker zone, then the sequins/confetti were piled in and the finished globe was secured on top. 

Here is the inside of the card using additional stamps from the "Stay Salty" set and the large Mermaid's Tail. I LOVE this sentiment!


Thanks so much for stopping by today! 

Rachelle 

Wednesday, May 30, 2018

Anniversary Card | Lawn Fawn - Out of This World


This card was featured on Lawn Fawn's "Fawny Flickr Friday" series on {6.1.2018}


Happy Wednesday!

I am lucky enough to have two wonderful younger sisters (who are also redheads) and they both celebrate spring wedding anniversaries. This year I decided to make similar cards for each of them using Lawn Fawn’s “Out of This World” stamp/die sets. I love the little astronaut and wanted to find a way to use it to represent the happy couples! This large 5 x 7-inch card gave me plenty of room to design my own colorful galaxy!

I arranged all of the Lawn Fawn images onto my MISTI (allowing enough room for die cutting) and stamped them onto Strathmore Smooth Bristol using VersaFine Onyx Black Ink. I stamped these images on 6 separate pieces of Bristol so that I would have ‘extras’ for later use. I heat set the ink, water colored & die cut all of the images.  I taped down a large piece (about 7 x 8”) of cold press watercolor paper onto a cutting board and blended Distress Oxide Inks (Twisted Citron, Wilted Violet, Salty Ocean & Picked Raspberry) in separate areas, leaving white spaces in between. I flicked large water droplets onto the paper to activate the inks and dried it with a paper towel after about 20 seconds. I then used a combination of Faded Jeans and Black Soot inks to darken my space sky by blending them onto the other colors. Water and Black Magic Glimmer Mist were sprayed onto the background, dried and sprayed again until I achieved the color I wanted. Gold metallic and white opaque paint were lightly flicked onto the paper using a stiff brush, creating the stars. I like using the textured watercolor paper for this technique because of the velvety matte finish and the amazing amount of depth you can achieve with a slightly textured paper.

I wanted to provide some depth at the bottom of the card (and I also needed a place to stamp my sentiment) so I die cut cloud banks out of both velum and gray card stock from the Puffy Cloud Border die set. I lightly blended Black Soot Ink around the edges of the card stock, flicked it with silver watercolor and stamped my sentiment in VersaFine Ink. After the black and galaxy panels were adhered to the card front, I started arranging my die cuts. I wanted a way to connect the two space sweethearts together and decided to use the looped kite string from the Yay, Kites! stamp/die sets. The heart loop was stamped onto silver card stock and then die cut. I think it tethered them perfectly together in space! 

Some of the planets were glued directly to the galaxy background and others were popped up with foam tape. The cloud banks were glued down with strong double-sided tape and Wink of Stella was used to add shine to the helmets and planets; the card was finished off with a selection of Lucy's Rainbow Sparkle Jewels. The inside of the card simply read "Happy Anniversary" and included the rocket ship blasting off from the sentiment.


Here is version #2 of the card featuring my blonde brother-in-law!


Thanks for joining me and have a great day!

Rachelle 

Tuesday, May 29, 2018

Birthday Card | Seas The Day

Hey there!

I’m beginning to think I have a problem – an honest-to-goodness addiction! I just can’t seem to resist all of the great stamp/die sets containing sea creatures! (I wonder if being a Pisces has anything to do with it?) The card today features a mix of some of my favorite images from the following: Julie Ebersole’s “Mermaid's Tail” and “S’Whale”, Hero Arts’ “Mer-Mazing Messages”, and Memory Box’s “Oceana Corner Die”.

To begin, a piece of teal card stock was glued onto a 6-inch square white card base. I taped a piece of Strathmore Bristol onto an Epicurean Cutting Board and randomly blended several colors of Distress Oxide Inks (Twisted Citron, Cracked Pistachio, Salty Ocean, & Broken China) onto the paper while leaving some white margins. After spraying generously with water, I flicked large drops of pearlized watercolors onto the wet inks with a stencil brush, waited about 15 seconds and daubed it with a dry paper towel. Additional ink and watercolor drops were added to the paper until I achieved the underwater look I wanted and then the entire surface was sprayed with Sheer Shimmer Spritz.  After it was dry, the panel was cut down to a 5-inch square, which matched the size of the Oceana corner die. I glued the die cut pieces onto the left side of the painted surface. The square panel was put into the MISTI and several fish images were stamped. After prepping the surface with an anti-static tool, the sentiment was stamped and embossed with clear embossing powder. I glued a 4.75-inch square piece of white craft foam onto the back of this panel and attached it to the center of the teal card front using strong double-sided adhesive tape. A mix of Lucy’s Ice Cube & Rainbow Sparkles Jewels were added and the die cut was highlighted with a Wink of Stella Clear Glitter Brush Pen.

I love how the fish seem to fade into the watery background and the corner die cut is amazing! 


Thanks so much for stopping by and have a great day!

Rachelle 

Sunday, May 27, 2018

Birthday Card | Bubble Over


Hey there!

Today I would like to share this birthday card featuring the Bubble Over stamp/die set from Stamping' Up.  I really like this set because it can be used for so many different occasions - especially for masculine-themed cards. 

I cut and glued strips of the patterned paper to edges of a white A-2 top-folding card base and then attached a narrower piece of navy card stock to the middle of the card front. After die cutting four bottle images, I glued them together in pairs. The bottles were then colored using Distress Oxide Inks, spritzed with shimmer spray and flecked with white pearlized paint. You can almost hear them fizzing!

The straws were die cut from a coordinating card stock and I used the negative cut as a template to lightly blend ink onto each bottle. The straws were then aligned and glued to the back of each bottle image. I added the stamped/die cut labels to each bottle and adhered the trimmed sentiment to the rose card stock. The yellow bottle was glued down onto the card and the sentiment and rose bottle were popped up with foam tape. I finished the card with a mix of sequins/confetti/gems and added a bit of shine to the straws/labels with a Wink of Stella Clear Shimmer Marker.


Thanks so much for "popping" by and have a great day!

Rachelle 

Thursday, May 24, 2018

Mother's Day Card | Honey Bee Stamps - Zen Bouquet


Hey there!

This recent Mother's Day card is my submission for the 5/23 Simon Says Stamp Wednesday Challenge: 'Use More Than One Stamp' - featuring Honey Bee Stamps. This card is a BIG Boy because I didn't want to trim down the beautiful Zen Bouquet any more than I had to...so it comes in at a whopping 8.5 x 5.5 inches!

After prepping the Strathmore Bristol with my anti-static powder tool, I used my MISTI to stamp the image with VersaMark ink. This took a few reinkings to get really good coverage on this large stamp and then I embossed it with an antique gold embossing powder. 

To color the image, I smooshed my palette of five Distress Oxide Inks onto a craft mat, spritzed the inks with water and let the fun begin! I dipped my embossed image onto the mat several times, moving the image to reposition after each contact. I wiped the mat clean/reinked it a couple of times so that the colors wouldn't get muddy and hurried up the drying process a bit with my heat tool. I then selectively popped-up the floral definition by painting the inks into a few areas. The entire image was spritzed with a shimmer spray to re-activate the ink and daubed with a paper towel to give it some texture. 

The bouquet was cut with the coordinating die, trimmed slightly and glued to the card front. The only embellishment I used was a mix of regular and chunky Rainbow Sparkle Jewels that I purchased from Little Things From Lucy's Cards. I was so excited when she recently introduced chunky-sized jewels because sometimes you just need a bigger bit of bling (and it was awesome getting a craft supply delivery from "across the pond".) See how beautiful they are?!!


I LOVE the medium-sized "happy" script from the appropriately named "happy happy happy" stamp/die set by Lawn Fawn and glued several individual die cuts together before adhering it onto the card; the mother's day sentiment is from this same stamp set.

After it was carefully padded in its 6 x 9-inch envelope, this card ate up a bunch of my 'Forever' stamps but it made it from North Carolina to Ohio in perfect condition. : )

Thanks so much for stopping by and have a great day!

Rachelle

Wednesday, May 23, 2018

Birthday Card | Rainbow Shaker

Hey there!

I wanted to share this card that I recently created for my youngest sister's birthday. I love using a "sunshine & rainbows" theme for birthday cards and this shaker mix really sparkles! 

All of these great sequins/confetti pieces came from Cartwright's Sequins, which has an unbelievable selection of glittery goodness! I think I bought every style of "Moonshine" sequin on their website and have been creating my own amazing custom shaker mixes ever since.

I die cut all of the images, created my rainbow by blending distress oxide inks, filled and attached the shaker window to the card front using foam tape, glued and/or popped up all of the other elements with foam dots and stamped my sentiment (very carefully of course!)

Thanks so much for stopping by and have a great day!

Rachelle